Buddycheck is a simple to set up and use peer evaluation tool which allows students to evaluate each team member’s performance in a group activity, as well as perform a self-assessment. The instructor can create any number of performance criteria or select from a number of samples. Students are awarded an average score (excluding or including their self-score). Students will receive feedback on the group dynamic and their performance against the group average. Buddycheck utilizes the research-based CATME framework for peer evaluation in groups.
Setting up Buddycheck
- Go to Course > Content and click Add Existing Activities.
- Select External Learning Tools.
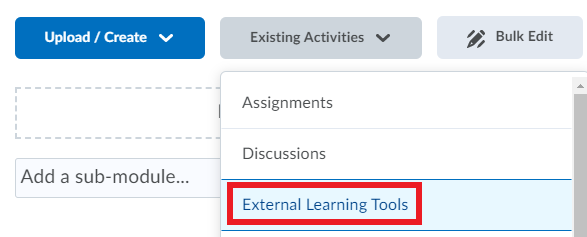
- Click on Buddycheck.

- Once added to the page, launch the newly added link.

- If this is the first time using Buddycheck in this course you get a message where you are asked to activate it for the course.
Click the Activate Buddycheck for this course-button to do this.
You can now create your first evaluation.
- Click Create Evaluation.
- Enter an Evaluation title or select a previously made evaluation as template.
- Enter an evaluation Start and End date.
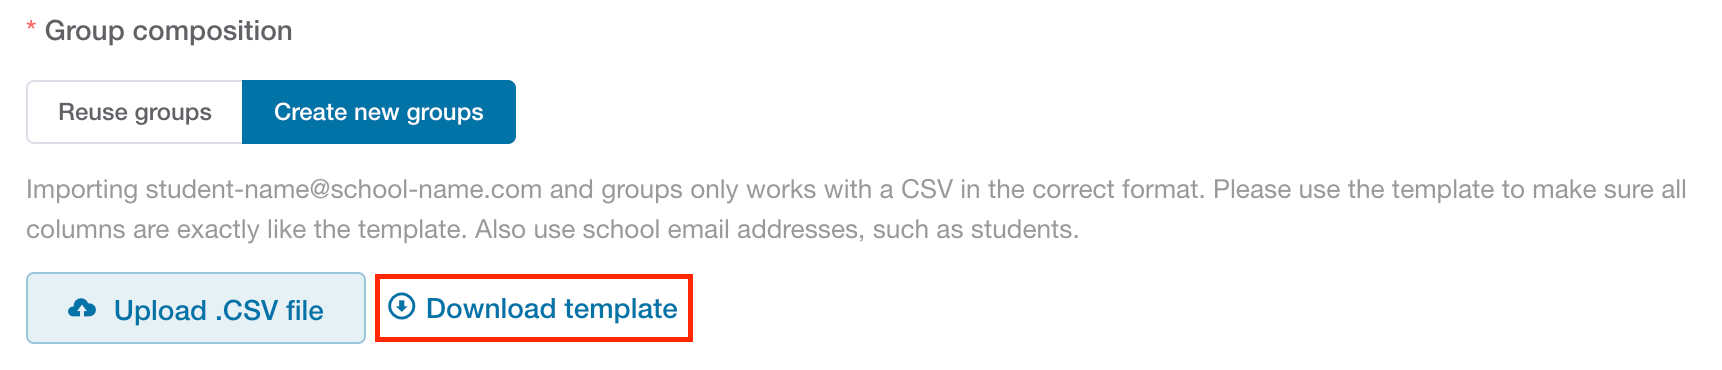
- At the Group composition, select if you want to Reuse groups or Create new groups.
Groups in Buddycheck, at the moment, stand alone. There is no link between Buddycheck groups and groups in Brightspace.
Creating new groups (Go to step 5 if you Reuse groups)
To add students/student groups to the evaluation you need to upload a CSV file (Comma Separated Values File) with the exact data as provided in the template provided by Buddycheck: Name (including First and Last Name), Email and Group Name. The steps below guide you through how to copy the students’ details from Brightspace and successfully upload them to Buddycheck.
- Start by clicking Download template. This template includes a placeholder for the following data: Name (including First and Last Name), Email and Group Name.
 The name must include the First and Last name otherwise Buddycheck will not successfully recognize the student.
 - To retrieve your student group data, Go to your course in Brightspace, go to Collaboration-menu and select Group Import/Export Tool.
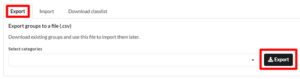
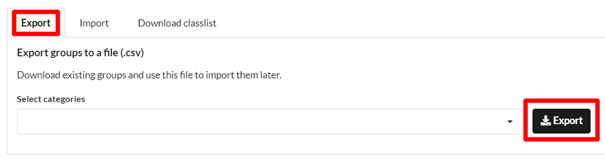
If you already have Groups in Brightspace, that you want to use in BuddyCheck, go to Export. Here, you can select the specific Group Category and Export the group to a CSV file.
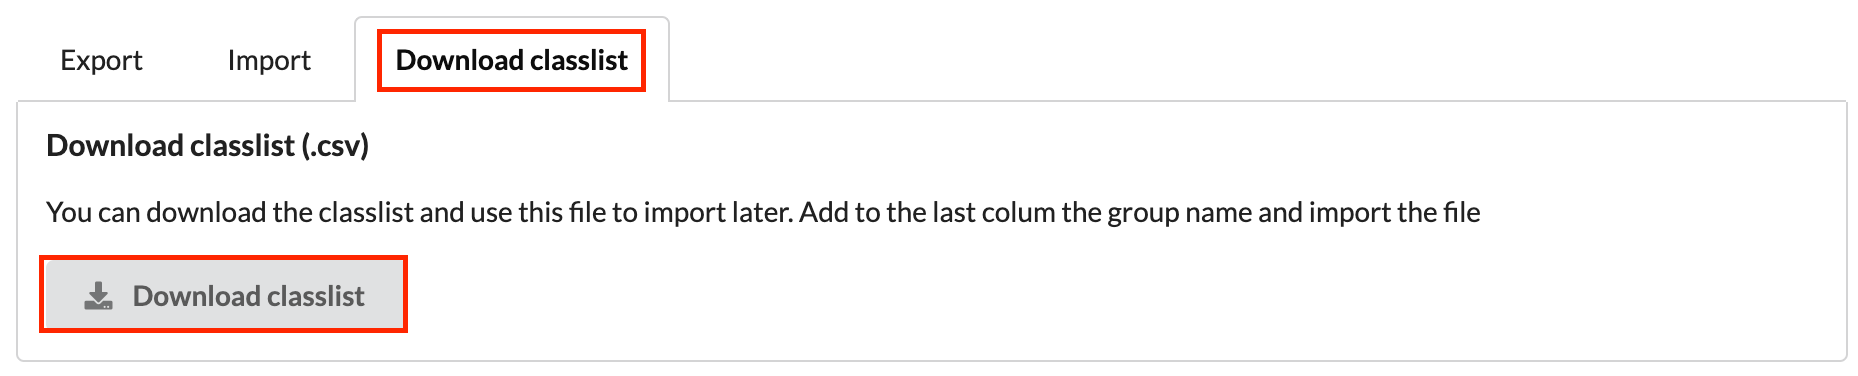
 If you do not have group in Brightspace, you can download the Classlist to make groups to use in Buddycheck. To do this, go to tab Download Classlist and click on download the CSV file.
 The downloaded output will show the following: OrgDefineID, Username, Lastname, Firstname, Email, Groupcategory, Group name.
The next step is to convert the output Excel file so that it matches the required fields of the template that must be used in Buddycheck. - In the output downloaded Classlist from Group Import/Export tool: Insert a column before the email column
- Go to row 2 and insert formula =CONCATENATE(D2;” “;C2) (your excel settings might require you to change the formula slightly to conform to the format). Copy it through the complete column to aggregate name and last name.
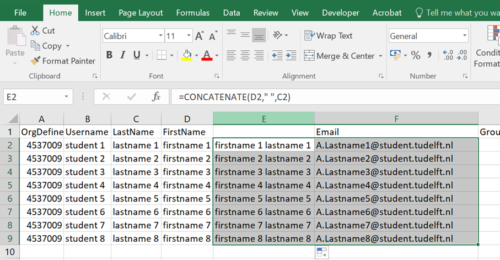
- Copy the columns with the first and last name and the email.
The information in those columns, together with the group names that you will add manually, will be the required details to add to the Buddycheck template. Later, in Buddycheck, you can easily swap students around in the created groups if necessary. - Open the CSV template file from Buddycheck.
- Select column A and then click Data, select Text to Columns, select Delimited, click Next, Semicolon, click Next, keep General and Finish.
This will separate the necessary column fields, which are Name, Email and Group Name. - Keep the first row information and from row 2 delete all data placeholders from the template.
- Paste the data from the output downloaded Classlist from Group Import/Export tool in row 2, making sure you paste values only.
- Save the new CSV file with Name, email, GroupName. Excel will ask you to keep the same format, click Yes.
- Upload the new CSV file to Buddycheck

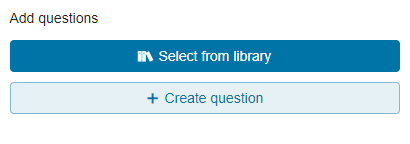
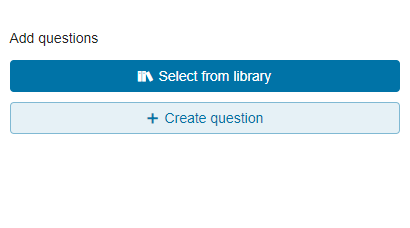
- Add your Peer questions (about the other group members) and Team questions (about the Team as a whole).
A set of Main questions is by default selected. These questions can be viewed, edited or deleted from your evaluation. You can change the order of questions using drag and drop. Move your mouse over the =-icon for the drag and drop symbol to appear.
 To create new questions click Create question. Fill in the required question information and click Create question.

- Click on Select from library to import custom questions from an old course you were involved in as Course manager.
- You can choose to enable Open questions to ask students about the team or the course in general. This can also be used if you want students to send you a private message about the group. The reactions are only visible to the instructor.

- If you want students to send peers a message, enable Peer messages (you can choose to make the reactions anonymous to the receiver or not).

- In Advanced Options you can set whether you want students to receive an automatic reminder to submit their evaluation by setting a reminder date. Here you can also set the date to automatically lock your evaluation. When locked, the results are final and cannot be submitted anymore. You can optionally release the results, this is not done automatically. And you can set here whether you want the student to receive a Buddycheck email that the evaluation has started.

- Before you save you can click Open preview, to open a preview of the evaluation.
- Click Create evaluation when you are done.

- The page will reload and you will see the new evaluation listed on the Peer evaluations page. You can create another by clicking the +Create evaluation button. All the evaluations will be listed in the same Buddycheck link, so you don’t have to create multiple links (as mentioned in step 1).
If you need to add or remove a student to/from a group you should use the same CSV file as when you created the groups in the previous step. Simply update the file first, by adding or removing the student(s) to/from the relevant groups.
This functionality cannot be used to change names!
- To change the group members for the evaluation, first update the CSV file to have the new combination of students in the groups.
- Save the file.
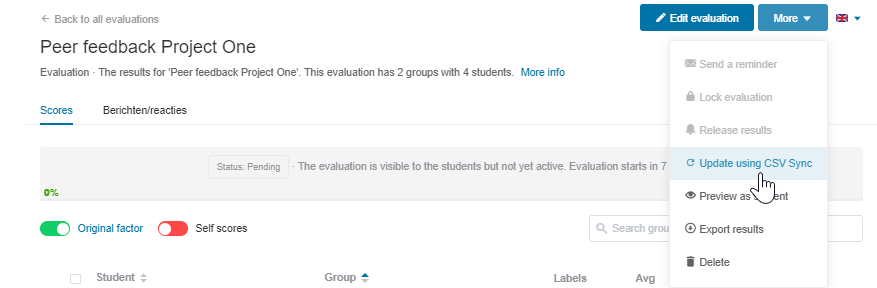
- Go to the Buddycheck evaluation in Brightspace
- Click More and select Update using CSV Sync.
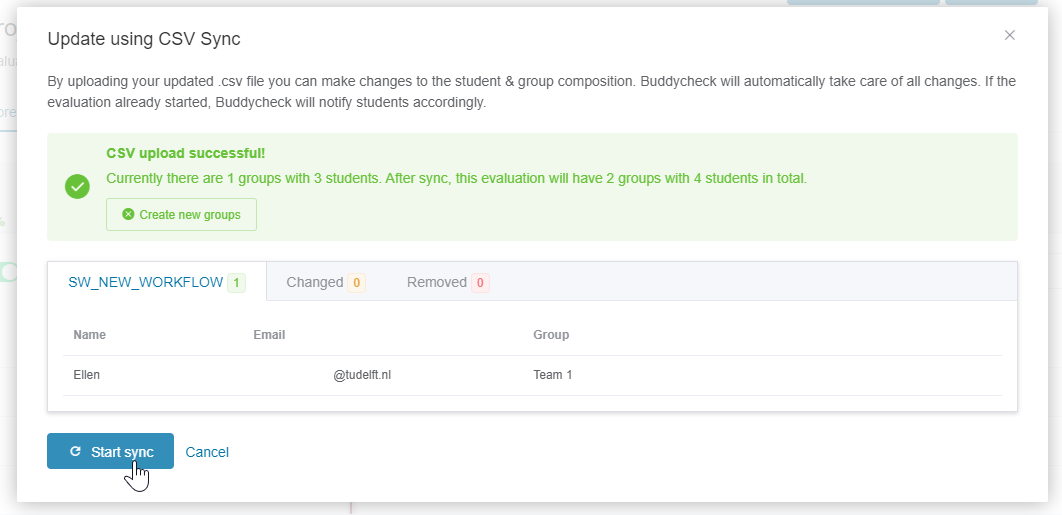
- Click on Upload CSV file.
This upload will replace the old groups. So when you add a new group member, add this person to the CSV file you used before. Do NOT delete the groups from the file that do not need any changes.

- Double-check the changes that will be made in all tabs (new/changes/removed) and click on Start Sync.
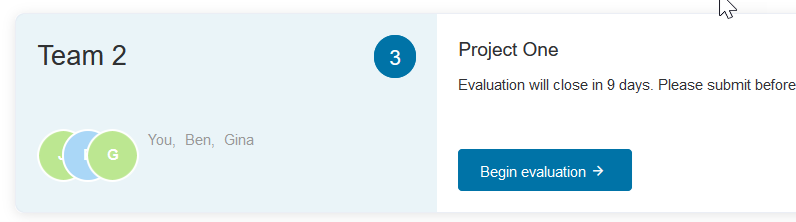
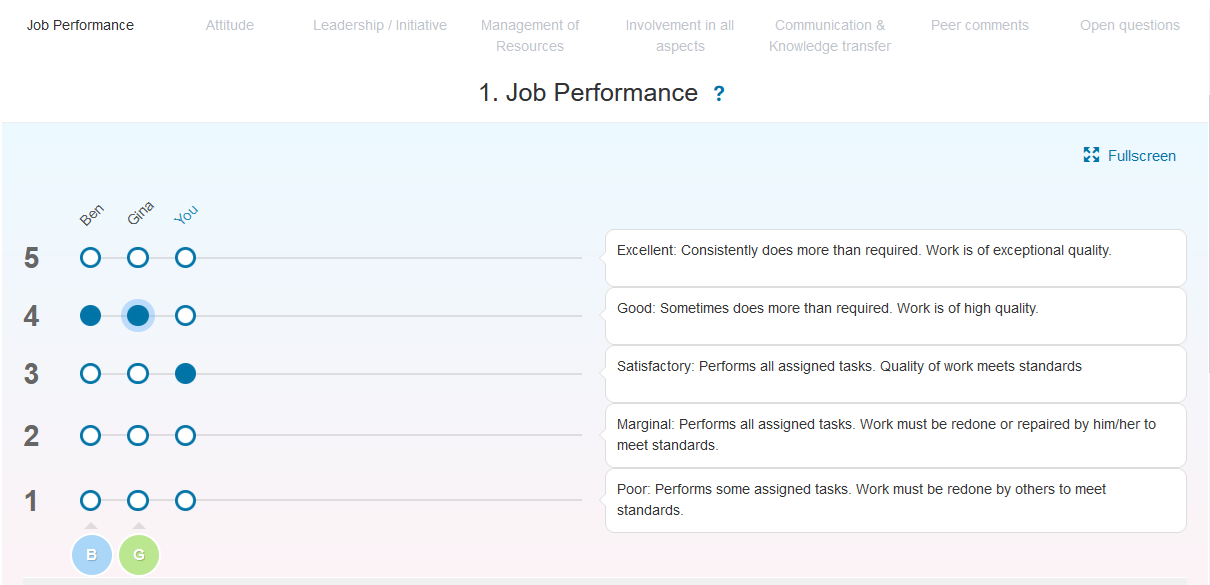
- When students click on Buddycheck they will see the evaluations created in your course. To start, they will click Begin evaluation.
- The student selects a rating for each criterion. The student clicks Next to select ratings for the following criteria until they have the option to Submit evaluation.

- You will be able to monitor which individuals and groups have completed the task and what scores individuals have given and received.
- Although you have set a due date, students will be able to complete the evaluation until you Lock the evaluation. Students will see that their submission is overdue.
 If students submit an evaluation after the due date, Buddycheck will indicate by how many days the evaluation is overdue.

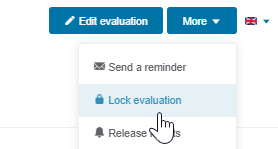
- You can allow a grace period and Send a reminder to students who have not completed their evaluation, or simply click Lock evaluation.

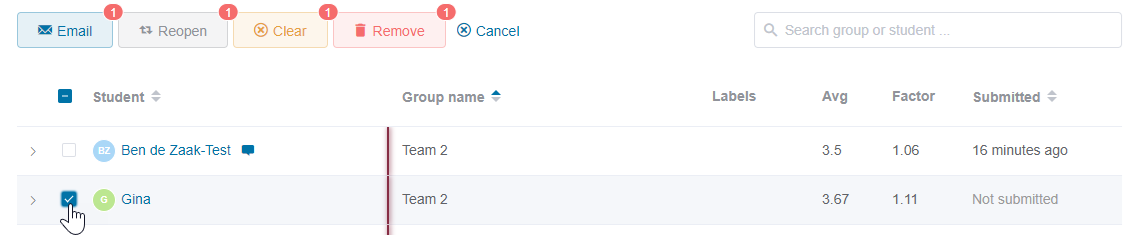
- If a student needs a reminder to finish the evaluation or needs to make the evaluation again you can select the student and Send e-mail or Reopen. Clear removes the results added by the student, Remove removes the student from the list.
If a student does not complete the evaluation, there is less peer evaluation data in the group of this student. This means that the results will be less reliable.That being said, an average and an adjustment factor of a student is calculated using completed evaluation data from the peers in the group. So you can just use all results even if not 100% of students have completed the evaluation.
- To release feedback to students, select More and click Release results.
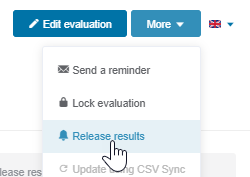
- Students will now be able to review their feedback within Buddycheck and receive an e-mail with a summary. Select More and click Export results to download a complete summary of the evaluation. You can choose to include or exclude self scores in the results.

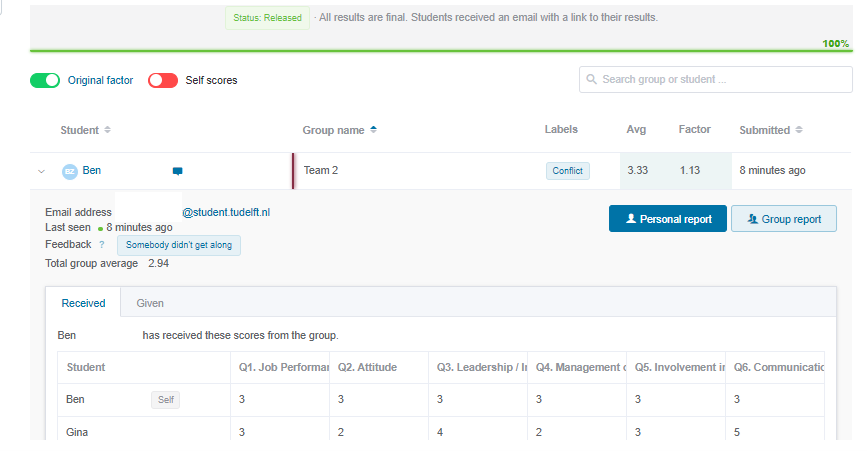
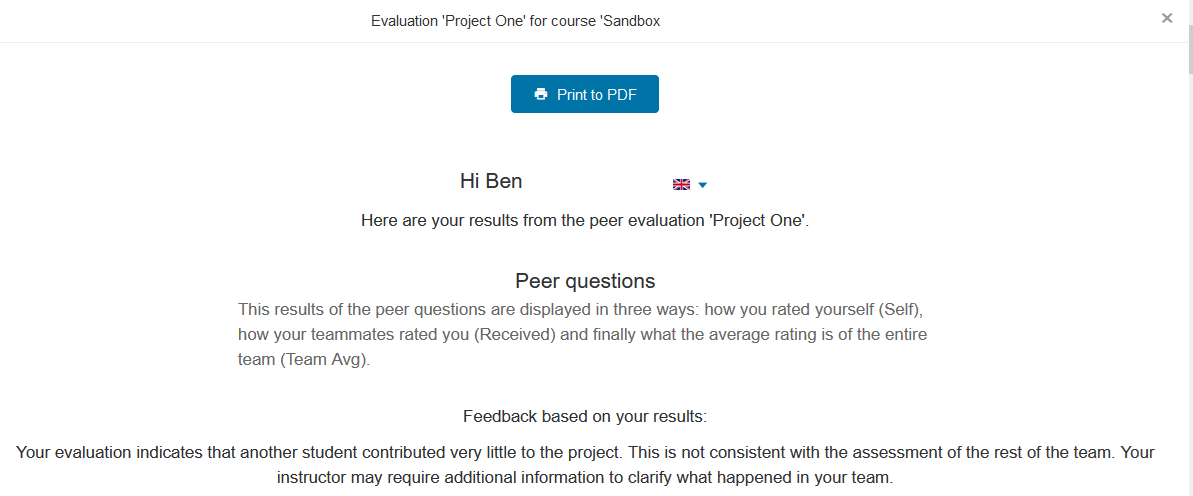
- To view a student’s feedback or the group results, Select the student and click Personal Report or Group report.

- Students initially see a graphical representation of how they performed across all criteria.
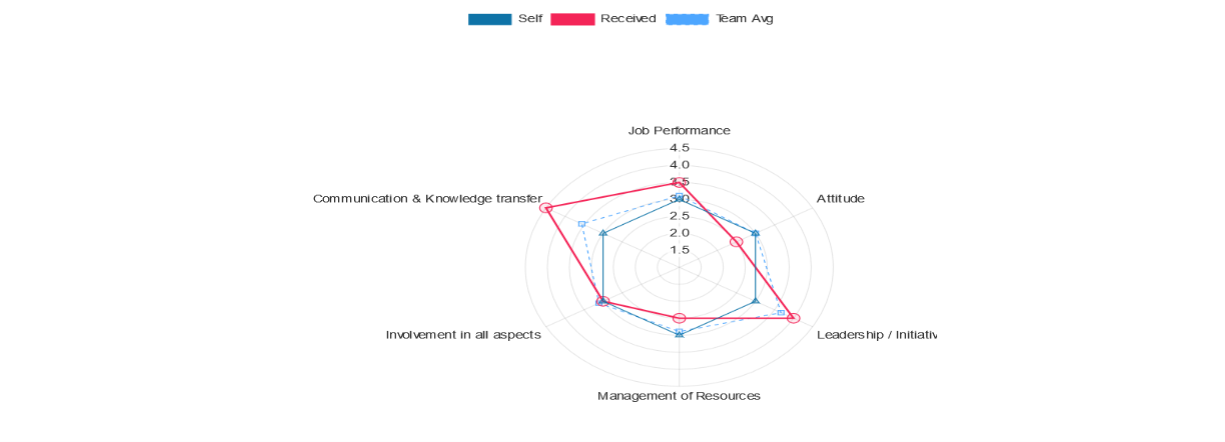
- Students then see more detail on each criterion, comparing their self-score, received score and team average.

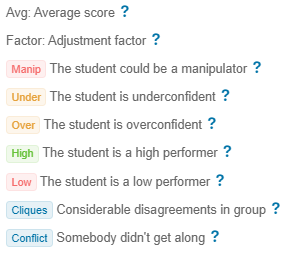
- You can choose to include or exclude the students’ Self-scores in the average score calculation in the Instructor view.

- Where certain team dynamics occurred, they will be labelled. See for example the Conflict label below.

- The label key can be found below.
- If you have enabled Peer messages to Instructor and received one, you will see this text/chat icon next to the student’s name
 .
. - If you enabled Anonymous for receiving student when setting up the evaluation, the feedback will be visible to the student but without the name of the sender.
Troubleshooting
It is possible that cookies are blocking your browser activity. Start by clearing all cookie settings and then try again. You will find more information about cookies, here: https://www.tudelft.nl/en/cookie-policy/. Also, using a different browser might help!
If it still doesn’t work, don’t hesitate to contact us at Teaching & Learning Support.
FAQ
Yes, students can still submit after the deadline. Their submissions will be marked red to indicate they were late. If you don't want students to submit after the deadline, you can lock the evaluation via Results > More > Lock evaluation. You can also release the results via Results > More > Release results. This will lock the evaluation and send an e-mail to your students, stating that they can now see their results.
Yes, go to the evaluation you created and click More > Sync with CSV. Upload your updated CSV file with all students and groups included. Only in scenarios where a student has to do the evaluation again, an email will be sent. Remember to periodically update the groups if necessary.
Yes, you can! When creating your evaluation or editing the evaluation, you can also create new questions. When creating or editing the evaluation, click Create Question in the middle of the form. A screen will open where you can create new questions, edit those questions and even import custom questions from an old course you were involved in.
Yes, go to Buddycheck, and click on the evaluation title. Then select More > Send a reminder. This will send an email with a link to the survey to each student who hasn't completed the survey yet.
Yes and no. If a student does not complete the evaluation, the results will be less reliable because there is less peer evaluation data in the group of this student.
That being said, an average and an adjustment factor of a student are calculated using completed evaluation data from the peers in the group. This means that the results are still usable even if not 100% of students have completed the evaluation.
Yes, this is possible, assuming that you enabled Peer messages when creating your evaluation, you can also set whether the feedback should be anonymous or not. This setting allows students to send feedback to each peer directly, which will only be visible to the receiving student and instructors.
Yes, you can! Assuming you haven't locked or released the results yet. If you did lock the results, you have to unlock the evaluation first.
Go to your evaluation results where you see all students in a table. On the left of each student is a checkbox. Select each student evaluation you want to reopen and select Reopen from the buttons that appear at the top of the page. Optionally tune the email text and click Send.
Students will directly receive the email. With the link in it, they can double-check or adjust their evaluation and submit it again.