*An instructional video is also available at the end of each section for this topic. Scroll down in each section if you wish to watch the video. *
There are multiple ways to communicate with your students in Brightspace and you should pick the way that matches your intention.
The most common way, and preferred way of communication is with an announcement, posted on the front page on your course.
Below find a quick summary of the different ways to communicate in Brightspace.
It is important to communicate regularly with all students enrolled in your course.
Maybe a reminder is needed, or an update about new materials that were posted, or perhaps telling students about a project that is now ready for them to start with. Announcements are the perfect way to do this in Brightspace.
To create an announcement:
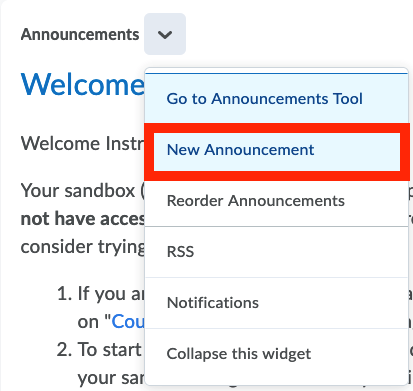
- Go to the home page of your course and expand the drop-down menu by clicking on the grey arrow next to Announcements; select New Announcement.
 Alternatively, you can go to Course Admin, click on Announcements and then select New Announcement.
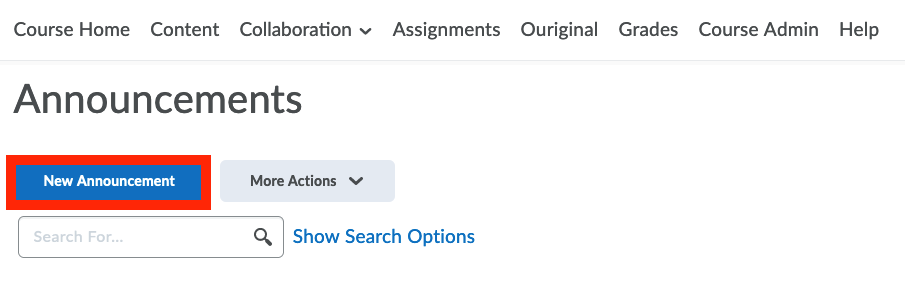
- Start your announcement with a Headline. This is similar to the subject line of an email.
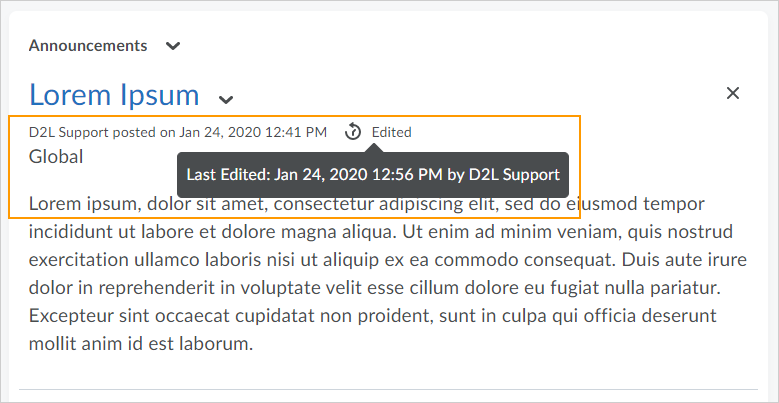
- If you want the author information to be visible in the announcement, enable the Display Author Information option. Users reading the announcement may see some or all of the following author information:
- the original author
- the original date and time of the announcement
- the author who edited the announcement
- the date and time of the edit
- Write the announcement in the Content field. You can format the content by using the editing options at the top of the Content text field. Click on the link icon to create links in your announcements to websites or specific areas in your course.
- The start and end dates for Announcements can be adjusted. If you set the start date for the current time, the announcement will appear immediately. After the end date, the announcement is not available anymore. Use these settings for announcements that are only applicable for a specific period.
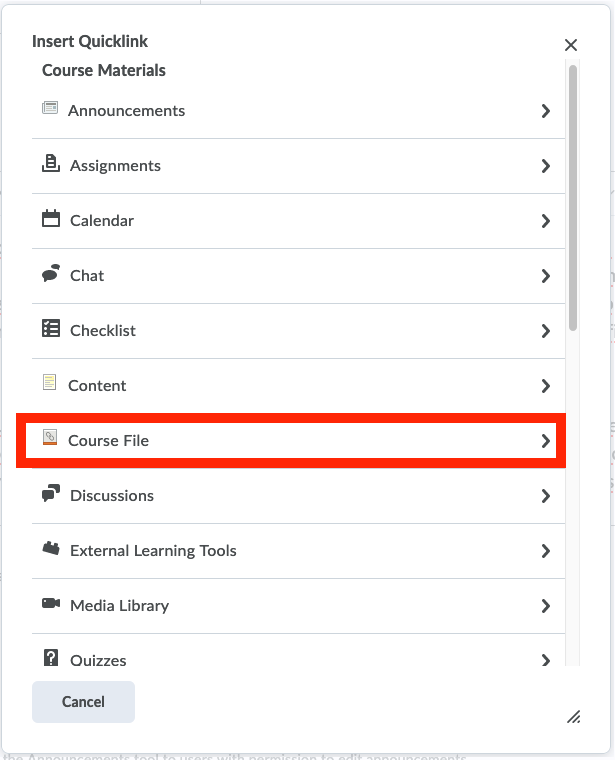
- You can also attach files to announcements. Make sure not to attach files that are too large to send via email, or else they might not reach your students. If you need to share very large files, rather upload them to your course and link to them in the announcement by using the option Insert Quicklink.
- Announcements can also have Release conditions attached to them. These announcements are only visible for students who, for example, are in specific groups or have attained a certain grade for an assignment. Another great way to use this is when a student completes an assignment, they can receive an announcement about the next section of the course becoming available. More information about release conditions can be found here.
- You can also save your announcement as a Draft, work on it some more, and then come back and Publish it when you are ready. Draft announcements are not visible to students.

- By default, all announcements go to all the students enrolled in your course. This is the preferred way to communicate with your students, because a copy of the announcement stays in your course, until you delete it. Students can also receive their announcements via the Pulse app. Most students make use of the app, so they will receive your communication instantly.
- Notice the “x” next to each announcement on the Home Page. You can click on these to hide them. If you want to view the hidden announcements again, click on the Announcements, just below the course banner. All the available announcements for that course will be displayed there.
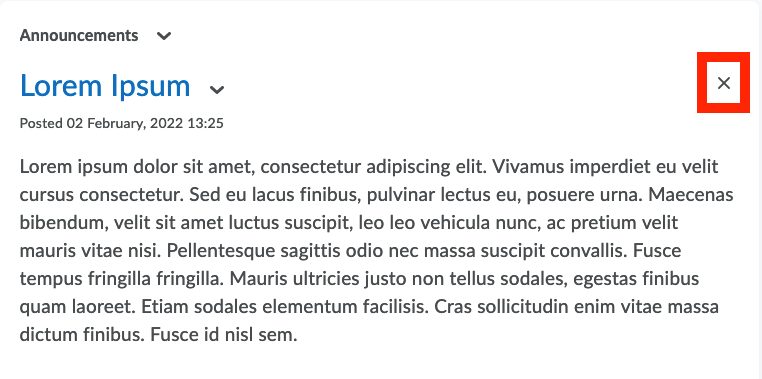
- To put an announcement back on the Home page, select the announcement by ticking the checkbox, click on the More actions button, and select Restore.
- You can also personalize the announcements and descriptions by addressing your messages to {FirstName} and/or {LastName}:
“Hi {FirstName} {LastName}” results in “Hi John Smith” (for example).
The second way of communication is to send an email. Please note however, that by sending an email, from Brightspace, does not mean the students receive it and read it in the time frame that you hope them to do so. We recommend that you reserve the use of e-mail for situations where you need to communicate a change of venue or cancellation of a lecture or postponement of an assignment.
There are other ways that you can use email effectively in your course and that is here, in the assignment area. It is possible to e-mail students with no submissions or, while you are grading an assignment it is also possible to e-mail a student or a group of students directly over there.

For more information of how to communicate using email, please visit this link.
Another way you can communicate with your students is via a discussion board. An option is to create a discussion forum for the entire course, on your course website. Here students can ask general questions to each other, but also to yourself and the TAs (teaching assistants). If you use a lot of group work in your course you can also create a discussion board for each group. On this forum, students can then communicate amongst themselves, share files and if you have a coach leading the group, that coach can participate in that discussions and file-sharing as well.
If you are a coach you can email the students in your group directly from the groups tool and you can e-mail multiple groups that you are responsible for. This way you can target just the section of the class that you need to.
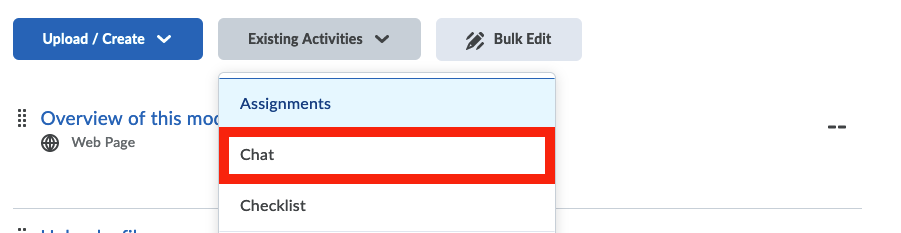
You can add chat boxes in your course. Simply open a module in your course.
- Click on the Existing Activities to open the drop-down menu;
- Select Chat.
- Click on Create New Chat and give the conversation a name and description.
- Scroll down and click on Create and Insert. It is advised that you make it clear in the Description what the purpose of the chat box is, and how often you will monitor what the students are posting in it. It is also a good idea to add a date restriction (or set it on Draft when not in use) to this item, so that the students do not use old chat boxes that are no longer monitored.
You an also create a chat by going to Course Admin and selecting the Chat option under Communication. When creating a chat from Course Admin it is possible to specify if the type of chat should be General or Personal. The general chat will allow all users enrolled in your course to participate. Users from other courses will not be able to access this chat. The personal chat allows you to add or remove users from its members list. You can also add users from other courses to allow them to participate.
How to use this to improve your course
There are multiple ways to communicate with your students. Announcements are the preferred way, followed by email and discussion boards.