A smart board or a digital blackboard (digi-board) can be viewed as a digital version of the classical blackboard/whiteboard. The advantage of a smart board is that it uses the possibilities of a computer, and apart from the writing and drawing option, also offers a number of projection possibilities. It adds the ability to display and interact with material (pdfs, powerpoints, websites, and videos), and also allow for the capture of this display and interaction for future access!
Application in education
Using a smart board can have a stimulating effect because of its interactive possibilities. It is easy and quick to use images or videos, formulas can be solved together, internet can be consulted classically, etc.
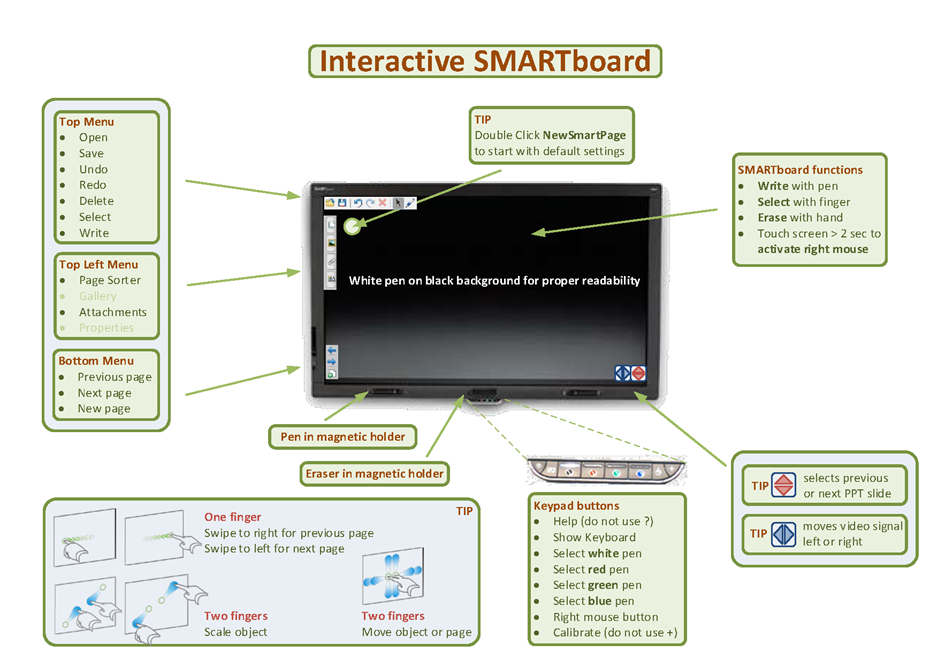
Below you can find the keys of the interactive whiteboard. Click on the image to enlarge.
Benefits for teaching
- Increase learner engagement, motivation and retention
- Support various learner preferences, including accessibility requirements
- Enhance lesson materials
- Increase interaction in teacher-directed and group-based activities
- Embed digital and interactive resources in teaching
Benefits for learning
- Showcase individual and group achievement Review in-classroom generated learning resources
- Work hands-on with multimedia in a large workspace
- Attain a higher level of whole-class interactive learning (by removing isolating individual screens)
- Showcase individual and group achievement
Interactive whiteboards are used in one of two ways:
- To capture notes/interactions written on the screen or ‘whiteboard’ surface.
- To control and annotate a computer-generated image projected on the screen or whiteboard surface.
In general
- When using a whiteboard, make sure there is adequate space to move on either side and in front of the whiteboard.
- Make sure you allow a lot of white(board) space for writing/annotating.
- Wherever possible, incorporate interaction between students and the interactive whiteboard (turn over the lesson to learners or groups).
- Consider capturing material with the document camera, so that you can display it on the interactive whiteboard for whole class review. Doing so stimulates discussion thay provides immediate feedback to learners.
Displaying digital files
- Use web browsers to access publicly available information that can help you explore different points of view.
If you will be using web pages repeatedly, add bookmarks for your favorite sites, and open them up in different tabs before your lecture. - To make full use of the web page and whiteboard space press F11 to eliminate the toolbar (press F11 again to bring it back).
- Consider using MS Office applications (PowerPoint and MS Word) for interactive quizzes and lesson review as they are fully integrated with any lectern PC (which runs the interactive whiteboard).
Using digital ink for handwriting & annotations
- If you choose to annotate your files with digital inks, design the pages so that there are blocks of white space.
- Practice using digital inks, and alternating colours before your presentation.
- Contrast the colour of the digital ink with the background so your annotations are legible.
- Change colours as you introduce new elements or aspects of your presentation.
Playing video files & recording interactions
- When recording video, adjust the frames-per-second rate according to the publishing method you will use. For example, record using a medium frames-per-second rate for online delivery, and use a high frames-per-second rate if you will be burning the video to a DVD. A high frames-per-second rate in an online video could take a frustratingly long time to download or stream.
- If you plan to annotate freeze-framed video, consider using the screen capture feature (accessible from your lower left menu). This will save a still image instead of a recording/video, allowing you to bring the image into your min document, reducing the file size of the final file you will share with your learners.
- Test your video, and your pause points (note the pause point time code in the instructors notes) where discussion and interaction will take place.
Lesson Ideas
- Introduce new concepts
- Summarizing and note taking
- Direct/guide a virtual field trip
- Involve students in cooperative learning
- Generate and test
- hypothesis Goal/agreements setting
Activity Ideas
- Deliver short lectures
- Exam review, or brainstorming ‘highlights’ and ‘lowelights’
- Bring up the website that offers your area of study (Smithsonian, Louvre, Stonehenge, etc.)
- Large groups solve an equation, students present draft concepts for peer review/adaption
- Large group case study planning/review
- Whole group development of course goals, or agreements
Getting started
TU Delft provides a short training session that covers the basics of webinars and live classrooms. The training will focus on the delivery of lectures from an active learning perspective. We also have a separate training for Do-It-Yourself Video.
Visit the TLS Training portal for more information about available trainings and enrollment.