Brightspace Grades (Gradebook) is available in most Brightspace Courses and can be used to communicate grades for, for example, assignments, exams, projects and participation. It is important to set this up properly. In a learning system such as Brightspace, we know that students spend between 7% and 22% of their time on the Gradebook page. On this page, we will briefly explain the features.
Using the Gradebook
In the following sections, the way how to use the Gradebook is explained. First, some useful terms are explained in Basics of Grades. Then, in Setting up a Grade structure, you can read how to set up the grades, categories, items, and schemes. In Entering Grades, a guideline for how to enter the grades and use formulas is explained. Managing Grades is about releasing or hide grades and managing them in bulk. Lastly, the option is given to Practice with the Gradebook as Grades is one of the more complex functionalities in Brightspace.
Basics of Grades
There are three different Grading Systems:
- Weighted grading scheme: grade items and categories are weighted as a percentage.
- Points grading scheme: grate items and categories are weighted in points.
- Formulas: grade items and categories use the point scheme, but a custom formula calculates the final grade.
You can find examples of the Grading systems when you go in Brightspace to Grades > Settings > Calculation Options.
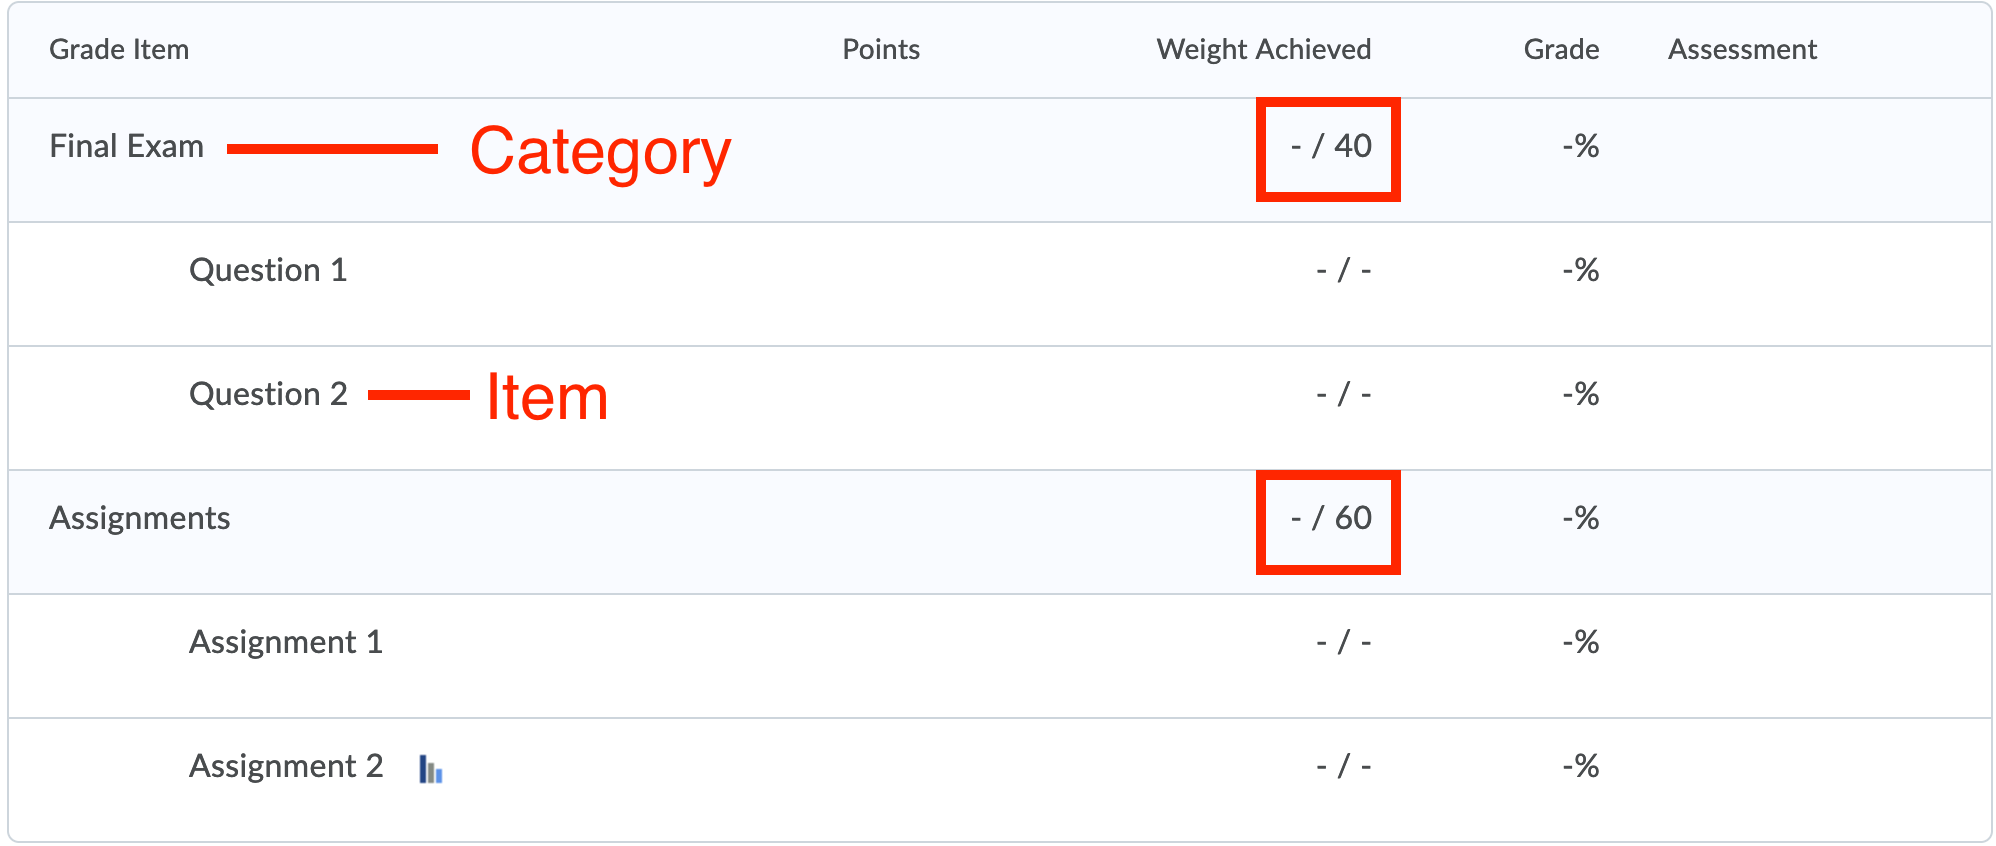
Items
At its simplest, anything that receives a grade is an Item. For example a quiz, an assignment, a project, or even each question in the final exam. These are all examples of items. Students will see a grade for each item in their view. For courses where only a few items are used to calculate the final grade that’s all the terminology you need .
Categories
However, you might have several items that naturally go together. For example: 4 quiz items, 7 questions in the final exam, or 3 assignments. You can group these items together in what Brightspace calls a Category.
Brightspace lets you do interesting things with Categories.
Firstly, you can make a Category count a certain amount of weight. Each of those categories, when added up, gives a 100% to the overall weight. This provides a great way for the students to see their grade breakdown. (see image below)
The second feature of categories is that it allows you to do interesting things with the items within each category. For example, you might have a grading policy where you have 6 assignments, but only the best 5 assignments count towards the assignments in the overall grade. In other words, you drop the lowest assignment.
The Grade schemes enable you to organize results on grade items into levels of performance. A grade scheme can have any number of performance levels desired. Each level is represented by a letter/numerical value/text and has a range of acceptable grades. You can create such schemes yourself, but you can also use the ones set up by Brightspace.
To find the Grade schemes in your Brightspace course go to Grades > Schemes.
Setting up Grade structure
When preparing your course in Brightspace one of the steps is to set up the Gradebook of the course. Do this before adding other activities such as assignments, quizzes and/or discussion because you might want to link these activities to the Gradebook. Before you set up your Gradebook it is good to have an overview of what grades will be given and how they relate to the final grade.
If you are using the grade book for the first time, the most ideal way to set it up is to use the Grades Setup Wizard.
To get more familiar with the Grades module in Brightspace you might consider to do the exercise for working with the gradebook.
Category
Because Categories are used to group Grade Items, it is advisable to create Categories for Assignments, Quizzes and other grouped Grade Items.
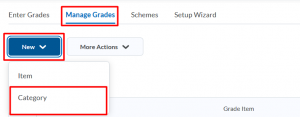
- Go to Grades and select Manage Grades
- Select New and select Category
- Give a Name to the category
- (Optional): You can also provide a Short Name and Description to the category
- Depending on whether you are using Point or Weighted Grade System, you will see different Distribution options. You need to decide how would you like to distribute the grade items in the category

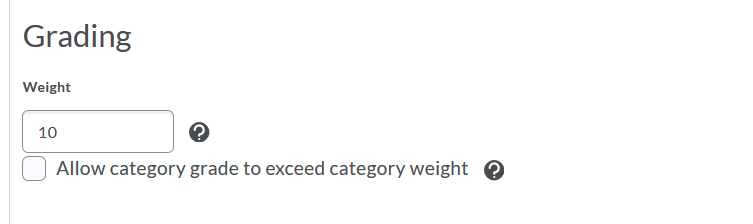
If you are using the Weighted Grade System, enter the total weight (in percentage) that you want the category to contribute towards the final grade.
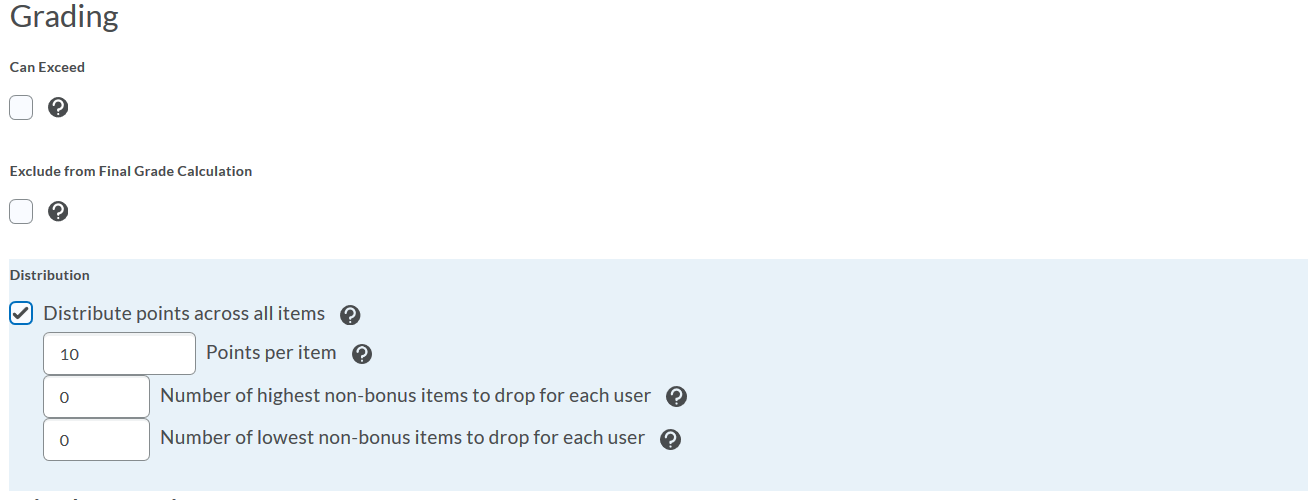
If choosing Points Grade System, you can decide how many points need to be distributed across all items in the category.
- Set up additional Display Options as per your need.
- Finally click on Save.
Grade Item
After the creation of the categories, they can be filled with Grade items. These can be associated to the learning tools, such as Assignments, Quizzes and others.
It is important to create a Grade Item for all your assessments (quizzes and assignments), because the system does not create these automatically.
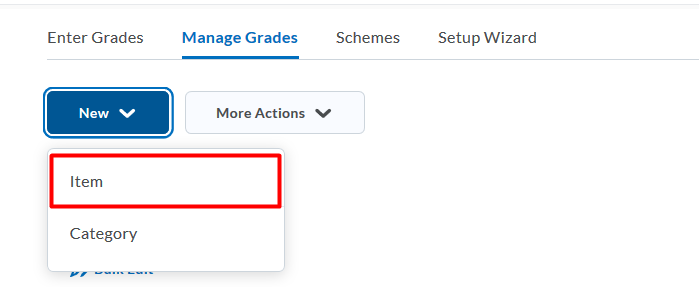
- Go to Grades and select Manage Grades
- Select New and select Item

- Select the grade item type that fits your grading scenario, i.e. Numeric, Selectbox, Pass/Fail, Text, Calculated and Formula.
- You will enter into the settings belonging to the selected Grade Item type. Give the grade item a Name and select a Category that the grade item needs to be a part of.
- (Optional): You can also provide a Short Name and Description to the grade item.
- Enter the value you want the item graded out of in the Maximum Points
-
- If you are using the Points System, you can also choose the Exclude from Final Grade Calculation option.
- If you are using the Weighted System, enter the Weight (%) you want the grade item to contribute to the category. If the item does not belong to a category, the Weight you enter contributes to the final grade. If you want to exclude an Weighted Grade item from the Final Grade Calculation, you can do this by putting the weight to 0%.
- Select the Grade Scheme.
- If you would like to associate a rubric with the grade item, select Add Rubric.
- Set up additional Display Options as per your need.
- Finally click on Save.
- From the navigation bar, click Grades.
- On the Schemes page, click New Scheme.

- Give the new scheme a Name and (optional) Short Name.
- In the Ranges area, enter your scheme details. If you do not assign a value in the Assigned Value % field, the Start % is used as the default.
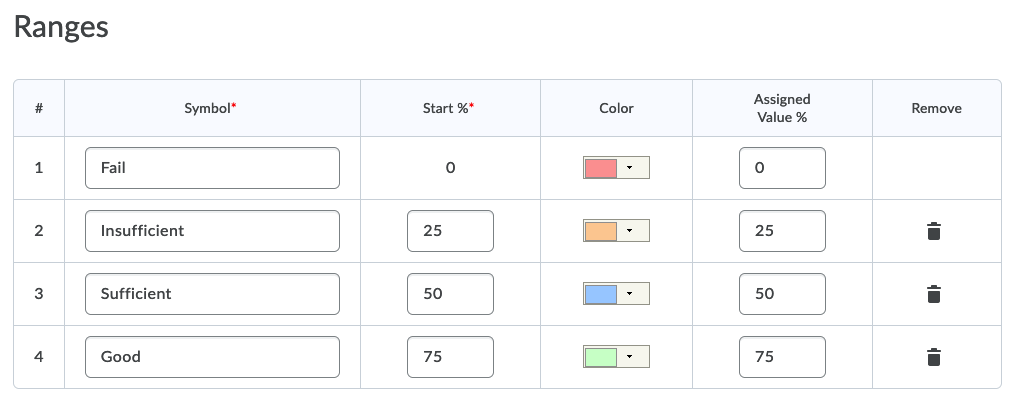
- To add more levels to your scheme, click Add Ranges.
- Click Save and Close.
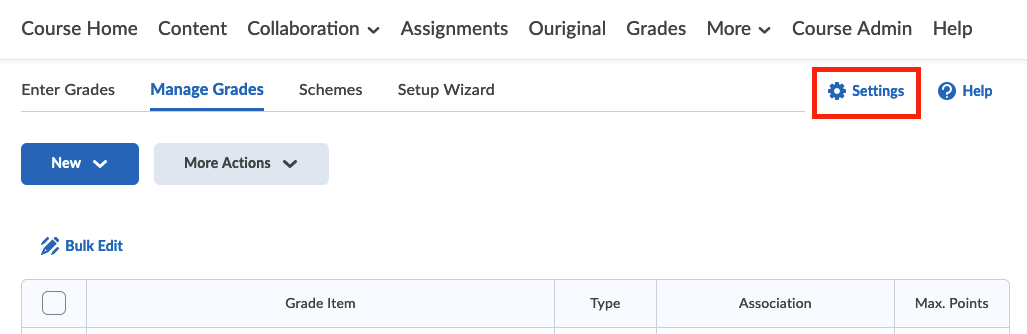
After you have set up the gradebook you might want to change/add/delete items or categories this can be by going to grades in the navigation bar of your Course and selecting the Manage grades-tab.

On the left side of the image below is what you see as an instructor in the Manage Grades-tab. As you can see on the right side of the image, this is very much in line with what students see when they click on the Grade-menu.
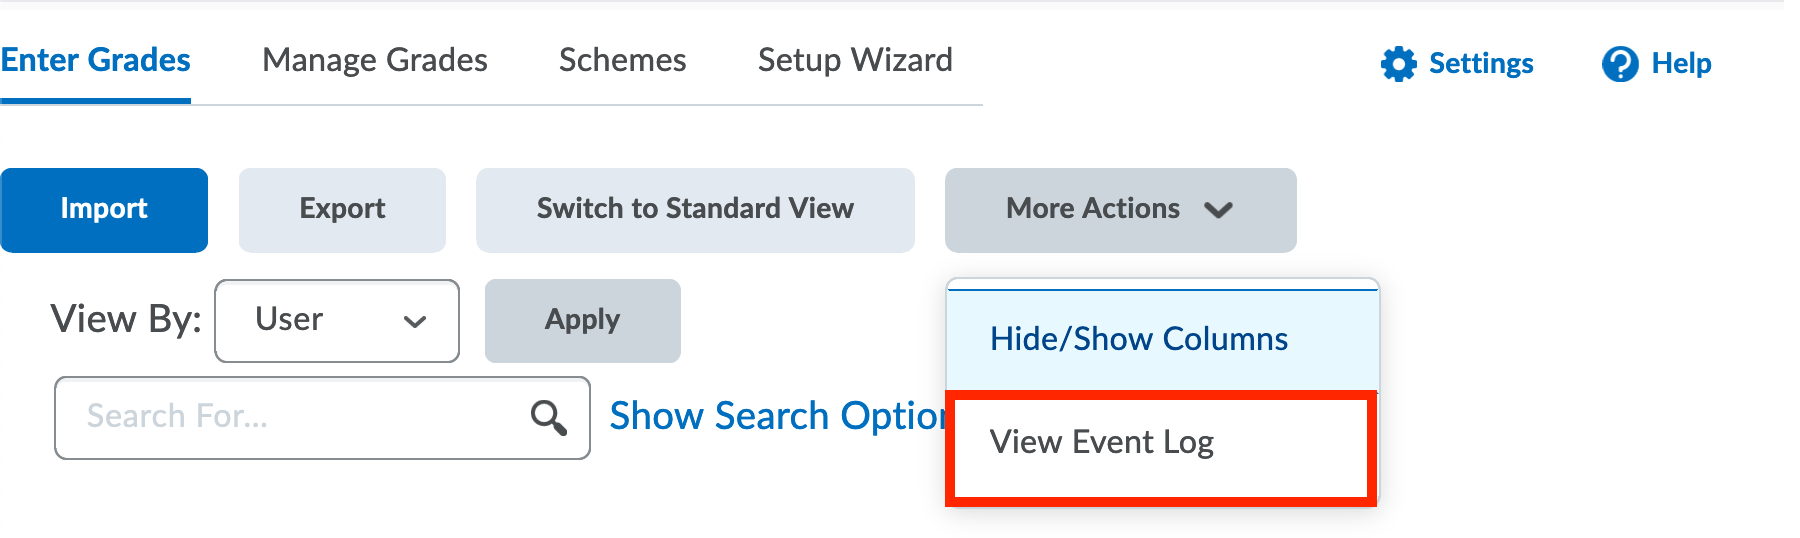
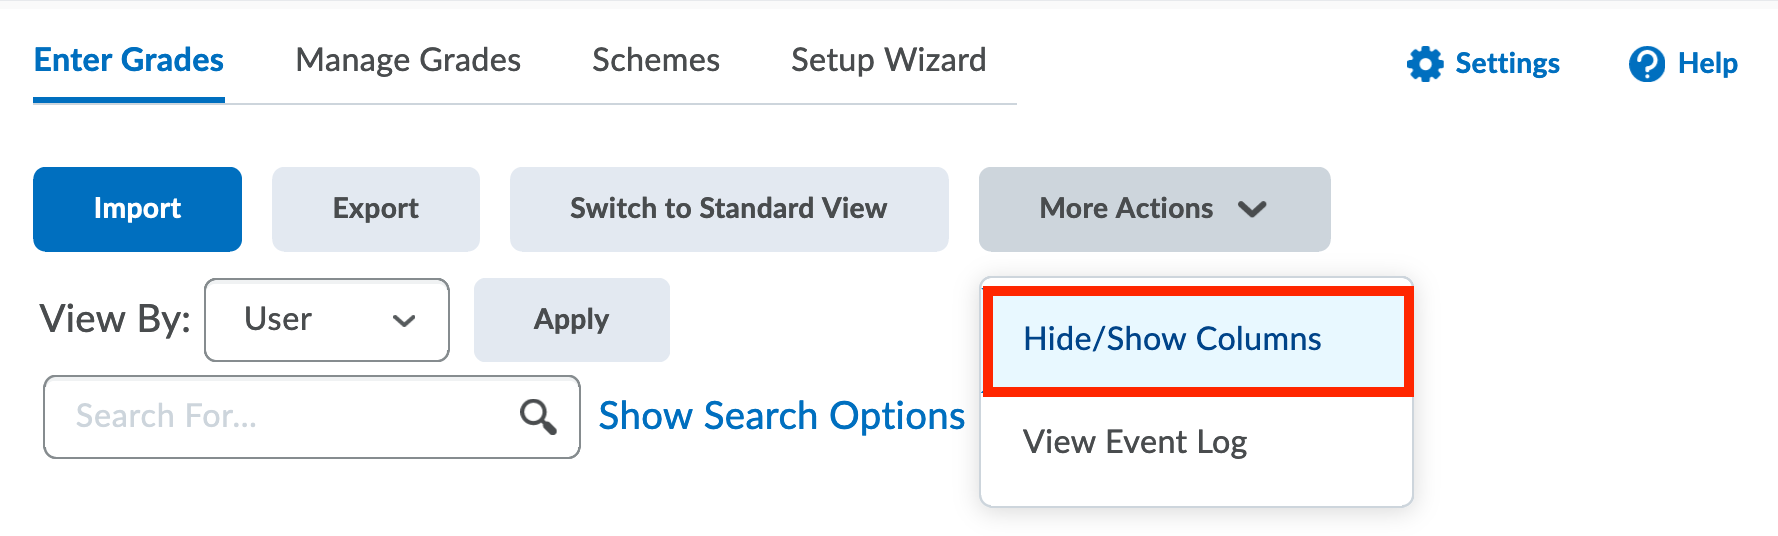
In the Enter Grades– tab (or the Manage grades-tab) you can find an Event Log which tracks actions in the Gradebook. This is useful in large courses where multiple people are entering and changing grades.
Entering Grades
You can enter grades directly into the gradebook in the same way as you would in Excel.
The locked Name column /header row will not be active when using a small screen space such as a mobile device.
- Click on Grades and go to Enter Grades.

- Choose your grade entry view by switching between Spreadsheet view and Standard view and enter your grades by filling in the students’ grades for each item.
Once you enter grades, students are automatically notified; however, you can release the grades at a later date if you prefer.
- In Spreadsheet view, the entry is much like a spreadsheet. There are empty cells that you can enter the grades into. You can do this for multiple grades, for multiple students, for multiple columns, in one go.
- In Standard view, you can click on the name of the student, and fill in the grades across all the columns of the gradebook. You can also add comments. These comments are shown as feedback to the student, whereas private comments are seen by people with grading access.


- Save your grades by clicking the Save button.
If you click the Back button or another link on the site, you can lose all the edits you have just made. So click on the Save button regularly while using this view.
- Optional: Grade all students at once for one grade item by clicking on the dropdown arrow next to the grade item and choosing Enter Grades.

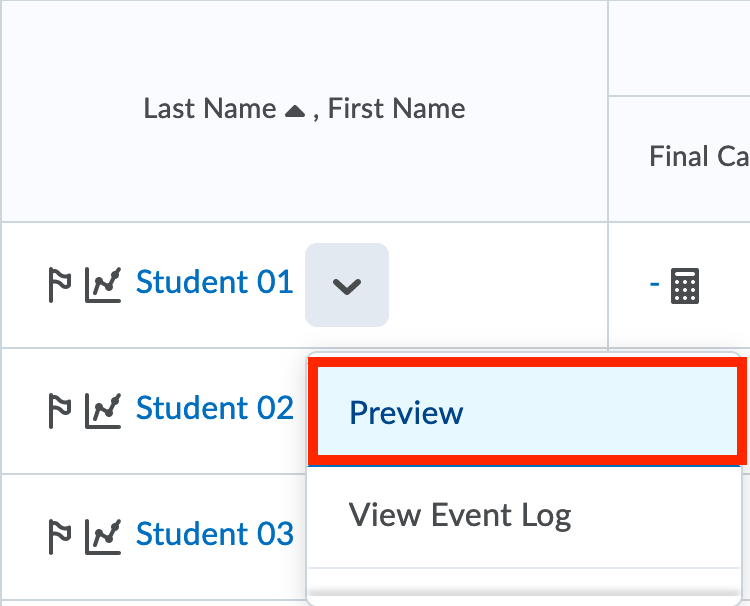
- Optional: Click on Preview to view the grades to see what a student taking the course will see.
- Click on Save and Close to finish.
- To modify or add grades for multiple students, click on Save, and use the arrow buttons at the top to navigate between students in the classlist.
- Optional: To add feedback go to Assignments. After clicking Assignments, click the specific assignment and then click the submitted document per student. There, you will find the feedback area.
Filtering Rows
In the Enter Grades-Tab you can filter and hide/show certain rows or sort by any column to make grade entry easy. The color coding helps identify which students are falling behind in your course or those who have not submitted any work.
Formula grade items are used to automatically grade users using a custom formula based on achievements in other grade items.The following limitations apply to formula grade items:
- They cannot belong to a category.
- You must create all of the grade items you want to include in the formula grade item before you create the formula.
- Formula grade items do not contribute to the calculated final grade in a points-based or weighted-based grade book.
- You can only calculate the final grade with formula grade items using the Formula grading system.
- Formula grade items cannot be associated with discussions, quizzes, and assignments. Only numeric grade items can be associated with these course objects.
Create a Grade Item with type Formula:
- On the navbar, click Grades.
- On the Manage Grades page, from the New button, click Item > Formula.
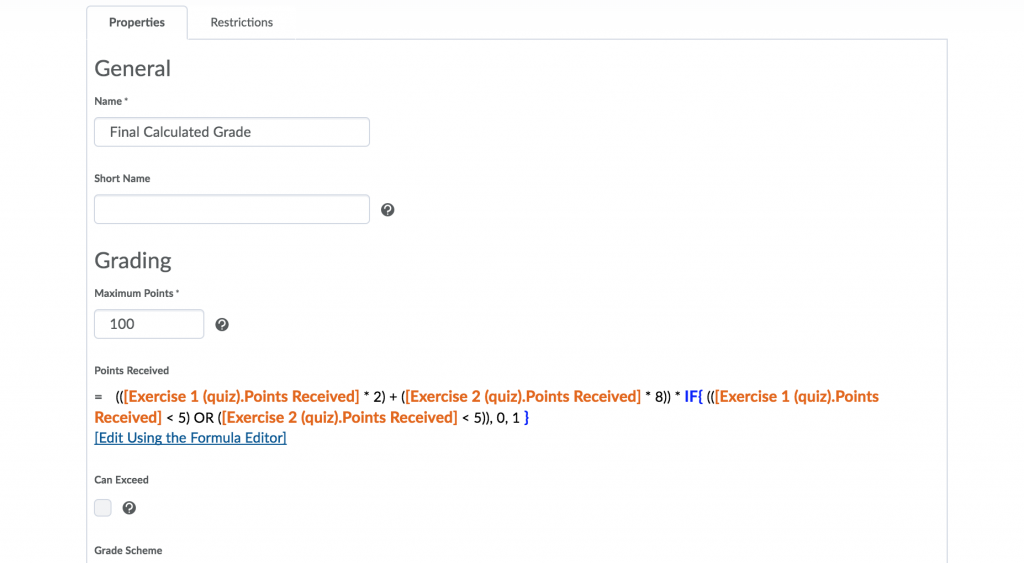
- In the General area, enter your grade item details.
- In the Grading area, enter the Maximum Points for the grade item. Then, do any of the following:
- To define the formula for your grade item, click the Edit Using the Formula Editor link. In the Formula Editor window, enter your formula and click Insert.
- If you want users’ grades to be able to exceed the maximum points specified for the item, select the Can Exceed check box.
- From the Grade Scheme drop-down list, select a grading scheme for your grade item.
- To attach a rubric to the grade item, click Add Rubric.
-
- In the Display Options area, select how you want the Learner View and Managing View for the grade item to appear.
- Click Save and Close.
- If you set up a Formula with the Grade Setup Wizard, please skip to step 4. If you did not setup a Formula through the Grade Setup Wizard, click on Grades and go to Settings.
- Go to the Calculation Options tab and select Formula under the heading Grading System.
- Click on Save and once the changes have been saved click on Close.
- Click on Grades and go to Manage Grades.
- Click on the dropdown menu next to Final Calculated Grade item and select Edit.
- In the Grading section click on Edit Using the Formula Editor to define the Formula that will calculate the grade.
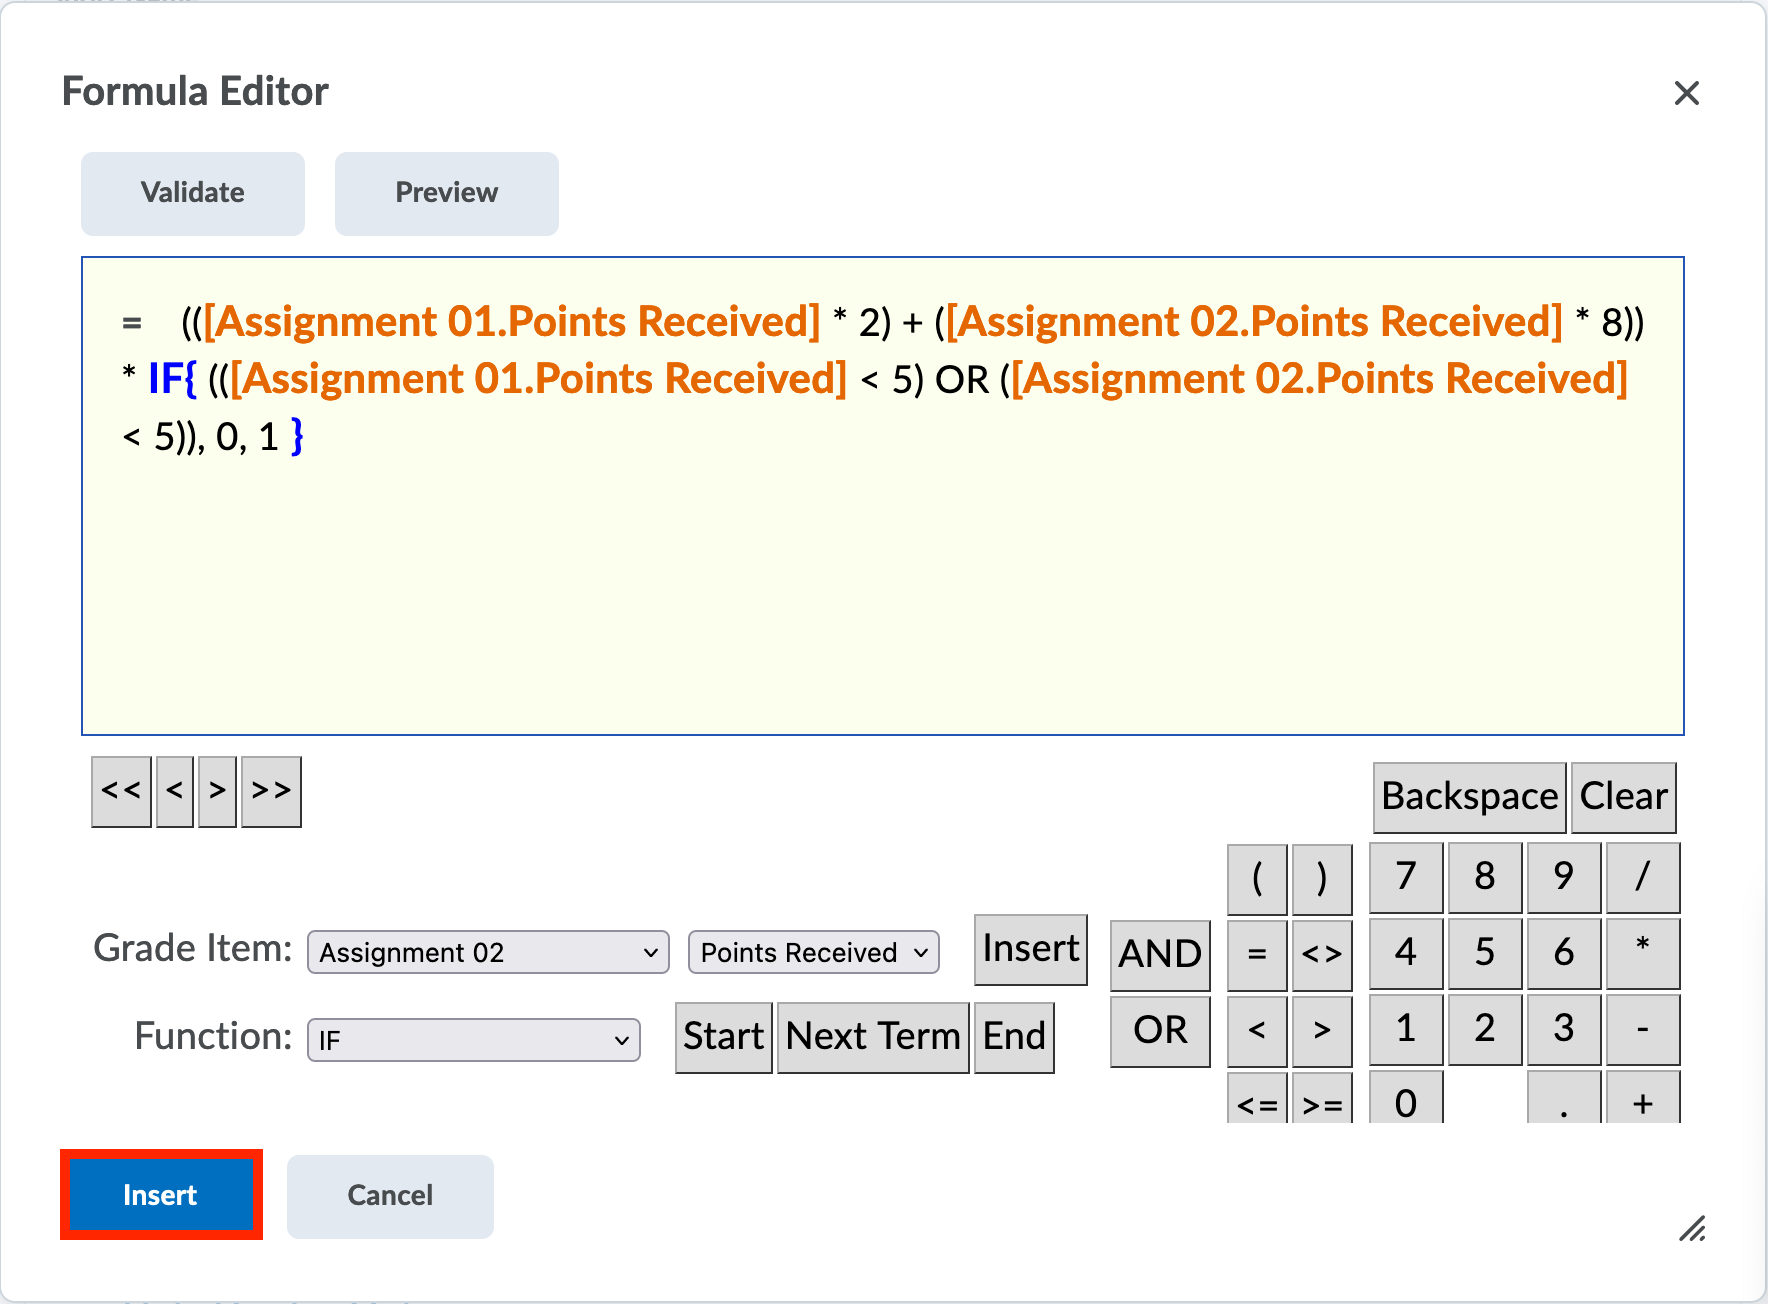
- To input functions or logical operators, click on the Function drop-down. Grade items to which these logic operators apply can be inserted in the dropdown menu next to Grade Item. Please note that an IF statement requires two inputs (and could therefore be regarded as an if/else statement in some programming languages). Some examples are given below.
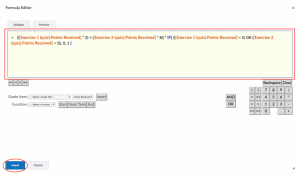
 In this last image, the following logic is applied: IF the student made the resit exam (and got awarded more than 1 point for it), then the grade is calculated by the formula:
if (student wrote the resit exam):
grade = (0.2 * Assignment) + (0.3 * Report) + (0.5 * Resit exam)
else
grade = (0.2 * Assignment) + (0.3 * Report) + (0.5 * Final exam)
You can also download an additional file that gives an overview of some of the options that you can use along with few examples. - Set up additional Display Options to suit your needs.
- Finally click on Save.

- Click on Grades and go to Settings.

- Go to the Calculation Options tab and select Formula under the heading Grading System.
- Click on Save and once the changes have been saved click on Close.
- Click on Grades and go to Manage Grades.
- Choose either:
- Expand the “Final Calculated Grade” item using the dropdown menu and select Edit Grade Item.
- Create a new Calculated Grade by clicking on New and then Item and choosing Formula.
- Below “Grading” click on Edit Using the Formula Editor to define the Points Received.
- Type your formula in the space provided and click on Insert.
You can also download an additional file that gives an overview of some of the options that you can use along with a few examples.
You or the teaching assistant can also provide corresponding feedback for students and also for the entire class. If you are working with a team of graders, then you can create comments that only that team can see internally using Private Feedback.
Read more about how to provide feedback Through grading
Managing Grades
- Go to Enter grades and then scroll to the column with the grade item you would like to grade.
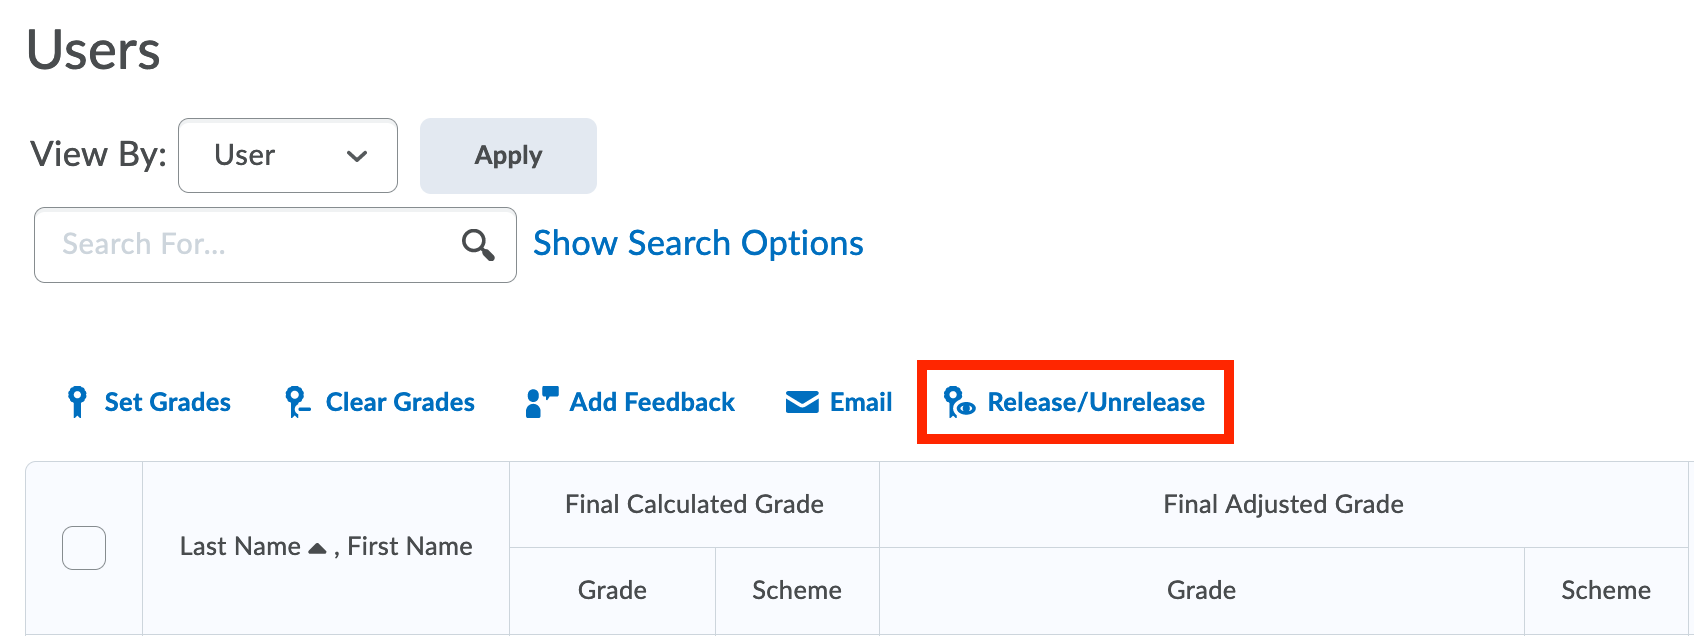
- Click the arrow next to the final grade and then select Enter Grades.

- Under Users you can select all students or select a few and click the option Release/Unrelease. Click Save and Close.
Do note that once you release grades students with active notifications will be notified.
You can choose to make a grade column invisible to students, either because you do not want them to see it at all, or because you want to release it at a later date. You might be unable to grade all students in one go, for example, or you might want to adjust the grades after grading. To prevent confusing your students, it is recommended to keep the grades hidden until you can release all of them at the same time.
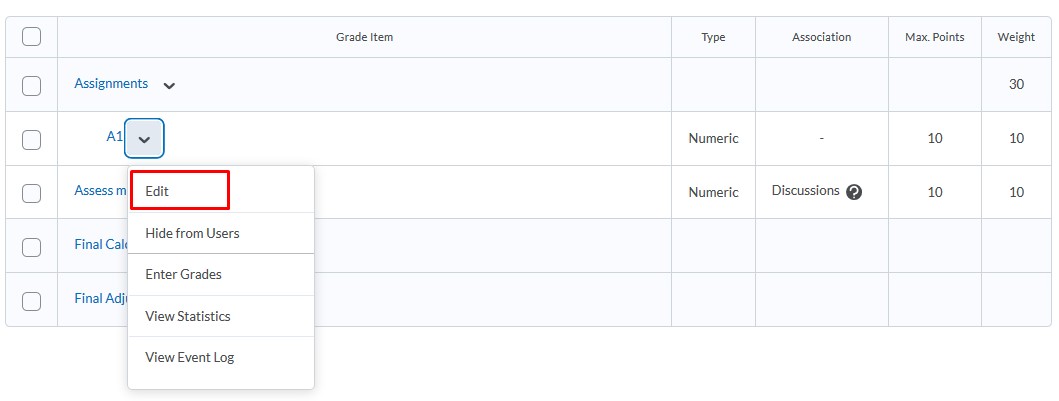
- Click on Grades in the navigation bar to access the gradebook. You can also find a ‘Grades’ link in the Assessment section of the Course Admin page. Switch to the Manage Grades tab and edit one of your grade items by selecting Edit.
- Go to the Restrictions tab. Here you find the options to directly hide the grade item from students, set a date range or to attach release conditions.

- Make your preferred selection and click Save and Close.
You can now edit the grades for this item without the students seeing them. Do not forget to make the grade item visible again once you are done.
There are three main reasons to export Grades from Brightspace:
- To Import grades to the Brightspace Grades through an Excel- or .CSV-file.
- To create a back-up file.
- To share evaluation results.
We have divided the process into 3 steps. For the purposes of creating a back-up and/or sharing results, only step 1 is needed. To import Grades from an Excel- or .CSV-file it is not required to export the grades first, but is recommended to avoid mistakes as Brightspace requires a specific format for uploading grades. To obtain this format, you can export it from the Brightspace course > Grades > Enter Grades > Export.
Step 1: Exporting Grades (to CSV or Excel)
- Go to the Grades of the applicable course, click on the Enter Grades-tab followed by the Export-button.
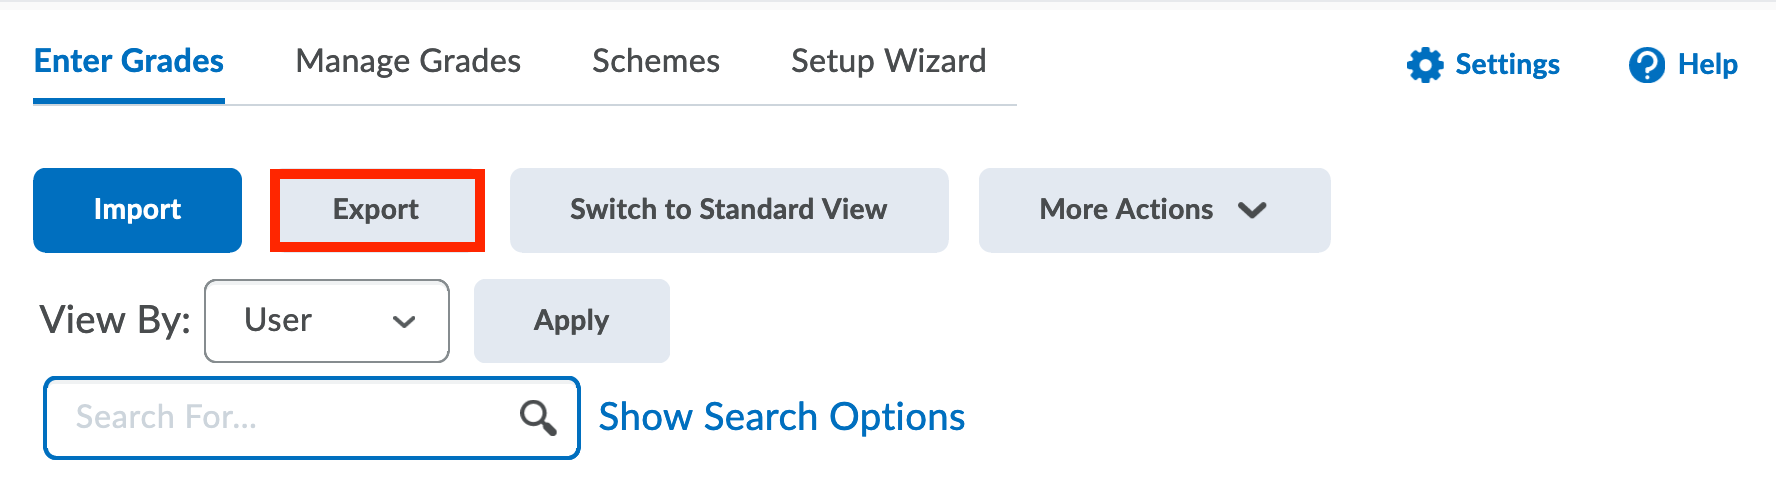
- Now, make the following selections:
- Export Grade Items for: All Users
- Key Field: Org Defined ID
- Grade Values: Points grade
- User Details: Optional (Advise: None. Extra columns will only create confusion)

- Check the Grade Items that you want to export. Each Grade Item will populate a column in the Excel or .CSV-file.
- Click Export to CSV (or Export to Excel).

Step 2a: Entering Grades when you exported a .CSV-file
Follow the steps below to enter grades into a .CSV-file and prepare the file for importing.
- Open the exported .CSV-file in Excel.
- Select Column A and click on Data-tab to select Text to Columns.
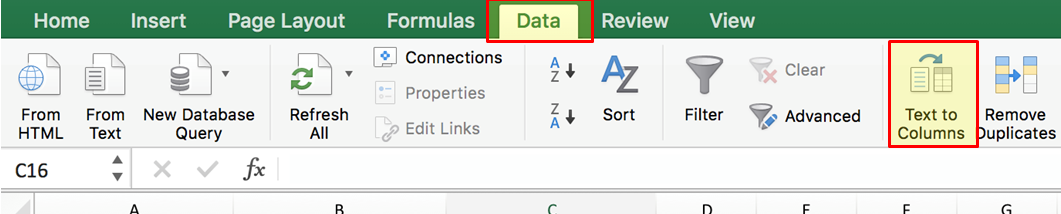
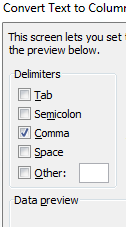
- In Delimiters section, select Comma as a delimiter and click Next and Finish.
- Enter the grades.
If grades contain decimals, the decimal separator should be a dot (.) and not a comma (,).
- Check the following things:
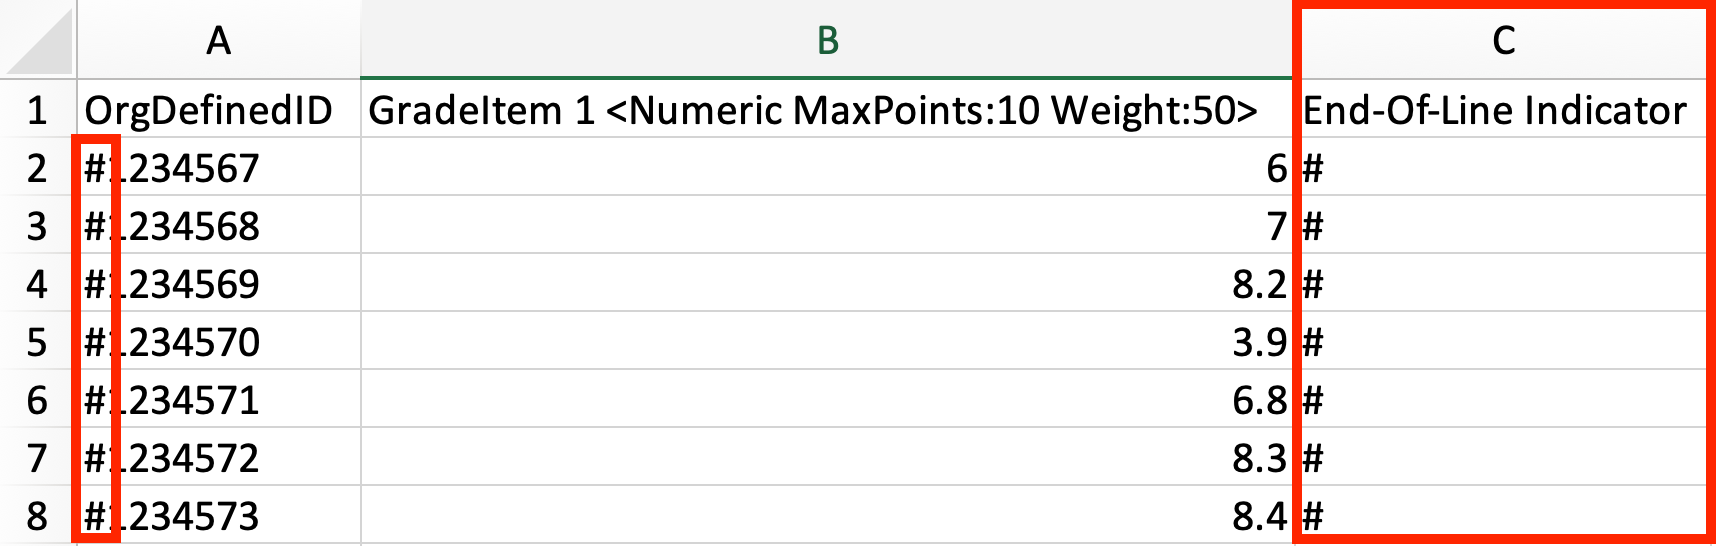
- The OrgDefinedId(=studentnumber) have a hashtag (#) in front (example: #1234567).
To add a hashtag (#) in front: add two empty columns after the one with the student numbers, in cell B2 then add the formula=CONCATENATE("#";A2)and copy this all the way down to the last row where there is a student number. Column B will now be filled with data that looks like #StudentNumber (example: #4644581). Select all numbers in column B and, paste them into column C as “ Values” (without formatting!). - The End-of-Line Indicator is the last column and the cells beneath are filled with a hashtag (#).
 If a non-student is enrolled in the course, the OrgDefineId will be their NetID.
 - The OrgDefinedId(=studentnumber) have a hashtag (#) in front (example: #1234567).
- Save and Close the file.
- Open the file in a text editor (Notepad for example) and replace any semi-column (;) with a comma (,) using the replace all function (Ctrl+H in Notepad).

- Save and close the file.
Step 2b: Entering Grades when you exported an Excel-file
- Open the exported Excel and Enter the grades.
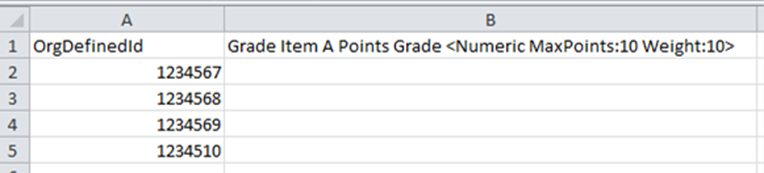
- Now that we know the column names that Brightspace accepts for our specific grade item(s), you can either replace the first row in your Excel file with the first row as given by the Brightspace Export, or you can copy-paste the student numbers and grades from your own file into the exported file from Brightspace.
- Add a hashtag (#) in front of the OrgDefinedId(=studentnumber) (example: #1234567).
To add a hashtag (#) in front: add two empty columns after the one with the student numbers, in cell B2 then add the formula=CONCATENATE("#";A2)and copy this all the way down to the last row where there is a student number. Column B will now be filled with data that looks like #StudentNumber (example: #4644581). Select all numbers in column B and, paste them into column C as “ Values” (without formatting!).
- Add a column named ‘End-of-Line Indicator’ as the last column and fill the cells below with a hashtag (#).
- Once all grades have been entered Save the Excel file as a .CSV (MS-DOS).
- Open the file in a text editor (Notepad for example) and replace any semi-column (;) with a comma (,) using the replace all function (Ctrl+H in Notepad).
- Save and Close the file.
Step 3: Importing Grades
A. Check the CSV-file
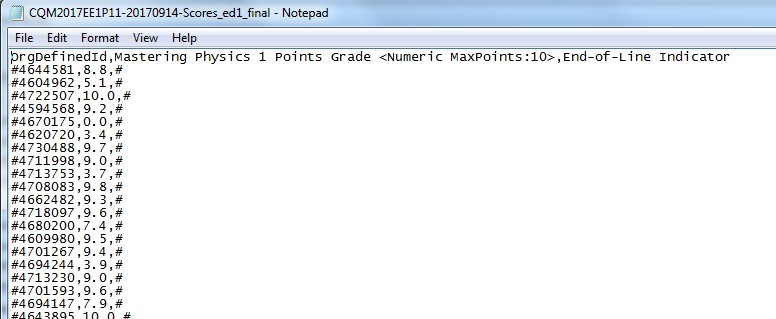
Once you have Entered the grades, you should have a .CSV file. If you open the file in a text editor (Notepad for example), it should look something like this:
B. Import the .CSV file into Brightspace
Please follow the steps below to import the .CSV file.
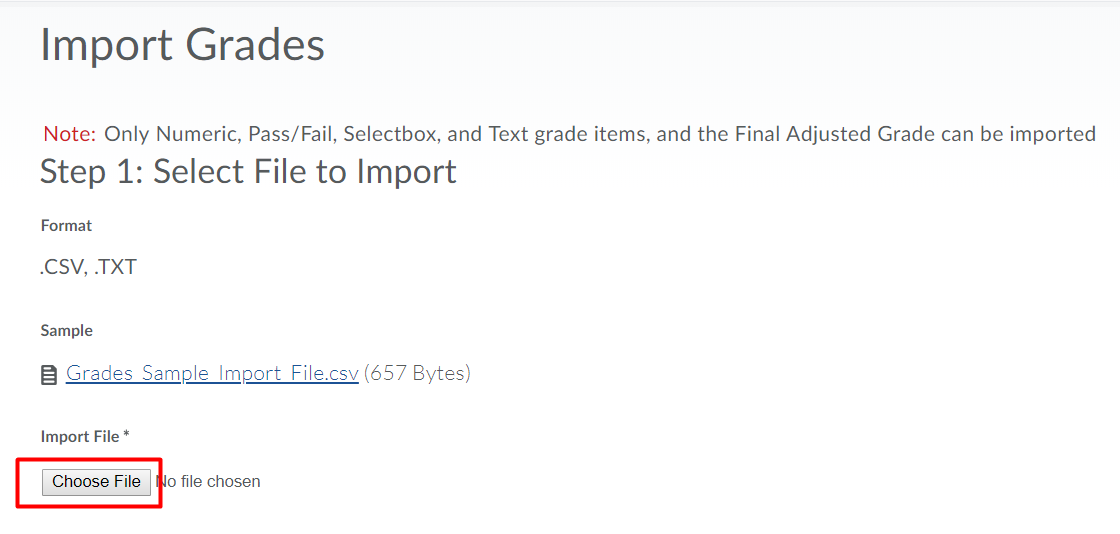
- Go to the Grades of the applicable course, click on the Enter Grades tab followed by the Import button.
- Click Choose File and browse to the saved .CSV-file.
- Select Continue.
- A page will be presented, displaying any errors that were found.
If all is well, please select Continue.
If errors are displayed, please refer to If any errors are found during the import (below these steps). - A preview page is displayed, showing the newly entered grades for each student. If all is well, please select Import.
- After a successful import, the newly imported grades will be shown.
C. If any errors are found during the import
Please contact Teaching & Learning Support. We are able to inspect your .CSV file to help determine what is causing the problem.
Lastly, at the end of the course you can export your gradebook, and upload the final grade for all students into Osiris.
More about Osiris
Practising with Grades
To practise how to use Gradebook, go to this page. Here you can follow exercises that will help you improve your skills within the Gradebook.