This page will give you a walkthrough for managing content to your Brightspace Course, such as adding text and uploading files. Once the content has been added to your course page, you can always return to the content and edit or delete the content.
Adding Content
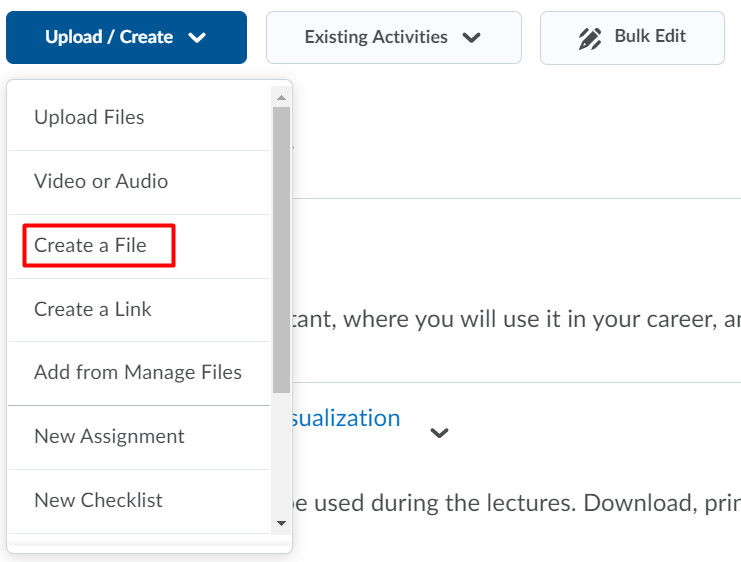
- Click on Upload/Create.
- Select Create a File.
- Give your Page a Title.
- In the big text box, you can use multiple operations to work with.
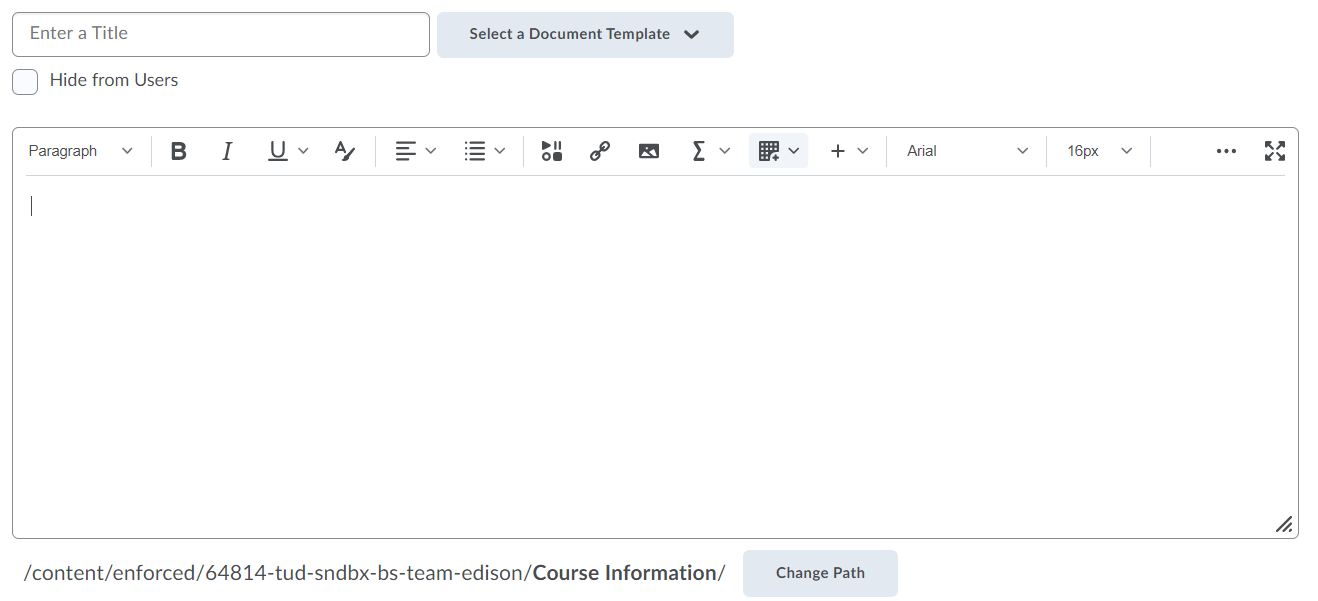 The text box is identical to any word processing software. You can type in relevant text and use text formatting options such as Bold, Italics and Underline. You can also change the font size, font type and copy–paste from other document.
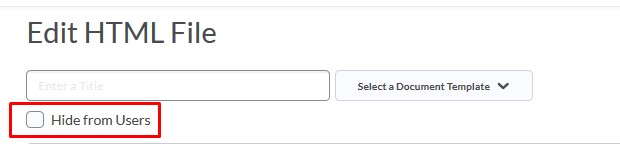
 - If at any point you prefer to work in hidden mode so that the students don’t see the update, click on Hide from users.
- In the top bar, new options will appear if you click on the three dots at the right:

![]() The format painter enables you to copy and apply text formatting. By selecting a text and clicking this icon you copy its format.
The format painter enables you to copy and apply text formatting. By selecting a text and clicking this icon you copy its format.
![]() The accessibility checker shows where to change things to improve accessibility.
The accessibility checker shows where to change things to improve accessibility.
![]() The source code enables you to edit text in HTML format.
The source code enables you to edit text in HTML format.
![]() The quick student preview shows how the page appears to students.
The quick student preview shows how the page appears to students.
If you copy text from a web browser or some other piece of text that has formatting we recommend you to remove the formatting yourself prior to pasting it in Brightspace. This will however still retain things such as bullet lists and font size. It’s a great way to import content to Brightspace without spending a lot of time creating it from scratch.
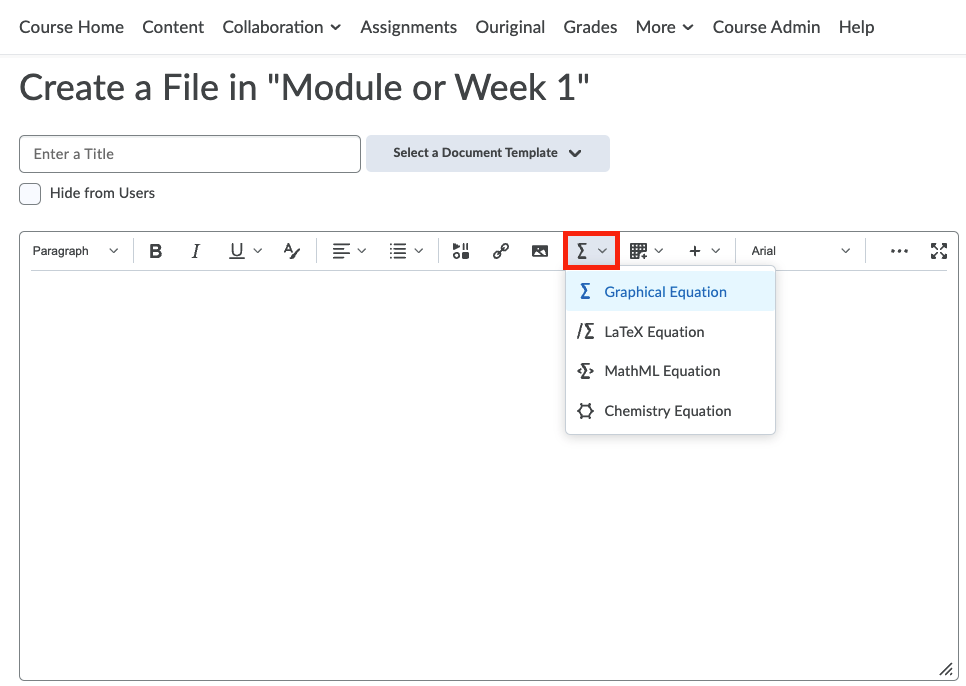
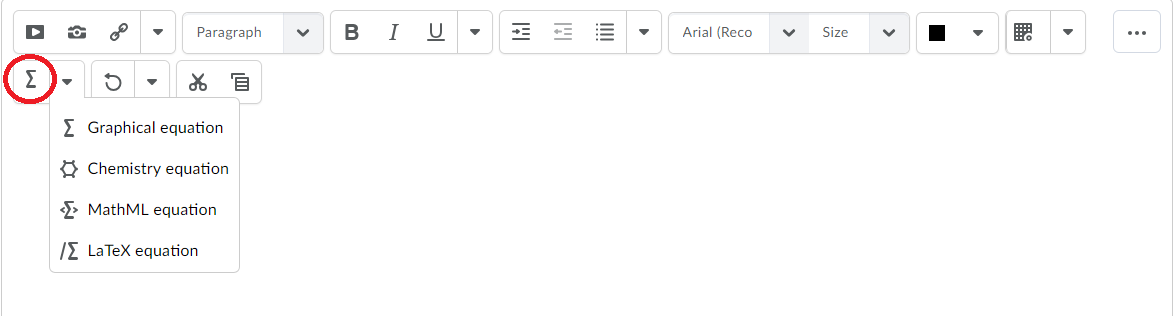
- Click on the Sigma (Σ) icon.
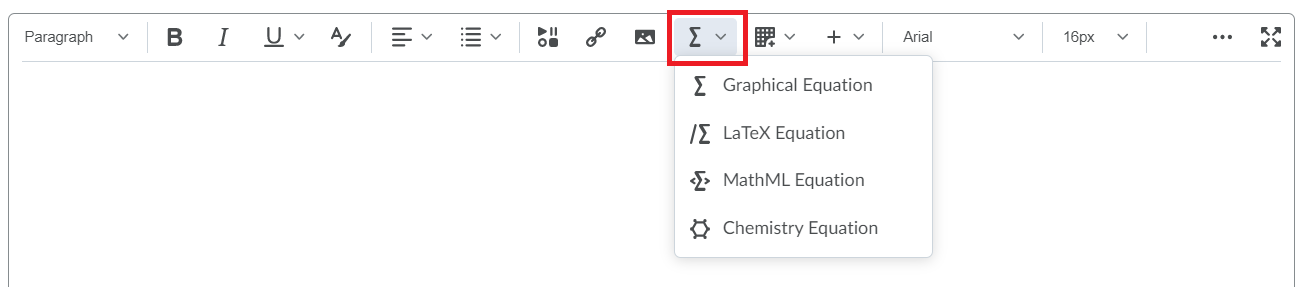
- By default, clicking on the Sigma (Σ) icon will open a Graphical Equation text editor, where you can directly insert your equation with special characters, style, format, etc.

- Select the drop down option next to the Sigma (Σ) icon which will give you access to other equation editors such as MathML and LaTeX equation editor.

- When using the text editor, click on the Show All Components icon. This will reveal the LaTeX editor, which is indicated with an upper-case sigma (Σ)symbol.
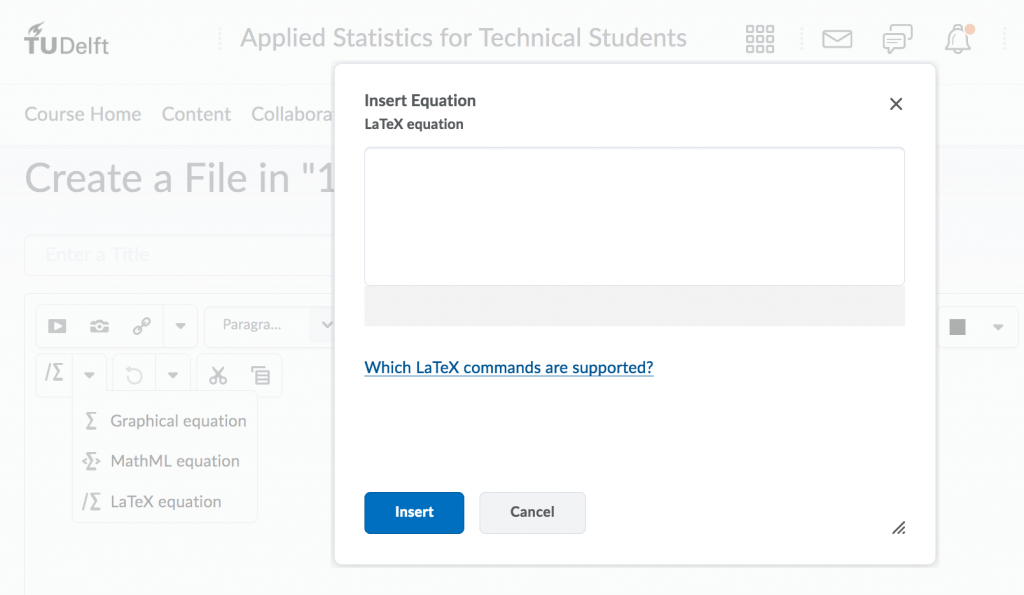
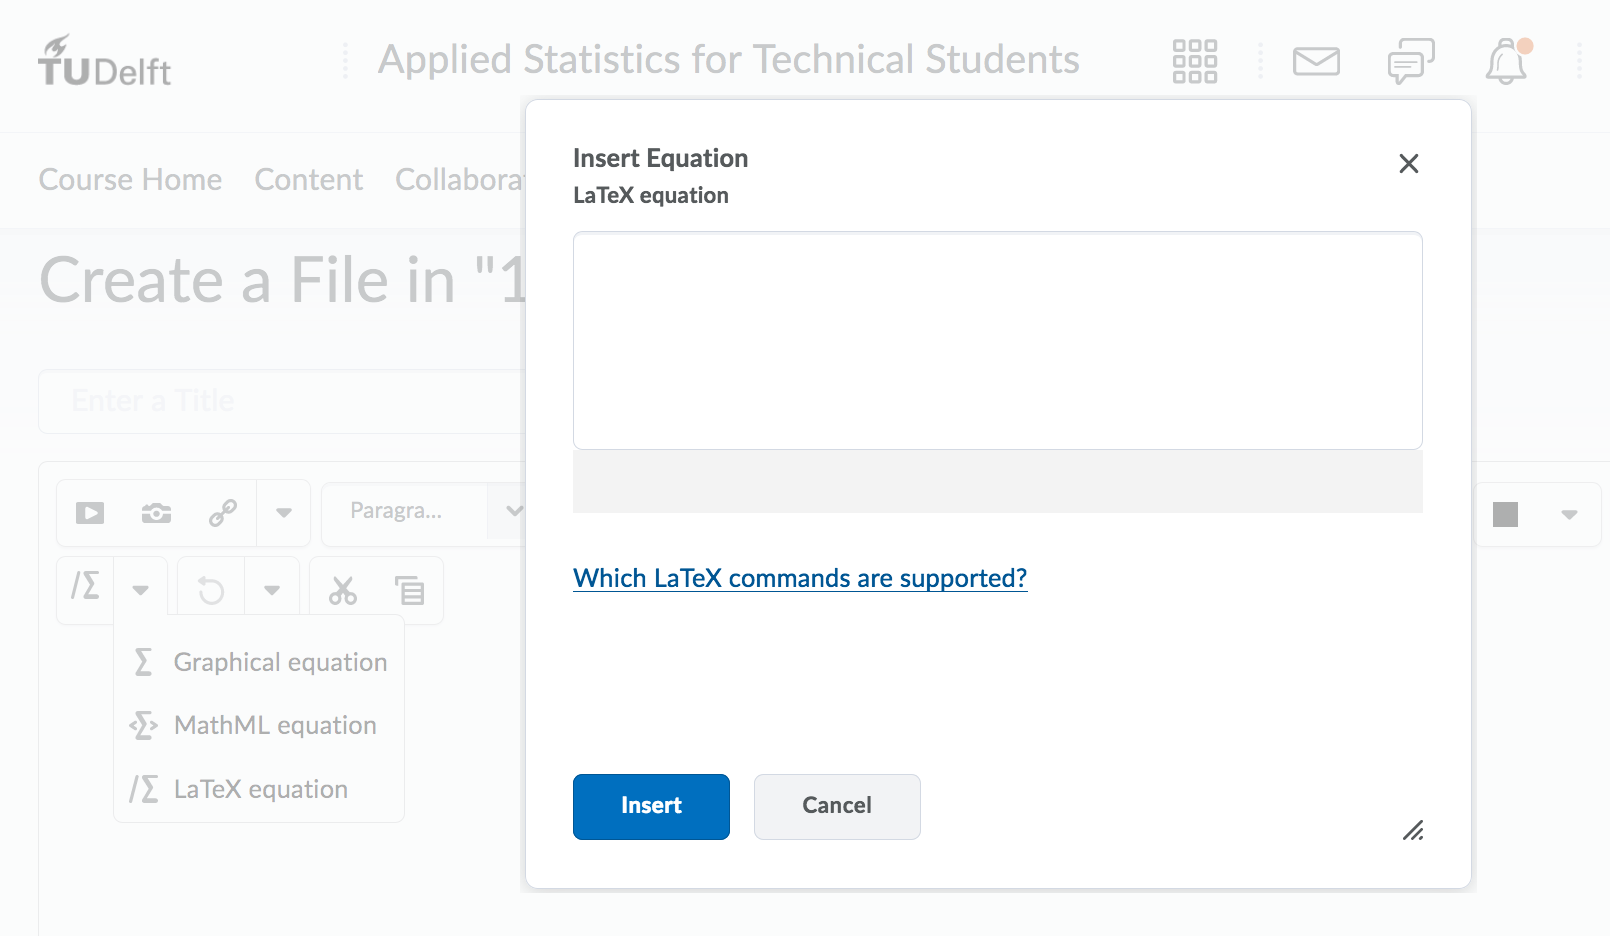
- Click to expand the drop-down menu right next to the sigma symbol and choose LaTeX equation from the list.
 The LaTeX equation editor will open. Note that it might take a few seconds to load. Once opened, you can start typing your formula. There are also guidelines provided: simply click on Which LaTeX commands are supported? to view them. As you type, a preview will appear just below the text box.
 - Once complete, click on Insert.
- You can now continue writing the rest of the text in the text editor and click Save and Close, or Save to save it.
When using the Brightspace editor it is possible to use inline rendering of LaTeX formulas. This works in any place where the Brightspace editor is used, for example quizzes, assignments and content topics. You can use the LaTeX syntax in the editor directly without the need for the separate formula editor. An example of the way this works can be seen below. The first image is the view of the Brightspace editor and the second image is how the text, of a content item in this case, is displayed to users.

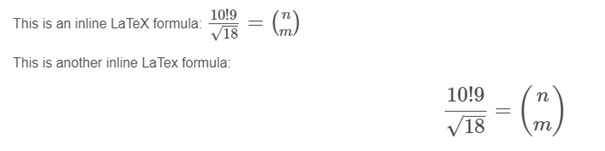 The \( \) syntax renders the LaTeX formula within the sentence and the dollar signs center the formula.
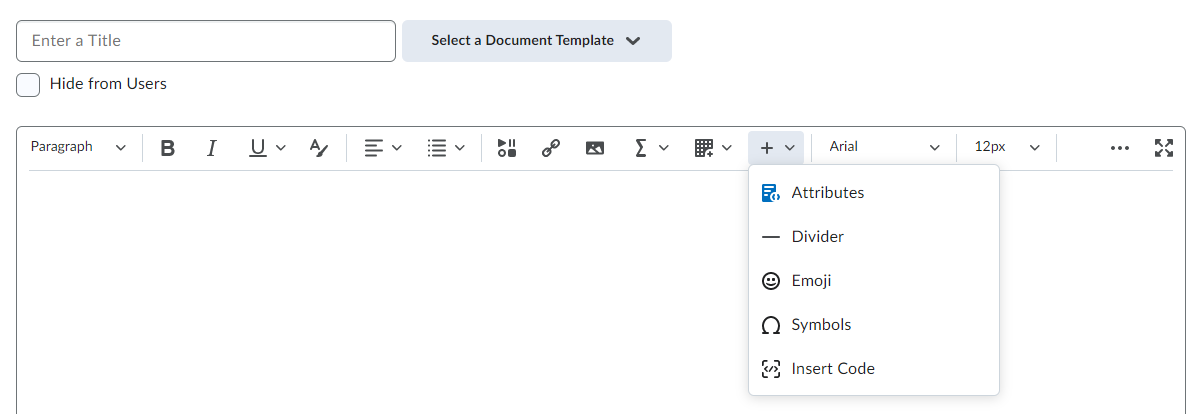
You can add code blocks to your content by navigating to the + sign of the editor and choosing Insert Code (see screenshot below). This code cannot be executed or run, but it does allow you to share code blocks with students in various languages. If you want students to edit code, run code and submit code assignments, please have a look at our Vocareum page.
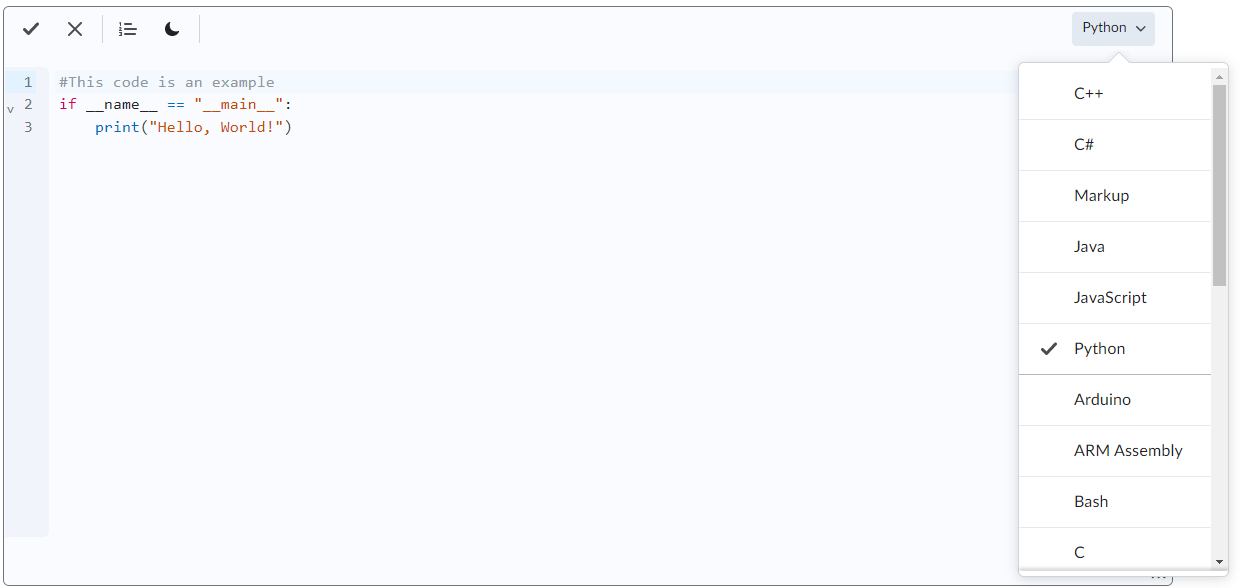
 Clicking on Insert Code opens the code editor where you can select your coding language by clicking on the language name (Included languages are: C++, C#, Markup, Java, Javascript(default), Python, Arduino, ARM assembly, Bash, C, C-like, CSS, Haskell, JSON, Kotlin, LaTeX, MATLAB, Plain Text, R, Racket, Regex, SQL and Wolfram). Once a code block is selected the language will be shown in the top left corner of the code block.
 In order to save or close your code editor, you need to use the √ or X buttons at the top of the code editor. Note: Clicking on the regular Brightspace Save and Close or Save buttons will close the page without saving the block of code to the HTML editor.
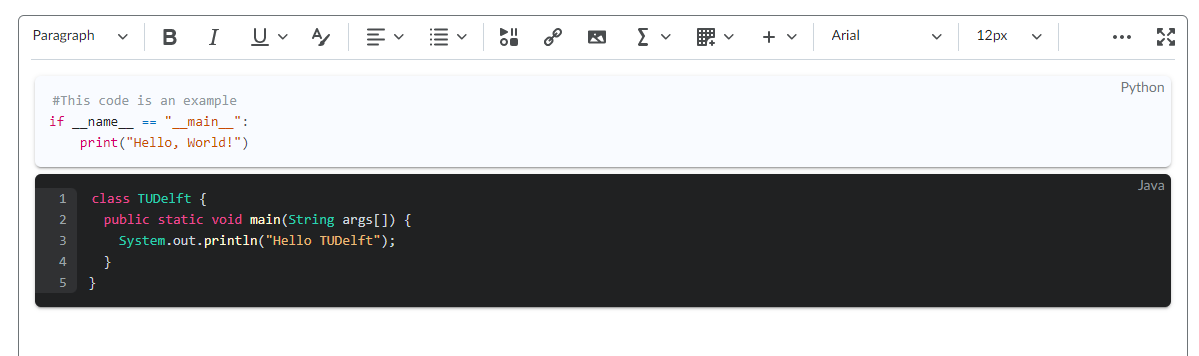
To include the line numbers in the code block, click on the Line Numbers icon at the top of the code editor. This setting will be carried over to the code block as shown in the HTML File editor.
If you want the code block to have a dark theme, click on the Moon icon (or Sun icon to reverse) at the top of the code editor. This setting will be carried over to the code block as shown in the HTML File editor.
Each code block can have its own settings, as seen in the screenshot below:
To edit a code block, click on the code block to open the code editor for that specific code block.
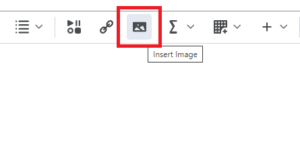
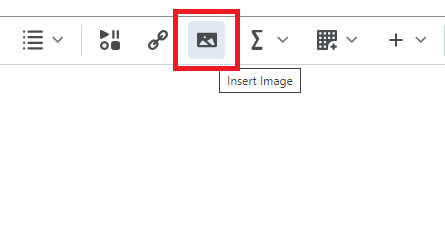
- Select Insert Image icon.
- Select where your image is available and click on Upload
To learn more about how to upload videos to Kaltura, you can visit this page. To learn more about how to add videos to Collegerama, take a look at this page. Information about adding Collegerama videos to Brightspace can be found here. The information below is about uploading videos from another server.
To upload videos from another server, like YouTube or Vimeo, follow the steps below:
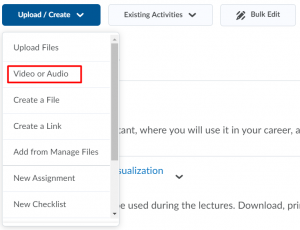
- Start by clicking on Upload/Create, select Video or Audio and then on the new menu select Web Video or Audio
 .Brightspace supports video uploads from different streaming servers, including the ones shown in the list below.
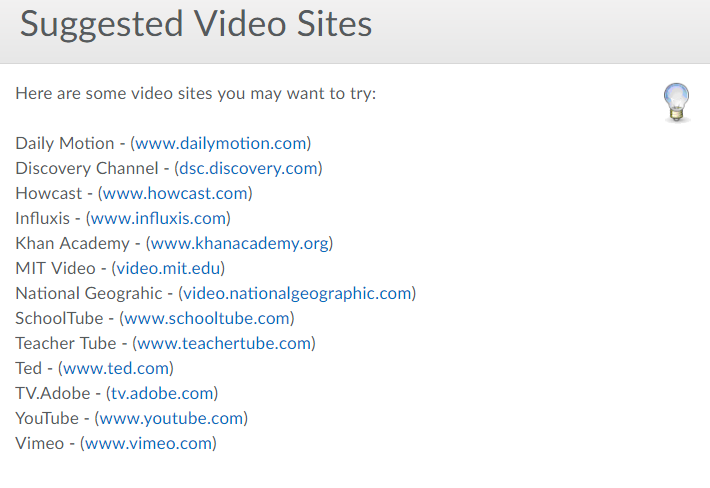
- Paste the URL of the video from one of these sources mentioned in the URL box.
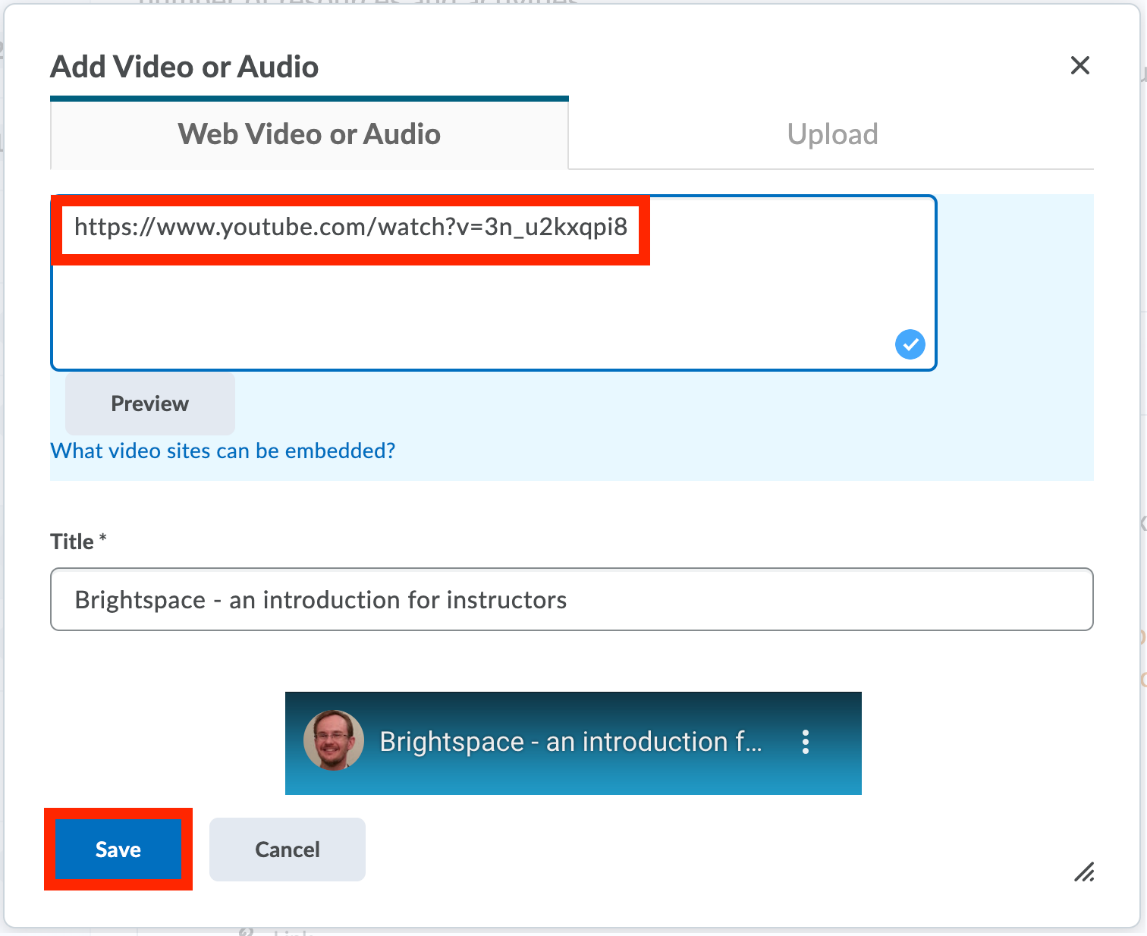
- Give your video a Title and click Save.
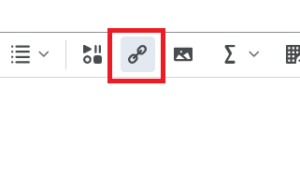
- Select Insert Quicklink icon.
- A new pop-up window opens with the list of course materials.
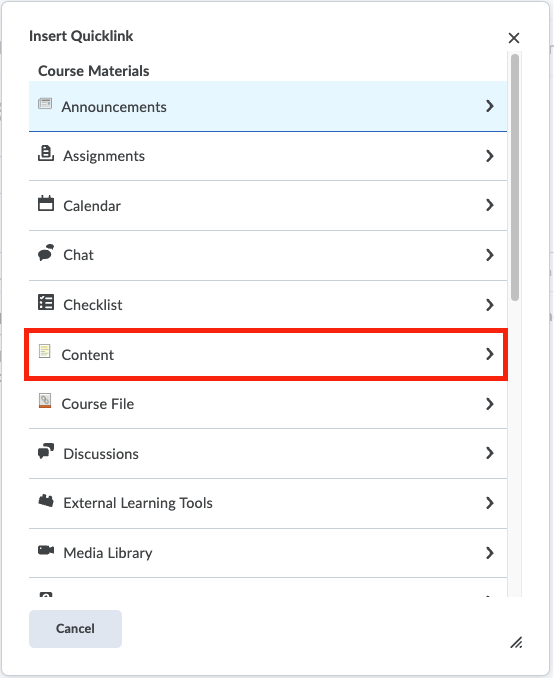
- Select the content you wish to hyperlink. Note that it is possible to directly link content modules, submodules and course overviews (if available).
- To hyperlink a submodule, click the module where that submodule is included and then click the + sign.

- You can choose the text that you want to link. After you click insert, you will see your submodule hyperlinked within the text field.


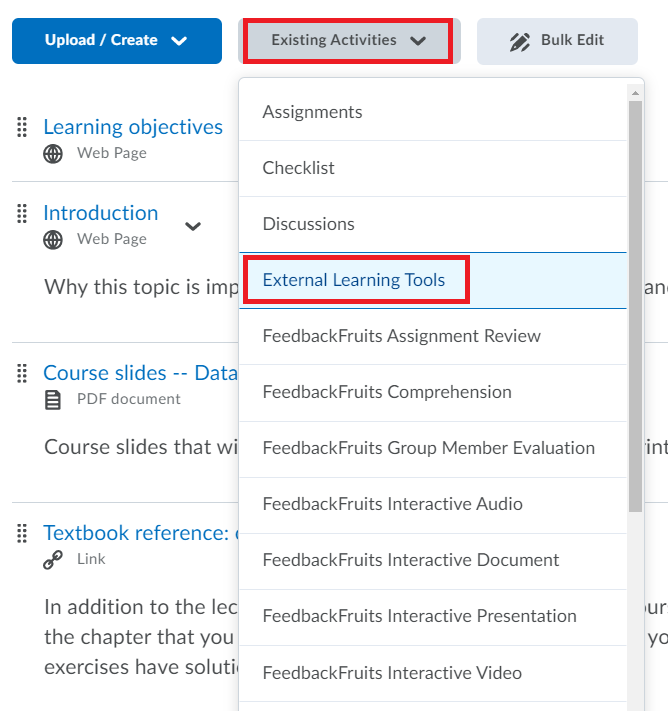
- Create/navigate to the module where you want to place, for instance, a Buddycheck tool.
- Click on the Existing Activities button to open the menu options and choose External Learning Tools.
The Add Activity pop-up window will open.
- Scroll down the list to find the tool you want to use. Once you click on it, the link to the tool will be inserted on the page.

- You can now click on the menu arrow to add/edit a description of the tool – this is where you will write instructions for your students on how to complete the task.

While the description is in editing mode, you also have the option to:
- Change the title of the link;
- Add date restrictions to limit the time during which your students can access it;
- And, change the Requirement settings.
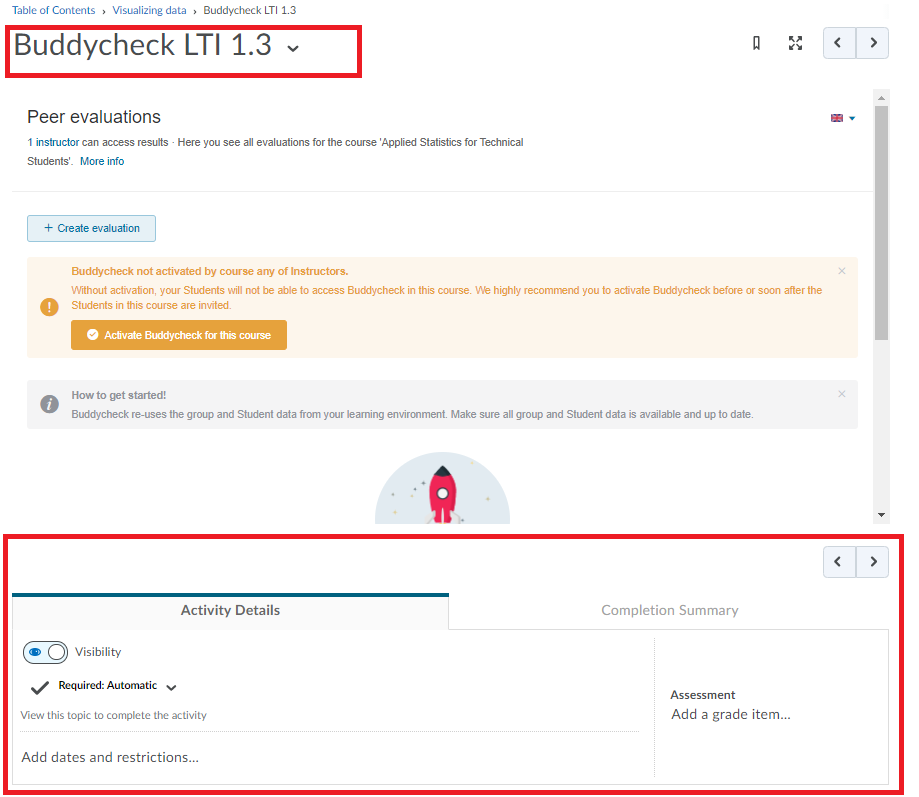
- Click on Update once you are done. You can now continue adding content to these tools.
Click on the link below to a list of available learning tools at TU Delft:
Simply select the external tool of your choice from the list. Once it appears on the course page, you can click on it to add and change content.
Brightspace offers different ways for making learning more fun and more interesting for students. You may have already seen the External Learning tools to add video’s, links and topic specific tools such as Maple TA and Kaltura.
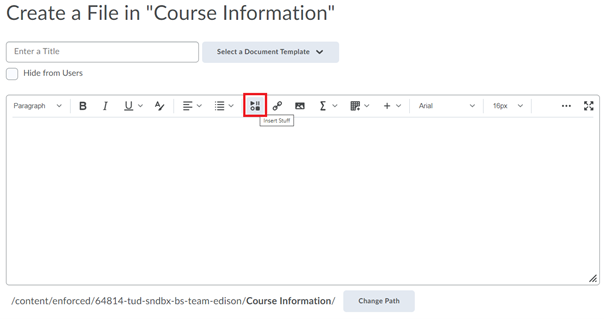
An alternative quick way to add ‘External Content’ to your course is through Insert Stuff. Insert Stuff allows you to place specific content items, such as specific videos.
- Go to your course and the module in which you would like to place the content
- Select Upload/Create
- Select Create a file
- Select the Insert Stuff button:
- Select the Learning Tool from which you would like to insert content.
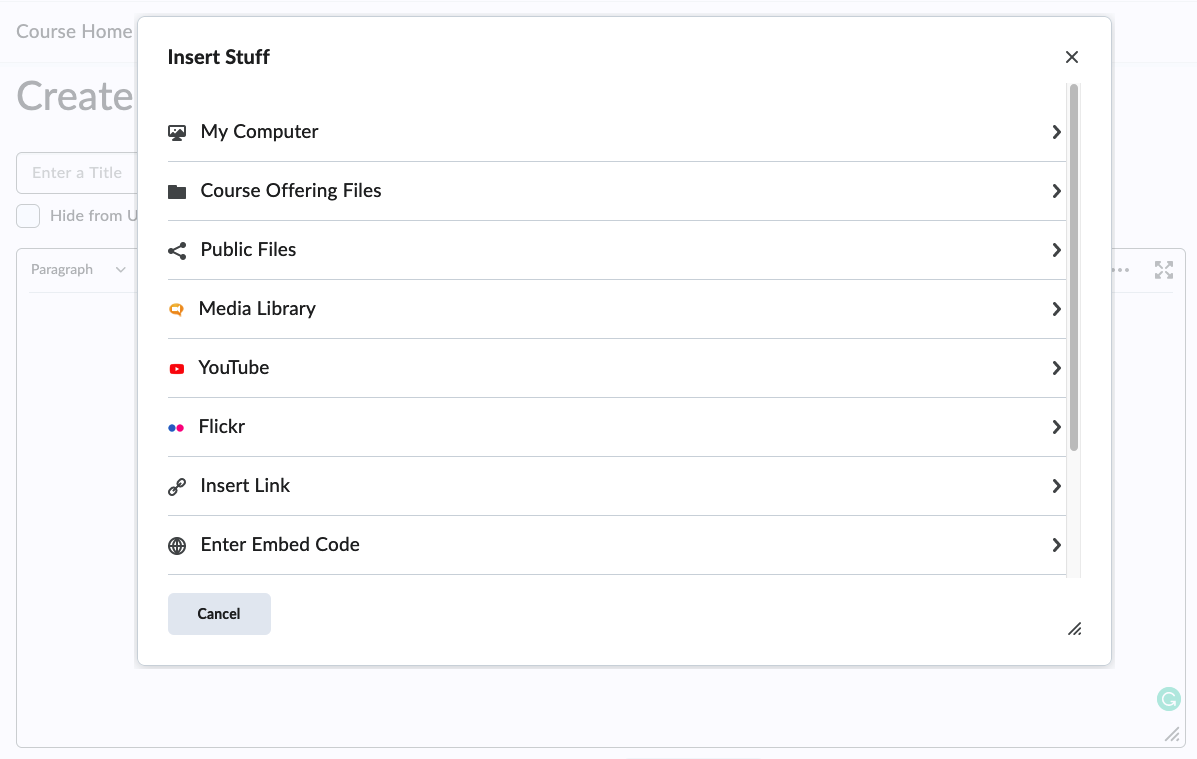
- From here, each tool works slightly different but all tools allow you to choose content and then press Select.
- The content is placed in the text field of the file.
- Add a Title to the file
- And select Save and Close or Save to add the file to your course’s content.
- Click on Upload/Create;
- Then click on Create a Link.

- Give the link a title, this title is what students will see in Brightspace. The URL is the address of the link that they will go to.
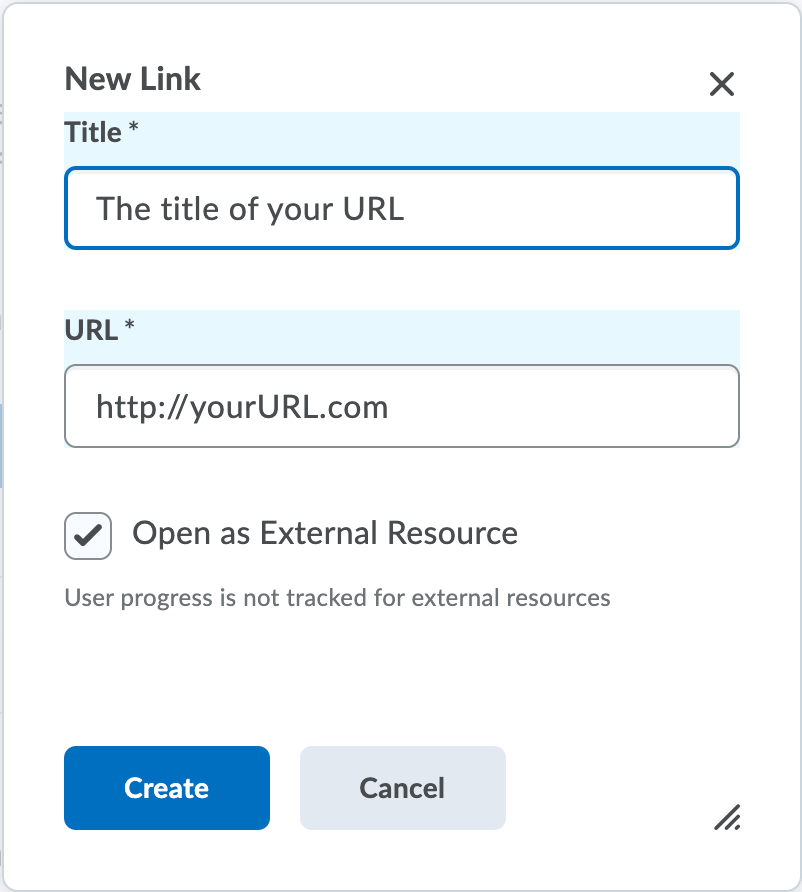 We always recommend that you choose: Open as External Resource. This is because this setting always works. These resources will then open in another tab in the user’s browser, clearly indicating that these exist outside Brightspace. If you leave this checkbox unselected, the resource will be embedded within Brightspace, which might not always work. Some websites explicitly do not allow themselves to be embedded within other sites. And websites without HTTPS security can also not be embedded in Brightspace, so must be opened externally anyway.
To add content from another course, you can use Course Copy. Follow this link to go to instructions on how to use Course Copy.
Add a description of what this content is, how it fits in the course and what you would like students to do with it. Do they need to read, learn, is it reference material, etc? The clearer you are in describing your expectations, the better the result!
Example description:
‘This video explains and demonstrates the techniques of water harvesting as discussed in the above documents. It will help you to visualize what is meant with a micro-catchment and how to set up a catchment system according to site specific needs. After watching this video, please answer the questions in Quiz 6.3.2, following this video.’
Uploading files
- You can upload almost any file format to Brightspace, including PDFs, PowerPoint lecture slides and programming language source code files.
- If equations do not display correctly in your PPT slides, upload the files as PowerPoint 97-2003 documents. Alternatively, upload them as PDF files, or insert the equations as images.
- The maximum size of files uploaded to Brightspace is 2GB. If needed, you can upload multiple files of max. 2GB.
- When uploading files, the file name may not contain:
- more than 128 characters
- illegal characters, such as: \ / : ; * ? ” < > | ~ # % & + { } –
Uploading files that do contain one of the above will result in an error while uploading or trying to access the file.
The quickest and simplest way to upload one or multiple files simultaneously is to drag and drop them into the content area directly where you would like them. You can do this by dragging files directly from your Windows Explorer window, or your Finder window if you are on a Mac, to your Brightspace course page.
As the files are dropped into the place, they will upload and a progress meter is shown for each file. The files are uploaded in the order that you dragged them. However, if the order is not quite as you would like them, you can rearrange the files after they have been uploaded. This is probably the easiest and simplest way to do it.
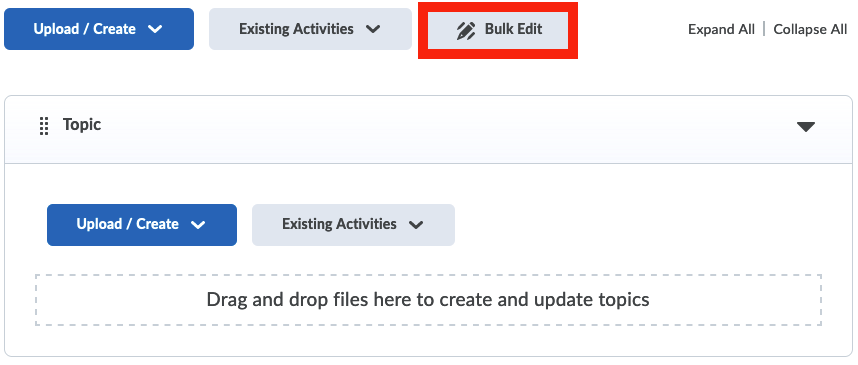
After uploading, you can individually adjust the settings for each of these files. The most convenient way to do that, if you have uploaded multiple files, is to use the Bulk Edit button.

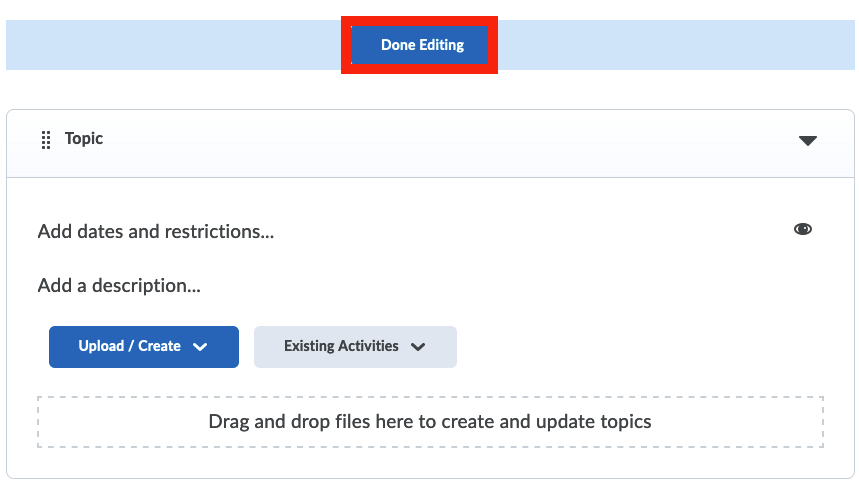
When you are finished, click Done Editing.
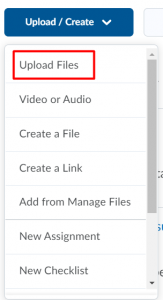
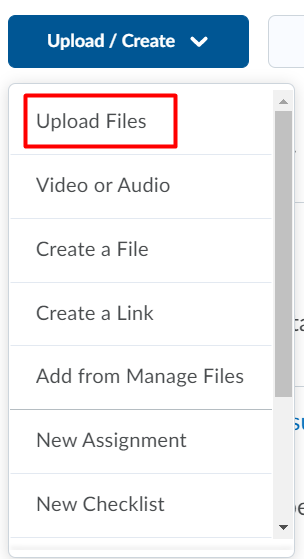
- Click on Upload/Create and then click on Upload Files.
 In this window, click My Computer to drag and drop your files, or click the Upload button, and select them from your computer. A progress bar is shown as each file uploads. The location of the saved files is also indicated here.
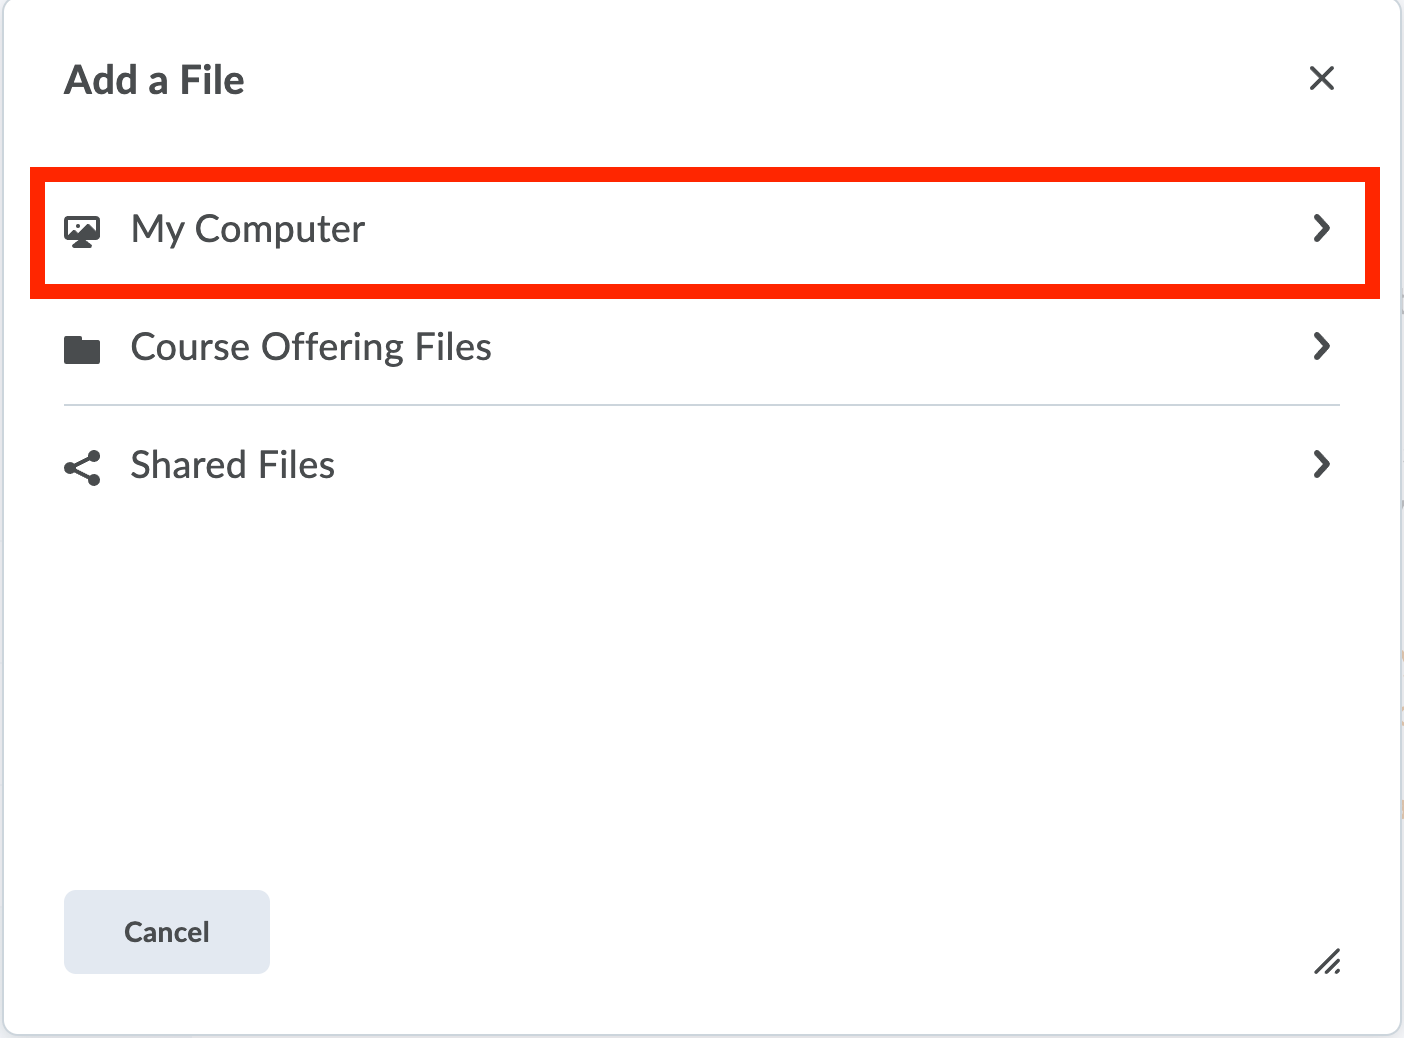
- When you have finished uploading the files, click on Add.
As your course progresses, you will be adding files, and sometimes you may want to reuse a file that you have already uploaded. So to add that file to make it visible to students now:
- Click on Upload/Create and then Upload Files;
- Once there, click on Course Offering Files.
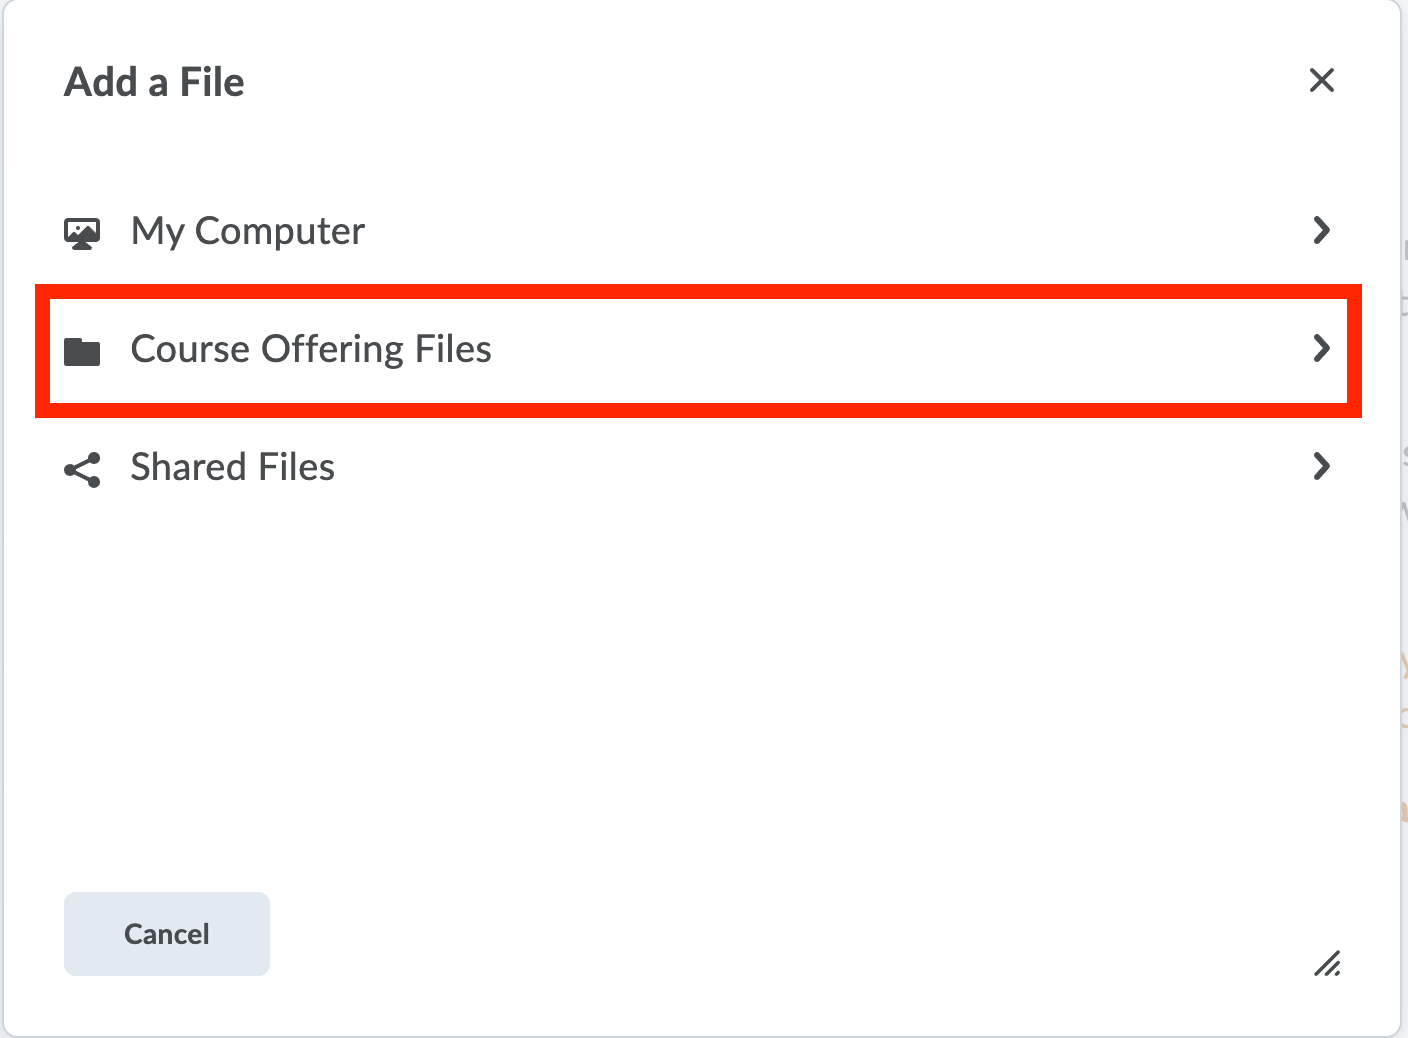
- Select the correct file from the shown selection, based on files you have uploaded at a prior time. After selecting a file, click on Add. The file will now appear in the content area.
A handy shortcut to get to the Course Offering Files, is to click on Upload/Create and then on Add from Managed Files. This takes you automatically to the “Course Offering Files” sections.
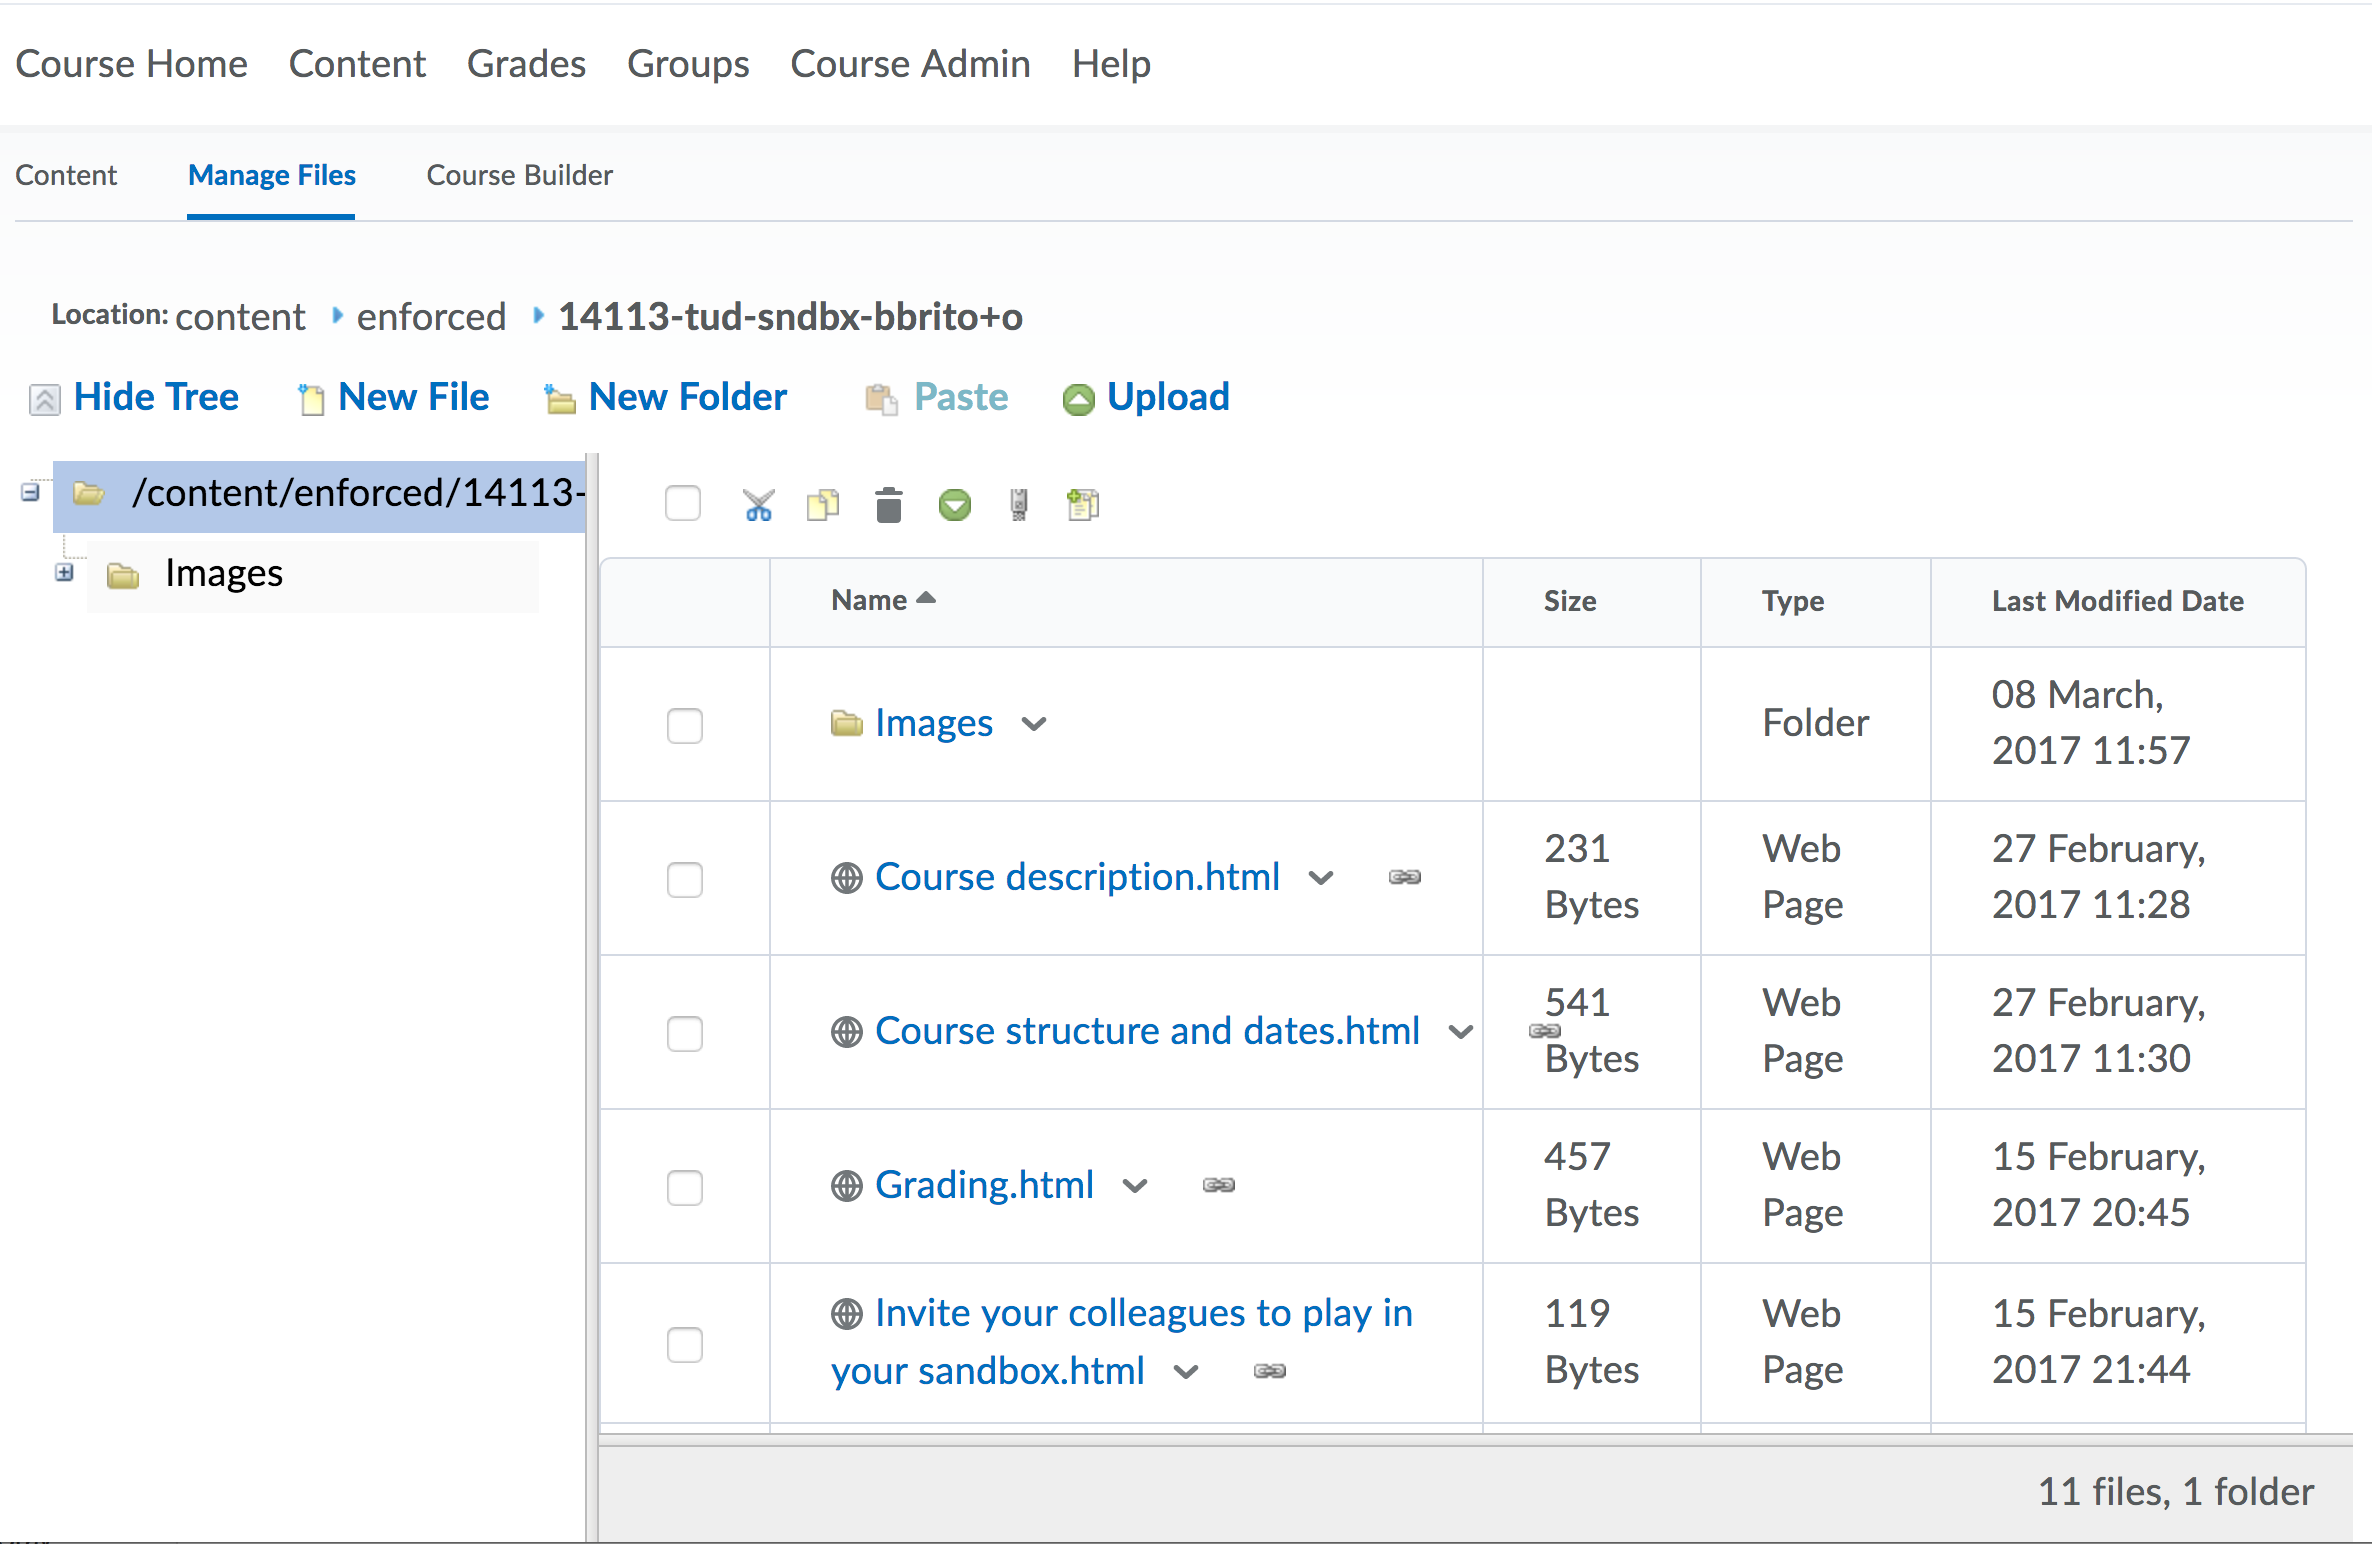
As you can see, Manage Files is a fairly important and useful feature in the Brightspace environment. To access this:
- Click on Course Admin and then Manage Files (under the Site Resources section).
- Here you can click on Upload to upload multiple files, or you can click on New File to create a single new file in the course folder.
You can use this area to manage files, to re-categorize them, move them around. Any links to existing course content are automatically updated, if needed.
Editing/Deleting content
If your course includes a lot of content, it is sometimes necessary to change settings or tweak text for all items. In this case, the Bulk Edit option may save you time. For example, you can use the Bulk Edit function to set multiple files to Visible or Hidden from Users, or if you want to change release conditions or dates.
To use the bulk edit feature, follow these steps:
- Go to the module or folder where you want to make changes. Click on Bulk Edit at the top of the page to make all content items editable. You can then add dates and restrictions, edit item visibility, edit descriptions or delete items.
- After making the desired changes, click Done Editing at the top of the page to save all changes simultaneously.
Each content item can be set to Visible or Hidden.
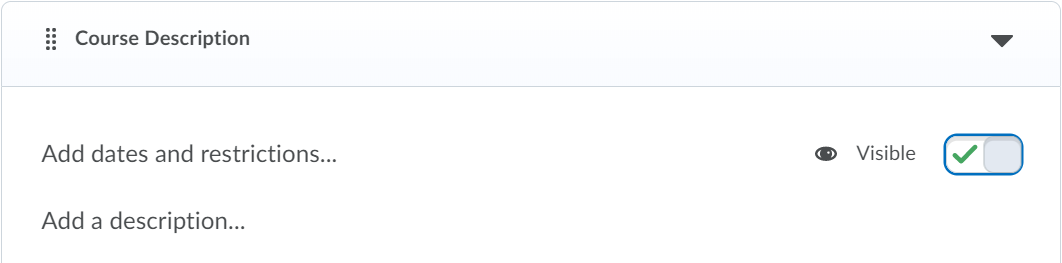
Use the checkbox to set the item to Hidden or Visible for Users.
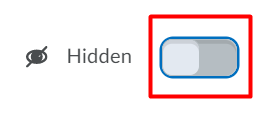
If an item is set to Hidden, it is never visible to students, no matter what the date and time settings are.
The Hidden setting is helpful if there are items that you only want to share with your teaching assistants, but not with students. Similarly, you can use it while you are building your course, by setting the status of your modules, submodules and/or topics to Hidden.
When you create content items, you can also add a description so that students can see more information about the item. This could be text, images or even a video.
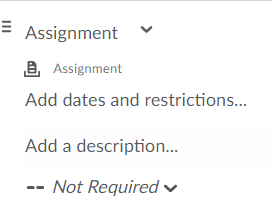
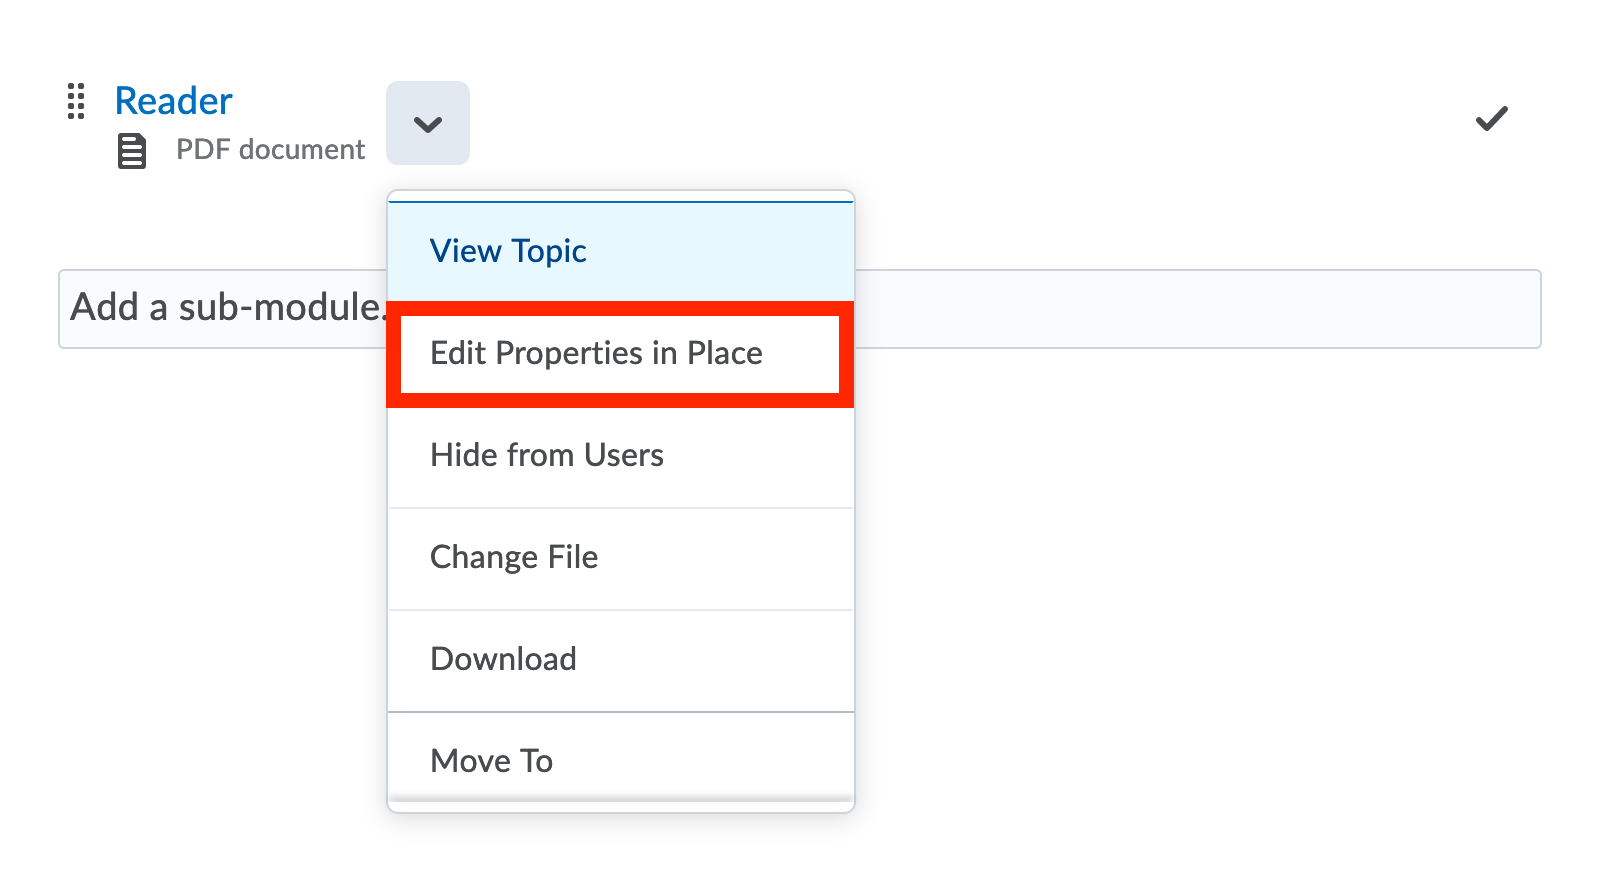
- Click on the drop-down menu of the content item and select Edit Properties In-place.
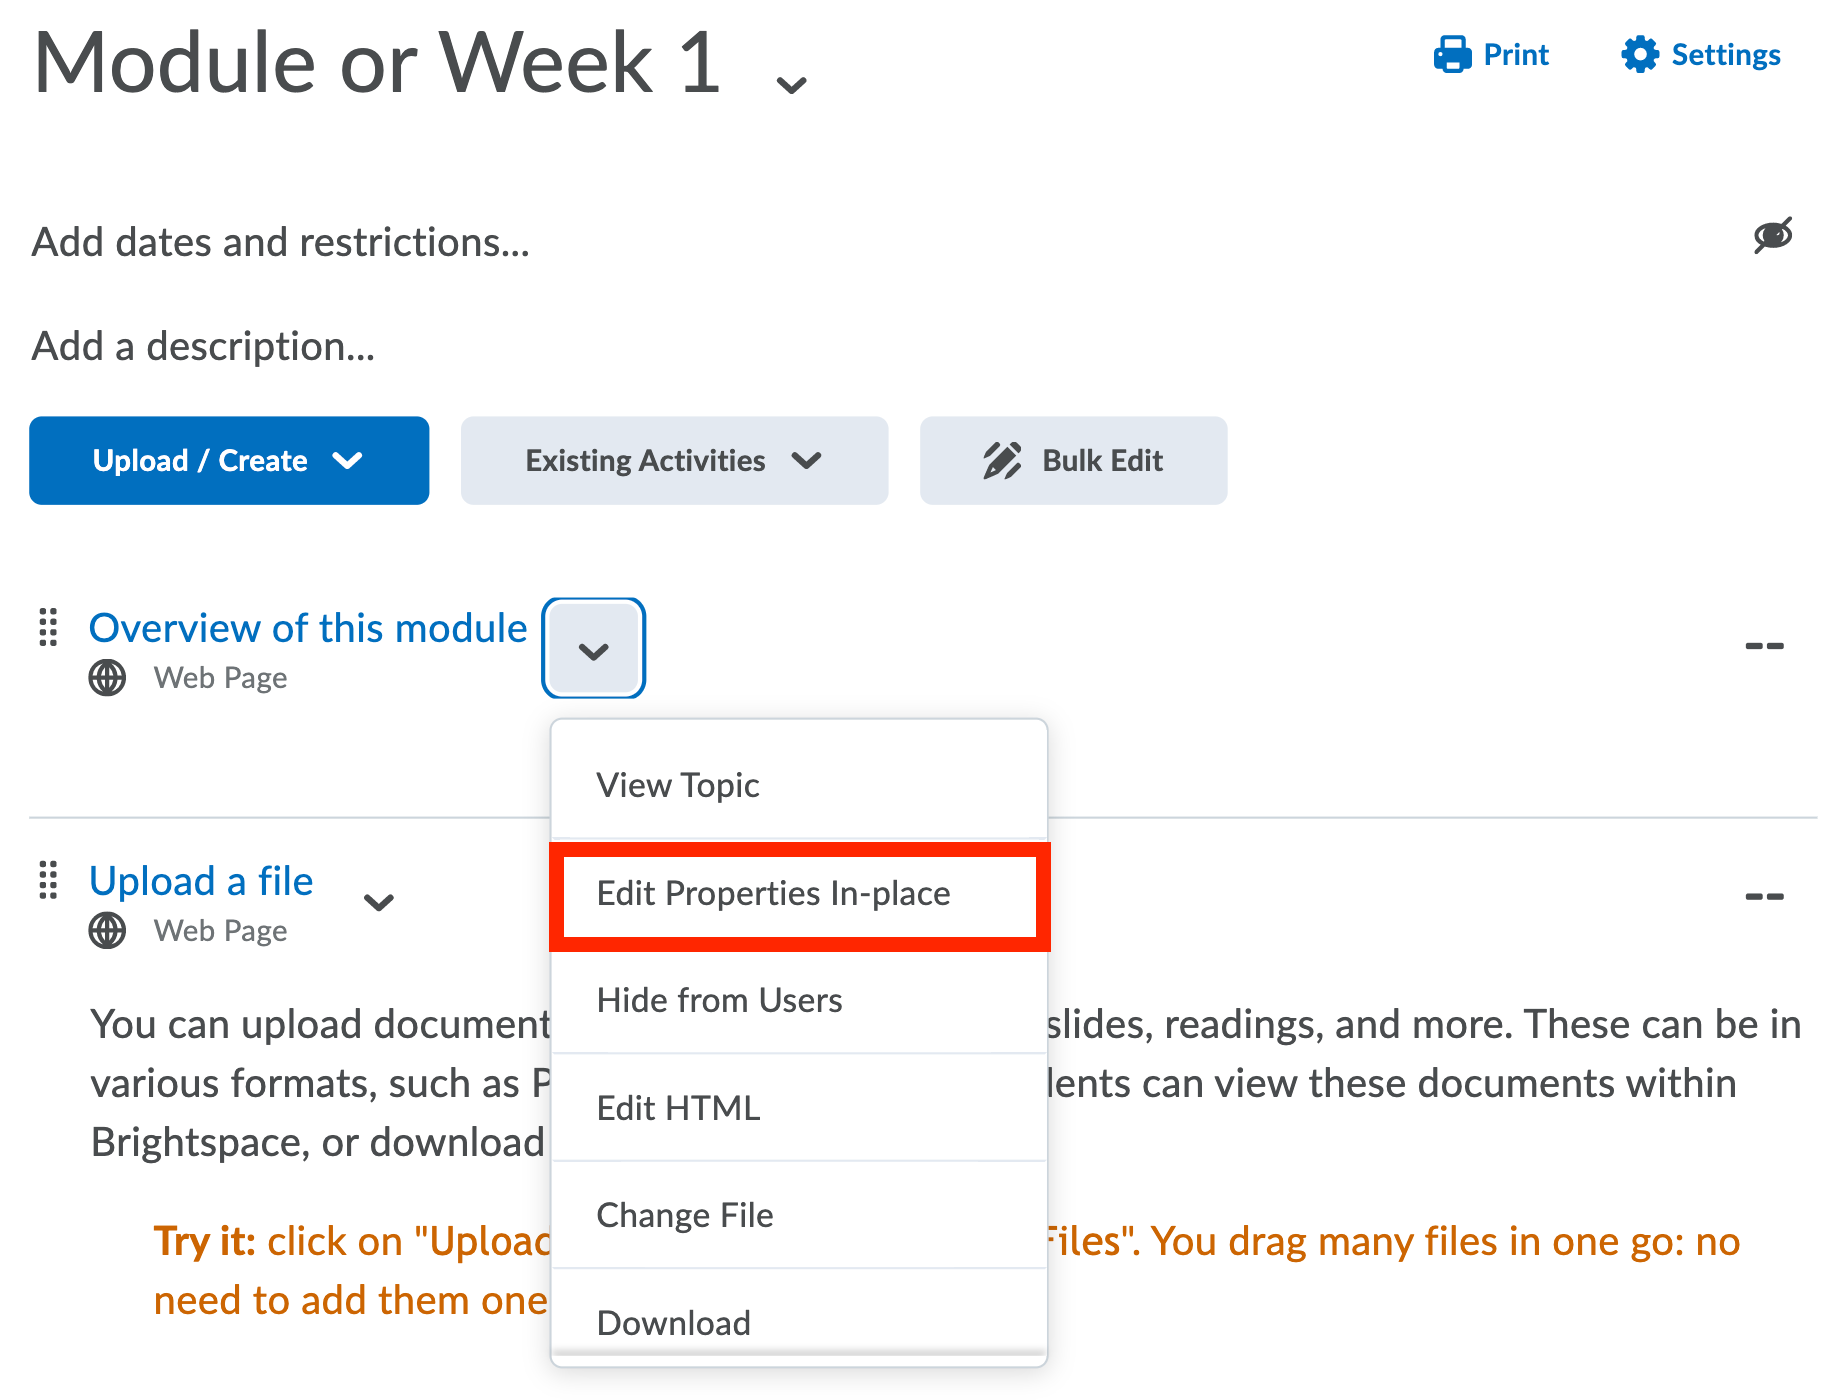
- (optional) To edit many items at once instead of step 1 click Bulk Edit.

- One of the options that now appears under the content item is Add a description…, click this to start editing.
- A text editor will open where you can add all relevant information. This is the same text editor you see when you create a page, to see more on how to use this editor click here.

- When you have finished click Update (or Done Editing in case of step 2).
When you set content items to Published you can also add a date, so that it is only available to students sometime in the future.
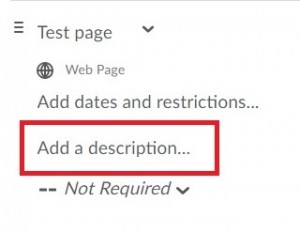
- Click on the drop-down menu of the content item.
- Select Edit Properties In-place.
- You can now set a date for the item to become available, under Add dates and restrictions…
After adding a content menu with a date restriction, the students will see the title of the item that will become available, including the availability date. However, they cannot click on this item. The item will automatically become available to them after the filled in date and time are reached, if the item is set to Visible.
When you attach a release condition to an item, users cannot see that item until they meet the associated condition.
If you attach multiple conditions to an item, users must meet all conditions before they can access the item. For example, you could require users to visit the first three content topics in a unit before gaining access to an associated quiz.
Examples:
- Attaching a release condition to the second topic in your course’s content area that would hide that topic until users viewed the topic before it.
- Creating a condition that required users to view a content topic before gaining access to a quiz, or one that required them to post to a discussion topic before they could see a content module.
Adding a release condition:
- Click the drop-down option next to the item(discussion topic, course file, quiz) where you want to set up the release condition.
- Select Edit Properties-in-place.
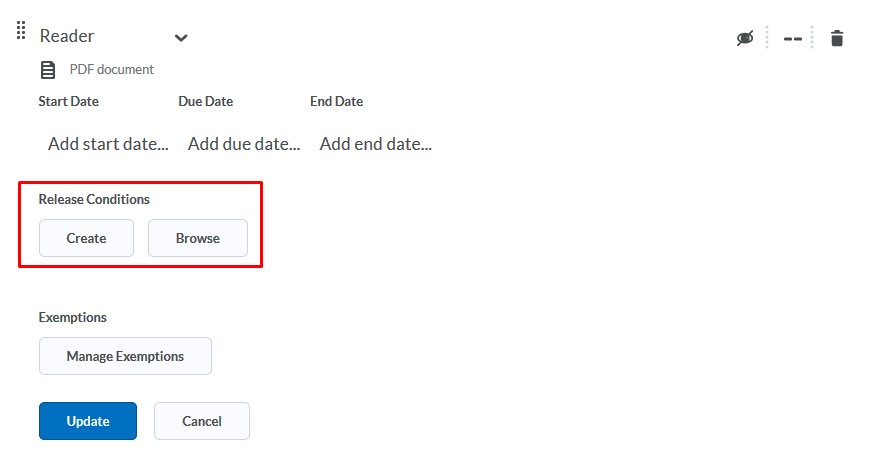
- Click Add dates and restrictions.

- From the Release Conditions, you have the option to Create a new release condition or Browse for an existing one.
 You can use an existing release condition if you want to release several items at once when a learner meets a single condition. To do so, find this release condition via Browse.
 - Alternatively, if you want to create a new release condition, click Create.
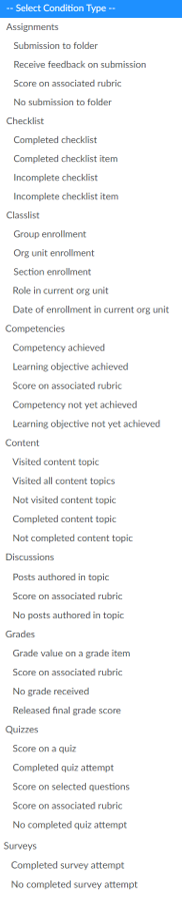
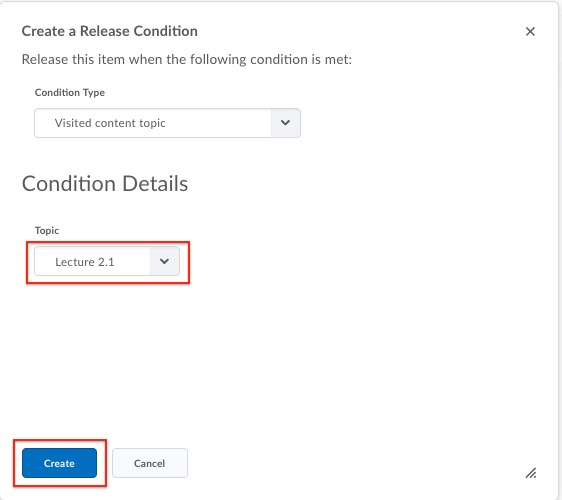
- From the Condition Type, select the required condition which should be met. For example: if the student needs to look at the lecture slides (say Lecture 2.1) before accessing the reader, in condition type, select Content and Visited Content Topic.
- In the Condition Details, select the Topic, so in this case, we select Lecture 2.1 and click Create.
For more information about completion tracking, please vistit this page
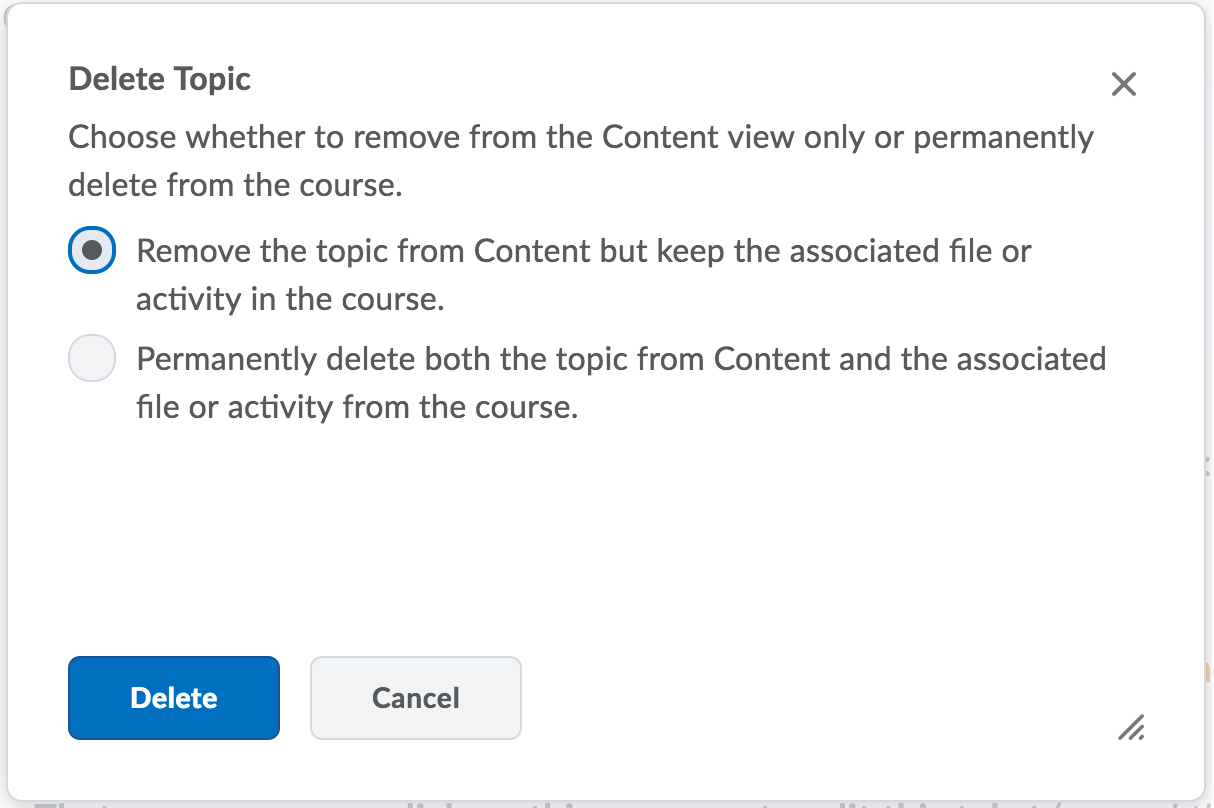
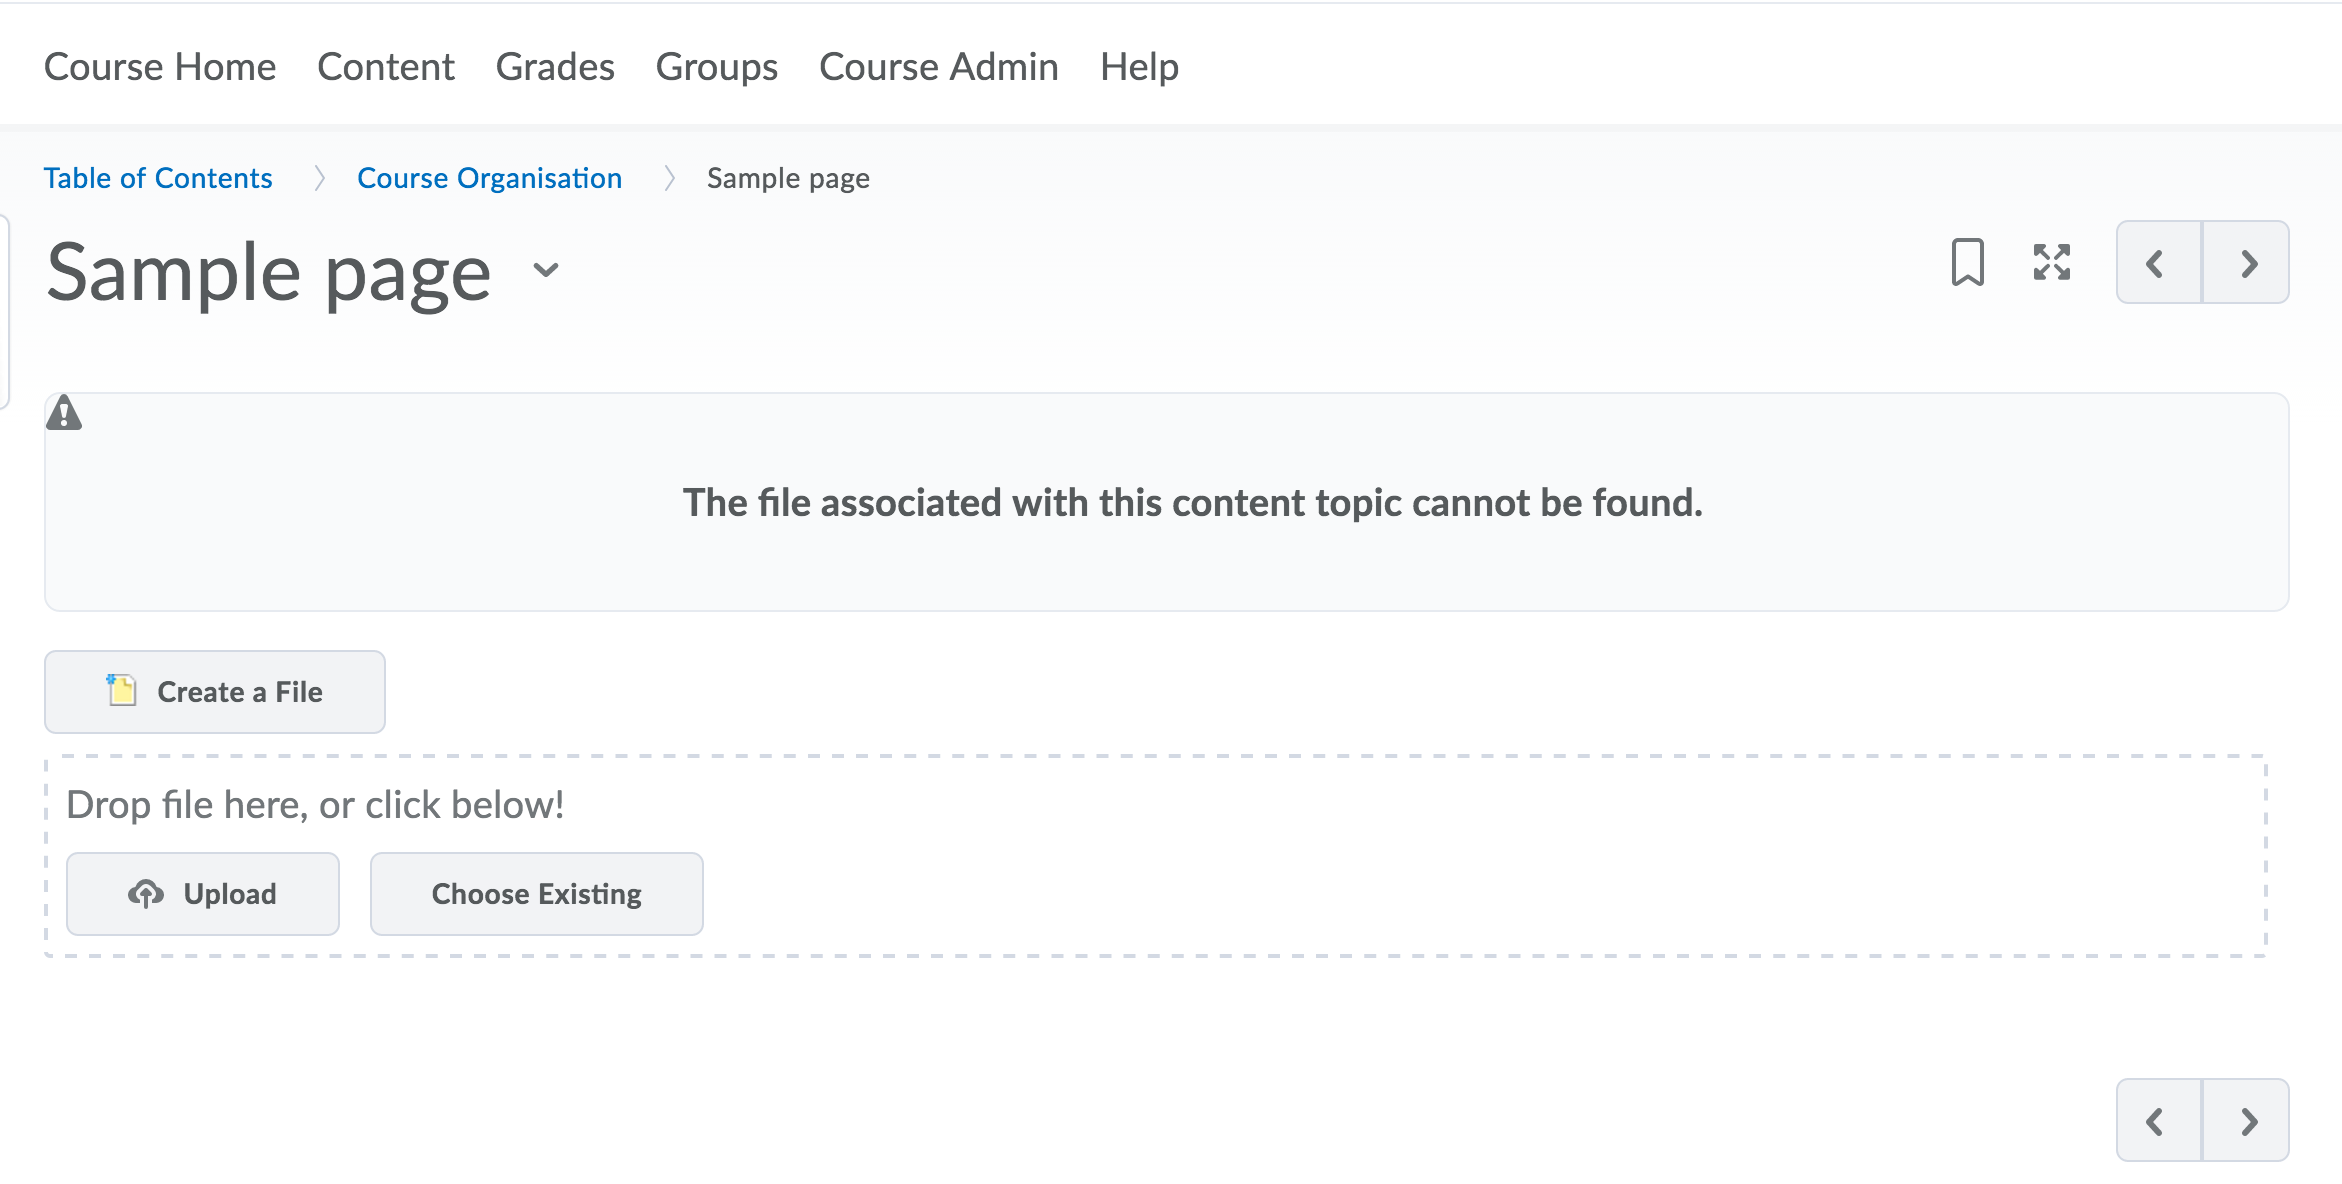
Go to the dropdown menu and click Delete Topic. When deleting topic items, you are presented with the option to remove only or to permanently delete. The first option only removes the topic from visual display, but the topic remains on your course’s website to be reused in the future. The second option will permanently remove the content from your course.
You can always check what content exists in your course before deleting it.
- Click on Course Admin.
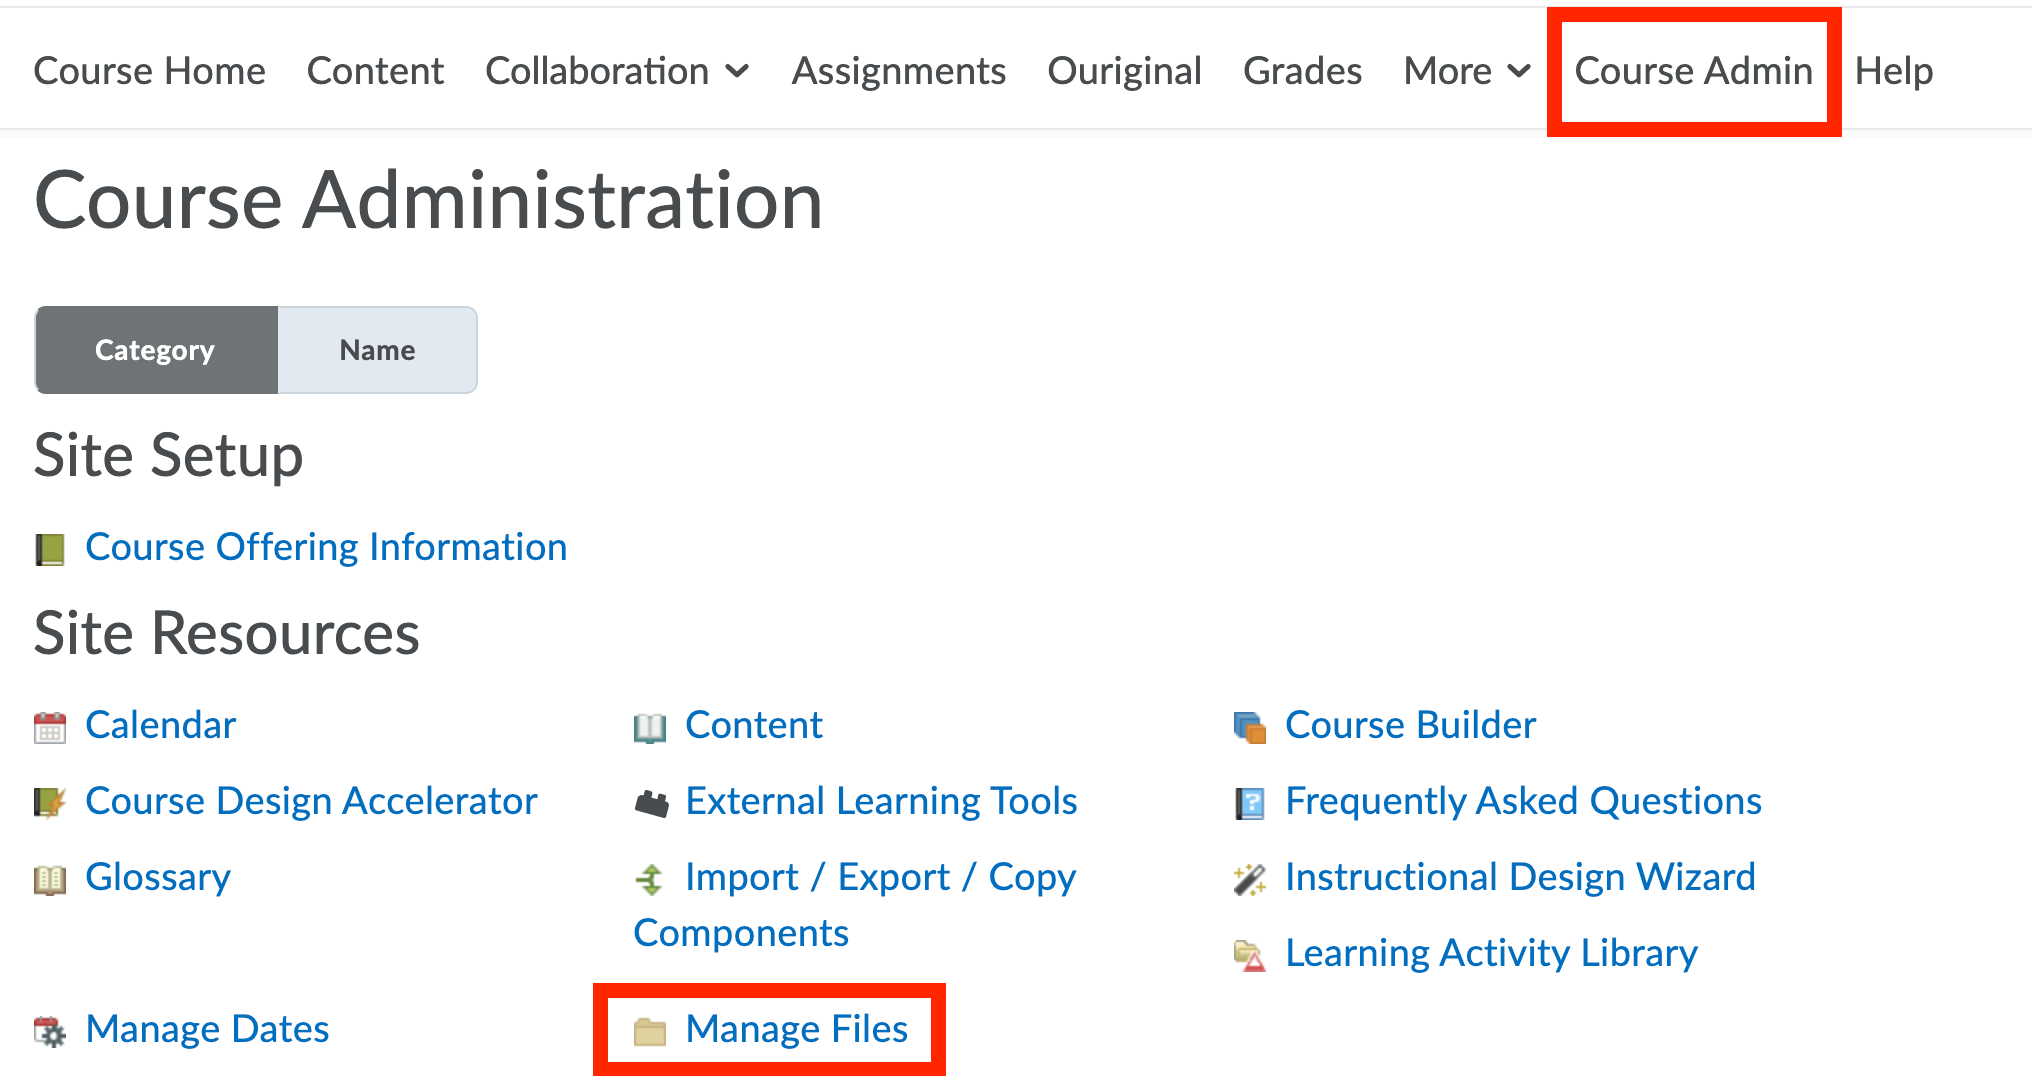
- Click on Manage Files to see a complete listing of your content. Read more about how to Manage Files in your course.
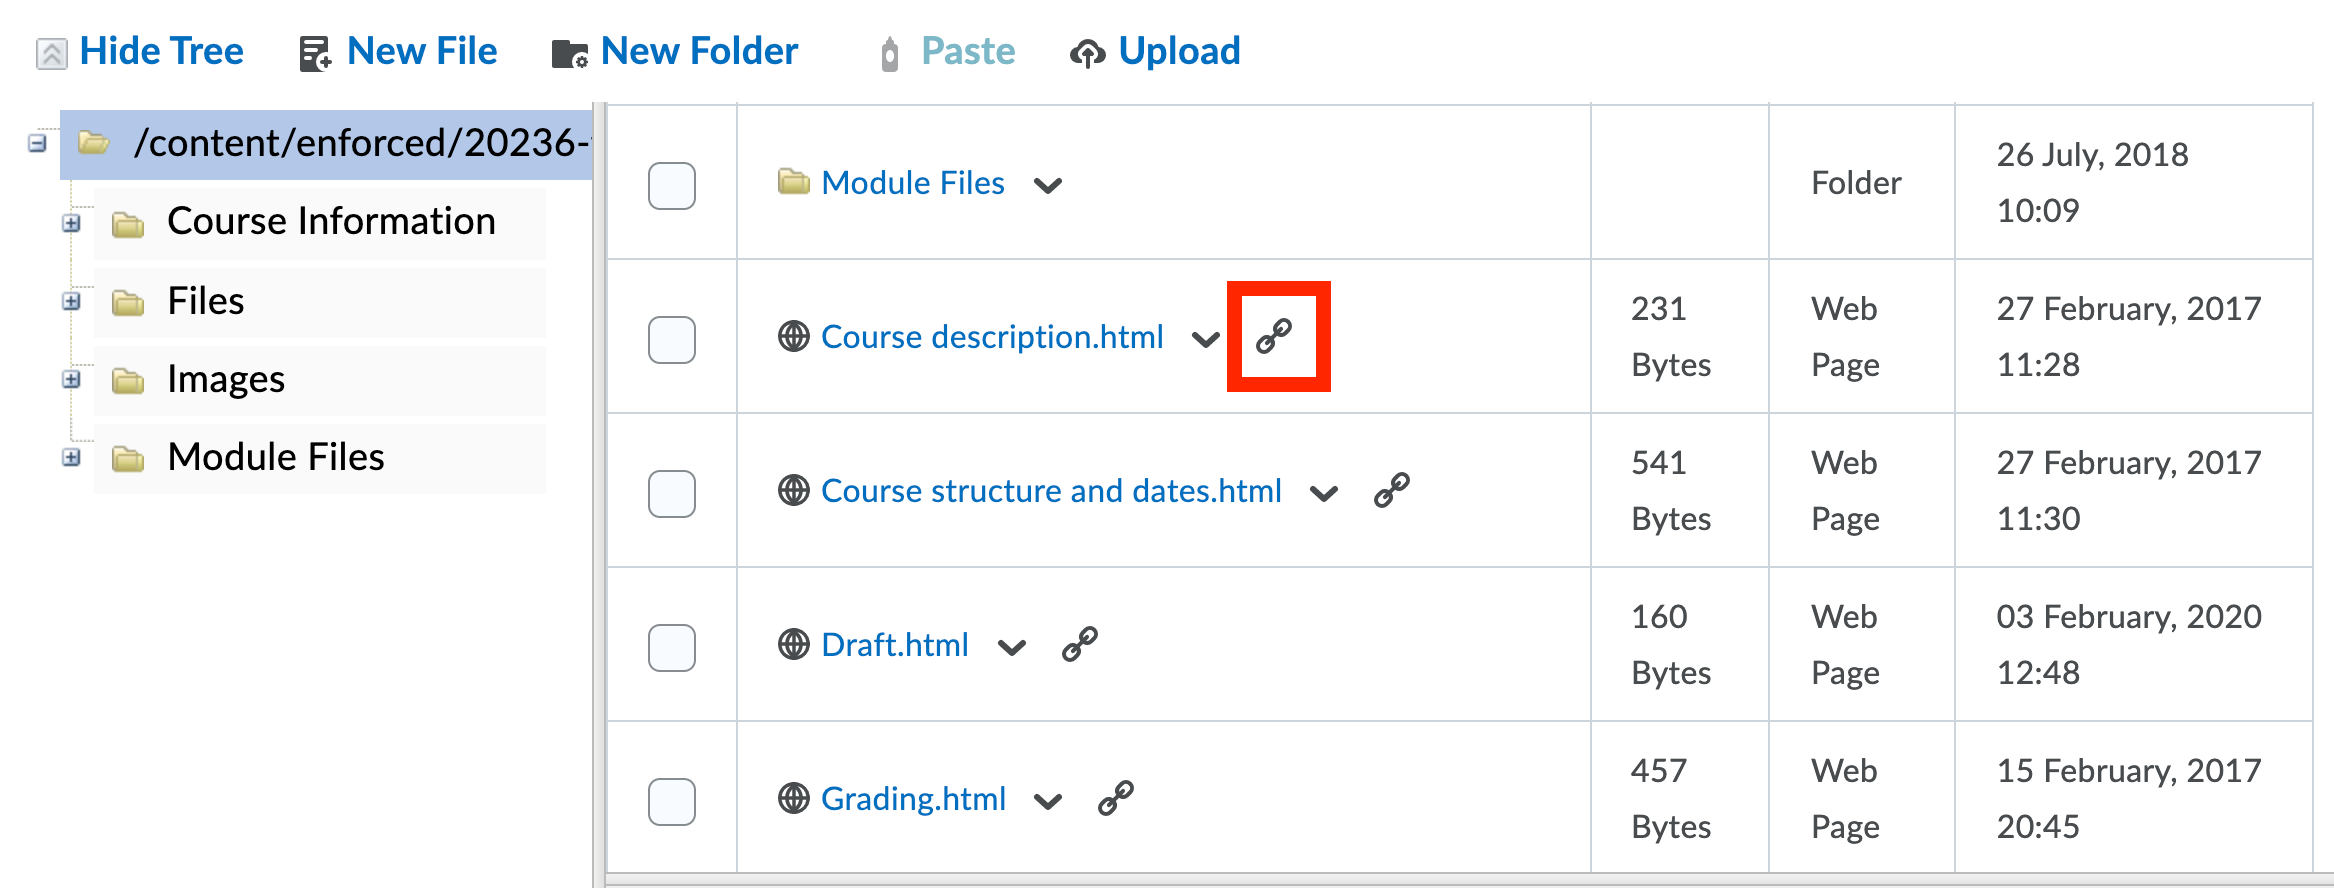
If there is a chain icon next to the name of a file, this indicates that this piece of content is still being used and linked in your course for other items such as an assignment. Items without a link can safely be deleted.
So, in general, use the first option to remove items you wish to reuse again in the future and use the second option to remove items permanently.
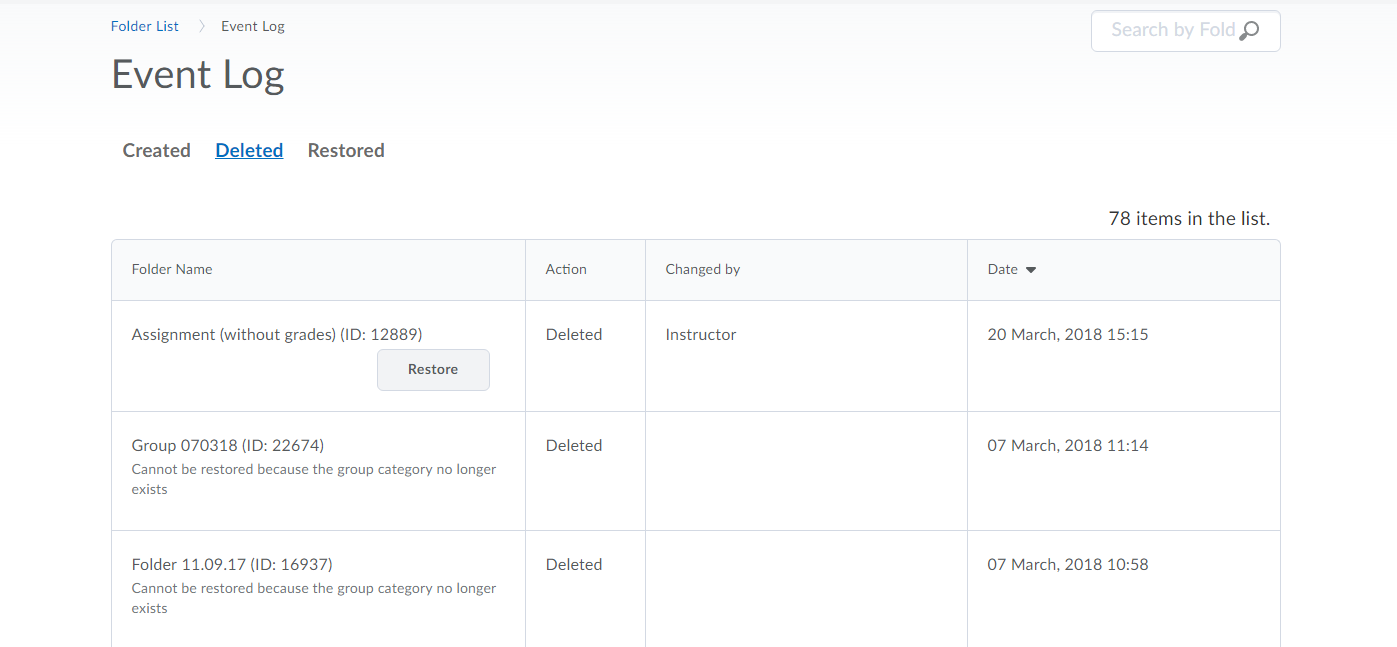
If you accidentally deleted an assignment submission folder, you can restore the folder as follows:
- Go to Assignments on the navigation bar.
- Click More Actions on the next page.
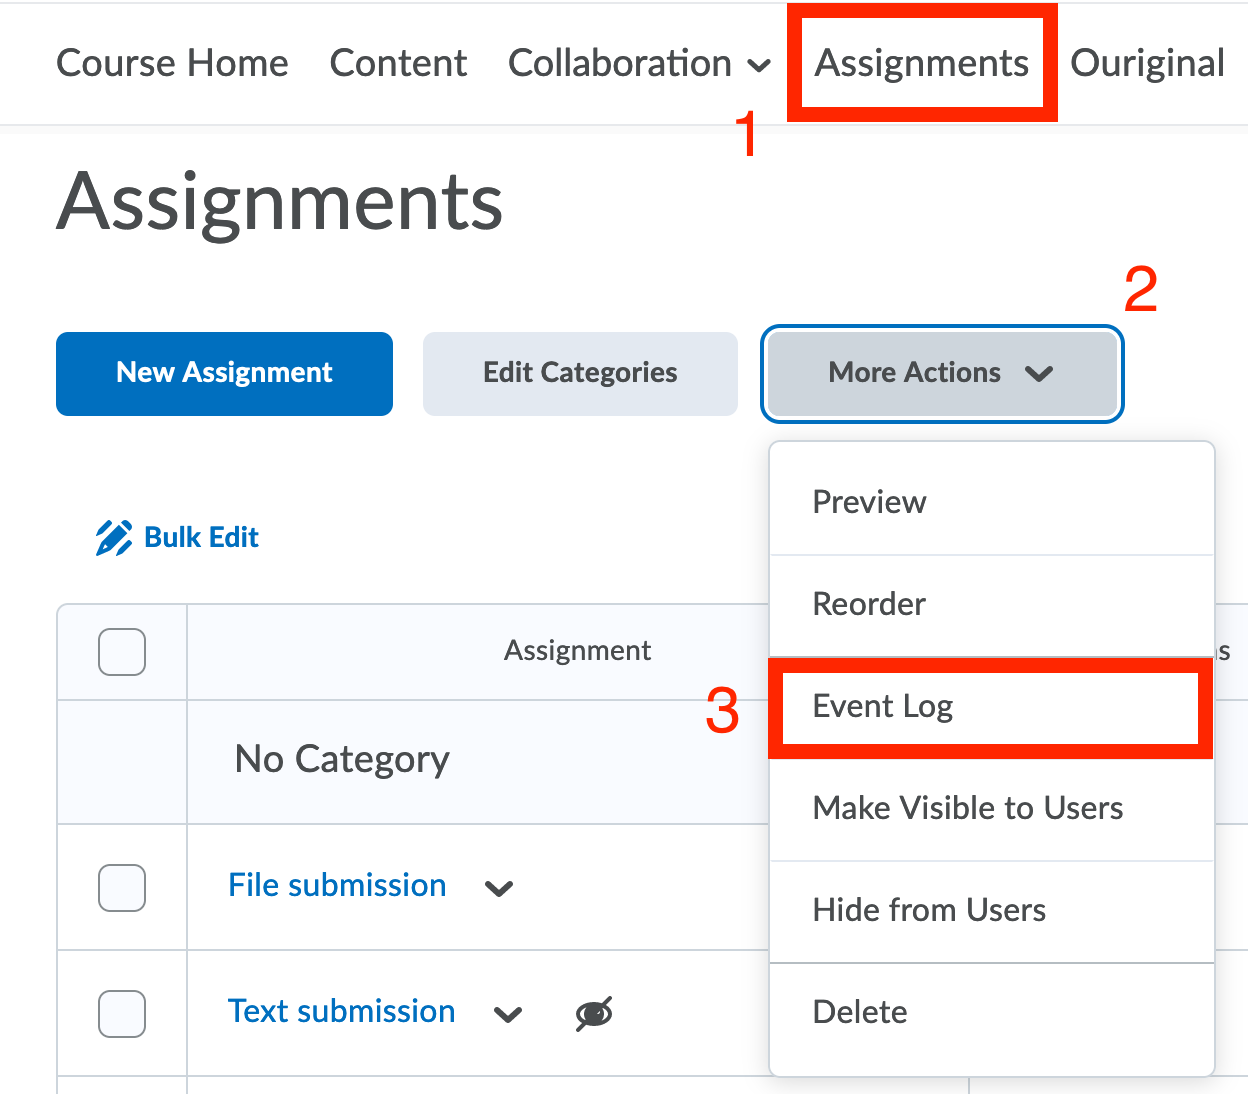
- Select Event Log in the drop-down menu.
- Find the deleted assignment on the list and click Restore.
More resources
Next to content there are several other learning activities to add to your course. Have look at the overview page of Adding course content/activities for more information.