Read this first
- Brightspace assignments can be used to distribute exams over your students, either as a whole exam, or -to diminish possibilities to exchange information on exam questions- per large question (max 2-4 questions). Students download the exam, create answers in a text editor (for example Word) or with pen and paper on blank sheets, and upload the result to Brightspace before the deadline (due date).
- If your exam will be split in multiple consecutive time slots, you will create multiple Brightspace quizzes, each with their own score.
Create a ‘category’ that will contain the grade based on the scores of the individual quizzes. - Your teaching assistants have access to assignments and quizzes. If your faculty, programme or Board of Examiners does not allow TAs to have access to assignments or quizzes before or after the exam, you will have to change their status to ‘student’. It is not possible to deny student assistants from Brightspace Support access to Brightspace Quizzes or Brightspace Assignments.
- The list of students who registered for the exam does not always match the list of students enrolled in your Brightspace course. As a result, students who did register but not enrol in Brightspace (e.g. students who failed the course last year), may miss official announcements on the exam. Therefore, make sure to enrol all students who registered for the exam in Brightspace and resend them important information on the exam, if needed.
Officially, students need to register for an exam in order to be allowed to take the exam. That way, the exam desk will check if students meet the requirements to be allowed to take the exam (e.g. passed previous tests or courses, enrolled in the programme, etc.). Registration furthermore allows you as a teacher enough time to adapt fraud prevention measures to the number of students participating (more students, more versions for example), prepare the settings of the exam for the individual students, and arrange extra correctors if needed to grade the exam before the deadline (10 or 15 working days after the exam date). - See here for more tips from lecturers who used Brightspace Assignments in Q3.
Communicate at least the following, for example by distributing relevant parts of the exam cover page.
- That students need to register for the exam, and enroll in the applicable Brightspace course.
- What learning objectives and subjects (reading) material the exam will and will not cover.
- Where they can find practice questions and answers that are exemplary for the exam questions (for example last year’s exam and model answer).
- What books/programs/mobile phone with camera/calculator you expect them to have available for completing the exam. Include clean sheets to write on.
- Information on the honour pledge: what does it contain and what are the consequences of committing fraud.
- What the exact procedure and used tools of the exam will be:
- What time will the exam be made available?
- If applicable: how many time-slots the exam will consist of?
- What time(s) students need to hand in what type of document?
- In case of hand-written texts, provide an example of a mobile scanning app to transform pictures of their work into a single pdf with their mobile telephone. They could also use a scanner. Indicate that students are asked to have a working scanning app available during the exam, which produces an acceptable file size (not too large to prevent delays due to uploading).
- How the timing and procedure will look for students with extra time (how-to’s can be found in this document).
- What will happen if the quiz is submitted after the deadline (you will only consider the answers that were not submitted after the deadline). That the students need to keep track of time themselves.
- When a practice test will take place.
- How you will make the answers and feedback available to the students.
Before you create the assignment, it is important to first create a grade item. When making the assignment, you will associate the grade item.
Learn how to create a grade item
Check whether the list of students who registered for the exam contains students who are all enrolled in Brightspace. If not, enrol the missing students in Brightspace. An exam ticket gives students the right to participate in an exam. Some students who are enrolled in your course are not registered for the exam. It depends on the programme your course is part of whether it is okay or not to give these unregistered students access to the exam. Ask your programme director in case of unclarity.
Prepare and fill a group for ‘All students who registered for the exam’ and a group for ‘Extra time students’. Use the ‘All students who registered for the exam’ for the restriction tab as a condition to get access to the Brightspace Assignment and the ‘Extra time students’ for assigning Special Access.
- Create the assignment.
- Associate the grade item you have created in the previous step.
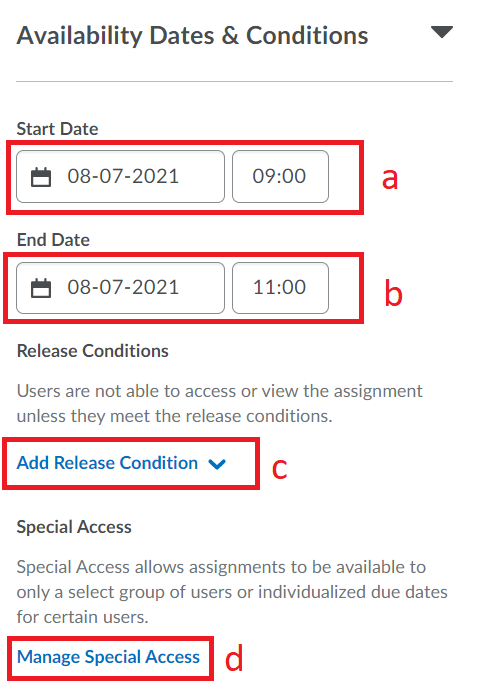
- In the tab Availability Dates & Conditions, make sure to:
-
- Add a Start Date and time (a). (For example 9:00)
- Add an End Date and time (b) (For example 13:00).
Make sure that this time is later than the official due time, so students with a delay (for example caused by technical problems) have finished the exam as well. - Add which students are allowed to access the exam by adding release conditions.
Once a user meets a release condition, the condition is cleared for that user and cannot be reset. For example, if you attach a release condition to an assignment requiring users to achieve more than 60% on a quiz before they can start that assignment, and one of your participants receives 72% on the quiz but you adjust their grade to 55% they will still be able to access the assignment because they did meet the requirement at some point.
- Set that some students are allowed to hand in their assignment late (because they are entitled to extra time) under Special Access. Add which students are entitled to extra time and set their extra time.
Tip: If you put students that need extra time in to a group, it is easy to select them when assigning Special Access .
- Make sure that the rest of the assignment settings are as follows:
Category Setting Value Needs changes? Submission & Completion Assignment type Individual assignment Submission type File submission Files allowed per submission Unlimited Allowable File Extensions No Restrictions Submissions All submissions are kept Notification email – Student view preview NA Rubrics If you want, you can add a rubric which can function as an answer model for the exam. Cannot be changed once you start grading. Click here for an example and a link to how-to in point 6. optional, useful! Annotation tools Check Make annotation tools available for assessment change Anonymous marking Check Hide student names during assessment to reduce bias. change - Click Save & Close.
To prevent fraud there are 3 ways to distribute different exam versions amongst students.
You can check student work for plagiarism in case students type their exams in a text editor (Word, Open Office), resulting in .docx, .pdf or .txt file extensions. This is not an option for hand-written assignments.
Check the Ouriginal page to see how to set this up. Using Ouriginal allows you to check assignments for plagiarism, grade them and give in-text feedback to students.
Do run a test with the entire exam with a colleague or student assistant, to spot and fix issues. You can change the timing. Use your sandbox to do this.
During the exam, you want students to be able to ask you questions about that one question that was open for multiple interpretations, that you did not see coming, even though you had your colleagues peer review your exams. There is no perfect communication platform available. You are suggested to either use email (and inform your students beforehand that they can reach you by email) and/or Brightspace Discussion Boards.
- Email: Especially in large groups, use a shared mailbox that you and your course team can access. That way, you can handle questions from multiple students at the same time.
- Brightspace Discussion Board: You and your students need to press ‘refresh’ to see new posts).
- Telephone: In case of emergencies, you could share your TU Delft telephone number with your students.
- Conference tools: You could try to set up a call in which you disable the chat between participants, allow students to enter break-out rooms to ask you/colleagues individual questions via chat or microphone, and, if necessary, you can communicate information to the group in the main room (one-way only).
Click here to learn more about how you can write feedback on the students’ exams in Brightspace. You can add text, or use a table to add hand-written text to the students’ pdf.
In case you are working with typed answers and you are using Ouriginal, go over the similarity reports to check for overlap with other students’ work. Grading in Brightspace Assignments (see here) is allegedly more grader friendly.
Click here to learn more about how to develop Brightspace rubrics and see the example below on how you can use them to grade exams.
You can use a test result analysis to analyze if there are indications to adjust the answer model. See the reader for UTQ ASSESS for more information.
After scoring all individual exams, and doing a test result analysis, you can publish the exam results and annotated exams. Make sure to make the grade visible, so that students can access their grade. Publish an announcement, including the procedure to ask questions and/or discuss issues in the grading and/or file complaints.
Students can find their annotated exams under the ‘assignment’ tab at the top of the Brightspace page.
Distributing different exam versions
Sometimes you want to split your class into two or more groups and give each group a different version of the exam. If you use Brightspace Assignments there are 3 ways to do this. Also, there are some generals things to take in account. Please read them below.
The easiest way to distribute different versions of exams is to make groups for those different versions. After you have made the groups, you make an assignment for each version and then use the release conditions of the assignments to make sure each assignment is released to only one group.
Pros and Cons
- Pro: Simple/quick.
- Pro: Easy to download all submissions at once.
- Con: Students can see which other students have their version (are in their group).
- Con: Students have to be pre-divided into groups using the group tool.
- Con: Maximum of 200 members per group.
Follow the steps below to use this method:
- Create the groups, as specified on this page.
- Create an assignment, as specified here.
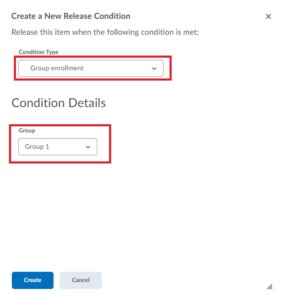
- Go to the Restrictions tab, and click create and attach in the section release conditions.
- Select Group enrollment and the group you would like to assign the exam version to.
A slightly more advanced way of distributing different versions of exams is by creating different group categories per exam version, and within these categories make one group per student. After you have made the groups, you make an assignment for each version and then use the release conditions of the assignments to make sure each assignments is released to only one category.
Pros and Cons
- Pro: Relatively simple and relatively quick.
- Pro: Easy to download all submissions at once.
- Pro: Students cannot see who else is in their Group.
- Con: It is slightly more work than using groups.
- Con: Students can see in which category they are and ask other students if they are in the same category.
- Con: Students have to be pre-divided into groups using the group tool.
- Con: Maximum of 200 groups per category.
Follow the steps below to use this method:
- In the Groups tool, create a set of new categories, one for each exam version.
- The most convenient way to set up the groups is by using the group import/export tool:
- Download the classlist.
- Assign each student to a version of the exam (one of the categories you made).
- Assign each student to a unique group.
- Convert to the right format (see link).
- Import the groups.
- Create an assignment (for each version a distinct assignment), as specified here.
- Go to the Restrictions tab, and click create and attach in the section release conditions.
- Select Group enrollment and the category you would like to assign the exam version to.
If you do not want students to see the group to which they belong, you can use this work-around. First, create a grade item that you set to be hidden. Then, give the students a grade for this Grade Item – the grade represents the version of the exam that the students get. Once you have inserted the grades, create an assignment for each version, then use the release conditions of the assignments to make sure each assignment is released to students that have a certain grade on a certain grade item.
Pros and Cons
- Pro: Students cannot see which other students have their version.
- Pro: It is easy to download all submissions at once.
- Con: Not very logical and straightforward to set up.
- Con: The hidden grades cannot be changed before and during the exam (see note).
Follow the steps below to use this method:
- Create a Grade item using the following settings:
- Grade Item Type: Numeric value
- Maximum Point: 100
- Weight: 0
- Grading Scheme: Percentage
- Hide from users: Selected (!)
- Add versions (grades) manually or by using Import and Export functionality. The grade you enter is the Version of the Exam that the student will receive.
- Create and Attach a Release Condition with the following settings:
- Condition type: Grade value on grade item
- Grade item: hidden grade item that you just created
- Criteria: Between
- Grade: Version number twice (for example: between 1 and 1 for version 1; between 2 and 2 for version 2).
The result will look like this:
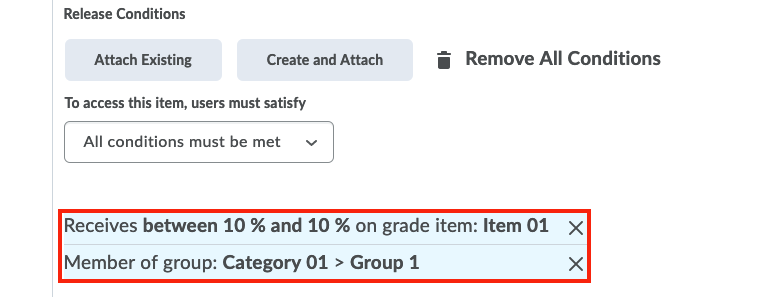
- Repeat in case you have multiple time slots and would like to have different group compositions for each timeslot (for example: Item 01 and Item 02).