MS Teams Live Events is an extension of MS Teams Meetings that enables you to broadcast your lecture to up to 10.000 participants. Where Team meetings are interactive, a Live Event is static. Attendees can only listen, watch and -if you enable it- ask questions in the Q&A chat. In between Teams Meeting and Live events there are also Teams Webinars, which allow you to have a more controlled interactive meeting with up to 1,000 participants but require registration.
Not what you are looking for? Have a look at the other online meeting tools.
Before your Live Event
Event Group roles: Organizer, Producers, Presenters and Attendees
The Event Group is the group of people that organizes or participates in the event. There are 4 roles: The Organizer schedules the meeting, adds Producers and Presenters and invites Attendees. The Organizer is either a Producer or a Presenter during the meeting. A Producer can manage what is shown to the Attendees and what they hear. A Presenter can present and moderate the Q&A and an Attendee is the one watching. He/she cannot share audio or video but -if enabled- an Attendee is able to ask questions in the Q&A.
| Organizer | Producer | Presenter | Attendee |
|---|---|---|---|
| Prepares and schedules the Live Event, selects production method and sets permissions | Guides presenters in their role pre-event, including tech check | Presents their own webcam video | Joins either anonymously or authenticated through a desktop browser, or joins authenticated through the Teams app (mobile and desktop) |
| Invites producers, presenters and invites attendees and promotes event | Starts and stops the Live Event and welcomes audience | Shares their desktop or window to the Live Event | Watches the event live or on-demand, using digital video recorder (DVR) controls |
| Configures event options such as recording, live captions and Q&A | May moderate Q&A | May moderate Q&A | Can participate in Q&A |
| May manage recordings and reports generated after the event is over | May manage recordings and reports generated after the event is over | May manage recordings and reports generated after the event is over | Can enable live captions in multiple languages |
| May chat with presenter | May chat with producer | ||
| Queues and live- streams presenter’s video or screen in various layouts | |||
| Platform: desktop only | Platform: desktop only | Platform: desktop & iPad | Platform: desktop, web, iPad, Mobile |
Read more about the Organizer, Producer and Presenter role
Tip: Get your colleagues and/or TAs to help you out when trying out Live Events (e.g. get together in Teams and try out all its functionalities from a student’s/producer/presenter perspective), this will help you to select the right settings and to get familiar with the functionalities of Live Events.
Tip: Don’t do it alone. Make sure you always have a colleague or TA to help you during your Live Event.
Tip: Use two screens if you are a Producer. This will make your life easier.
Live Event Types
Microsoft talks about two Live Event Types. At the TU Delft, it is currently only possible to produce a Live Event using Teams. It is not possible to produce Live Events using a professional camera set up in a lecture room. For this, you can use Collegerama. You can of course add an external camera and/or microphones to your PC and use that to present in a lecture room.
Recording a Live Event
At the TU Delft, Live Events are always recorded and available for Producers and Presenters to download. When you check the option “Make Recording available to attendees”, the recording will be saved. To share the recording, a Producer or Presenter can also always download the video and upload it somewhere else (i.e. in Brightspace or in a Class Team in Teams).
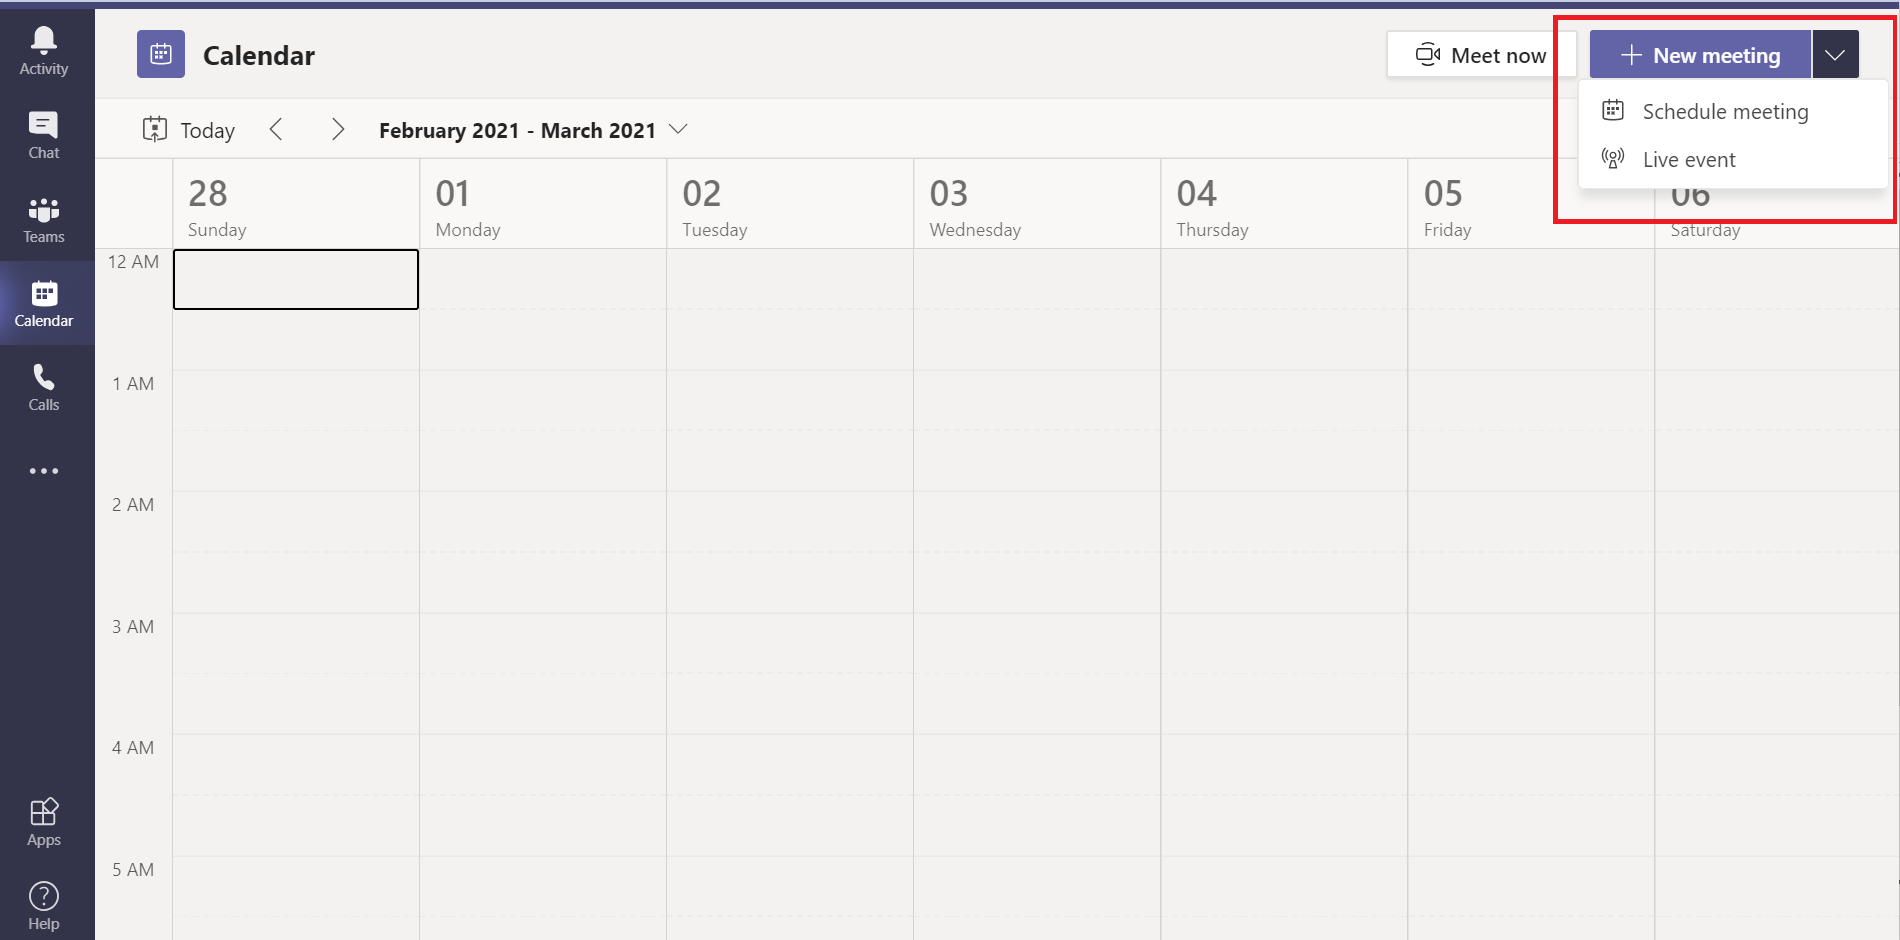
Live Events are scheduled through the Calendar in Teams.
- In the Teams Calendar app, open the + New Meeting drop-down menu in the top-right corner, select Live Event and follow the prompts.
- Invite Producers and Presenters by typing their names in the search box. You can also add external participants as producer or presenter, by entering their email address. They will be invited through an email.
It is advised to invite Attendees after the event is scheduled.
 The organiser is also able to give an anonymous person permission to present. Make sure to turn the toggle on for Allow external presenters and type in their email adress in the invite presenters search box as shown below.
  You can also send the link to invite attendees as described here.
Tip: Don’t do it alone. Make sure you always have a colleague or TA to help you during your Live Event.
Tip: For the event Start and End Time, make sure you add 30 minutes of buffer time. This ensures that ample time is scheduled on your presenters’ and producers’ calendar to arrive well ahead before the event and to make up for accidental delays.
- Set Live event permissions
You can set the Permission to access the Live Event to Public, Org-wide or People and groups.
-
- If you set the permissions to Public, everyone that has the link can join. They will have the option to log in, but they can also join anonymously.
- If you set the permissions to Org-wide, people will have to log in with their TU Delft account before they can join.
- If you set the permissions to People and Groups, the people will also have to log in before they can join. If they have a Teams account, you can invite people from other organisations as well. Anyone can make a free Teams account
When you add people here, they do not get a notification. You still have to invite them by sending them the link to the event.
- Choose to Produce your Live Event in Teams (Other Production types are not (yet) available at the TU Delft.)

- Set the setting for your Teams Live Event. Some things to keep in mind:
- Recording available to producers and presenters: This setting enables you to download the video after the Live Event has finished.
It will take some time (+/-15 minutes per recorded hour) before the video is available for download.
- Recording available to attendees: this setting enables attendees to see the recording. To share the recording with (non-)attendees a Producer/Presenter can also download the recorded video and upload the video at some other place (i.e. in a Team or in a Brightspace course).
- Captions (preview): A caption is a text version of what the speaker says. In Teams it can also be translated into 6 Languages live. Captions are available for English, German and simplified Chinese.
- Attendee engagement report: When enabled Producers and Presenters can download a Report after the event that tracks attendee participation.
- Q&A: When selected, the Q&A is open by default and attendees can start asking questions even if the event hasn’t started. These questions are only visible to moderators until they publish them to the event. A full report on all questions (private, public and dismissed) and answers can be downloaded after the Live Event.
Q&A should be enabled before starting the Live Event. When the Live Event has already been started, Q&A cannot be enabled anymore!
- Recording available to producers and presenters: This setting enables you to download the video after the Live Event has finished.
Read more on how to schedule your Live Event and review the ‘Planning and producing your event’-section in Best practices for producing a Teams Live Event.
After you have scheduled the Live Event you have to invite Attendees by sharing the link. You can find the link at the final stage of scheduling the Live Event or when you open the Live Event from your Teams calendar.
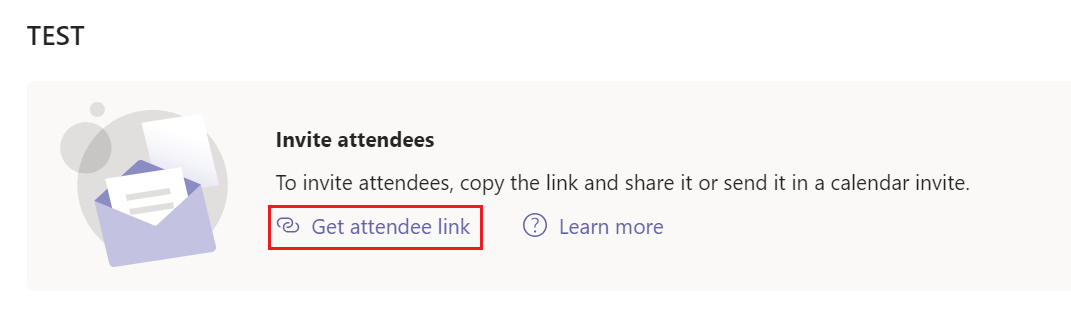
With the Live Event scheduling option in Teams Calendar you can only invite Producers and Presenters. Attendees need to be invited separately.
You can share this link in Brightspace, an email, on a website, in a Teams conversation or anywhere you like.
Creating and sharing an *.ics calendar event file
One way to share a meeting invite is to make an share an *.ics-files are calendar event files that recipients can insert into their own Outlook or Google Calendar, allowing them to be reminded about the event. To generate an *.ics file, create a regular meeting invite and insert the Live Event attendee link in the invite message body. Then export the meeting invite as an *.ics calendar file. This *.ics file can then be uploaded to OneDrive or another cloud service, from where you can share it. Be aware that not everyone is familiar with *.ics files.
More about inviting attendees
Have the Producers and Presenters join about 30 minutes ahead of time. Share a slide with a nice intro, indicating that the event will begin soon. Then, start the live broadcast about 10 minutes early to make sure everything is working. Leave all audio muted until you’re ready to go live with your presenter at the start of the Live Event.
During the Live Event the Producer determines what the attendees see and hear. You can show the presenter, the screen of a Presenter or Producer, or other content such as a PowerPoint presentation.
Read how to set up and manage a Live Event as a producer
Key resources for Live Event organizers
During your Live Event
The Presenter can share audio, video and/or a screen and moderate Q&A.
When the Presenter shares, it is immediately visible for attendees. In case of multiple presenters the second presenter will take over when he/she shares his/her screen. The screen of the first presenter will then immediately be unshared and the screen of the second presenter will go live. The Producer cannot undo this.
Presenters and Producers are both able to Open, Moderate and Close the Q&A.
If the Q&A feature has been enabled by the Live Event organizer during set-up, then a Q&A pane is available at event time through which attendees can submit a question or a comment. The button location is different depending on your role:
- For Producers, the button appears as a chat-icon with question mark in the top-right corner.

- For Presenters, the same button appears integrated on the presenter toolbar.
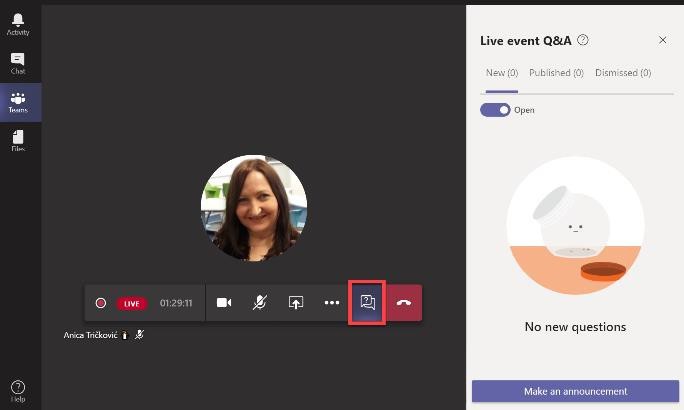
The Q&A pane has three Tabs: New, Published and Dismissed. Some remarks:
- All event team members can see the messages in the New tab and need to decide up front who will moderate those messages.
- Questions from the audience need to first be pushed to the Published or Dismissed tab before you answer them, otherwise your answer will not be glued to the original question.
- Messages from the moderators are prefixed with the word Moderator. The attendees cannot see the name of the moderator. If you want to make yourself known to the attendees, prefix your messages with your name.
Presenters and Producers can communicate with each other through the Chat pane. For Producers, the button to open Chat is in the top-right corner. For Presenters, the button is on the presenter toolbar.
![]()
As a producer, you can restart a live event while the event is active, or after you have ended it. This is useful in the case where you accidentally lose connection or the event runs into errors during your live event.
To restart your live event:
- In the live event: Select More actions at the top of the Teams meeting window.
- Select Restart event.
- A confirmation will pop up, select Restart to confirm.
Teams will then verify that the event can be restarted. If Teams can successfully restart your live event, the producers and presenters will be disconnected, while attendees watching the event will see a waiting screen informing them that the event will begin shortly. Producers and presenters will need to rejoin and start the event again.
After your Live Event
At the TU Delft, Live Events are always recorded and available for Producers and Presenters. When the option Make recording available to attendees is checked, attendees can also see the recording. After the event has finished, it will take a while (+/-15 minutes per recorded hour) before the video is available to download.
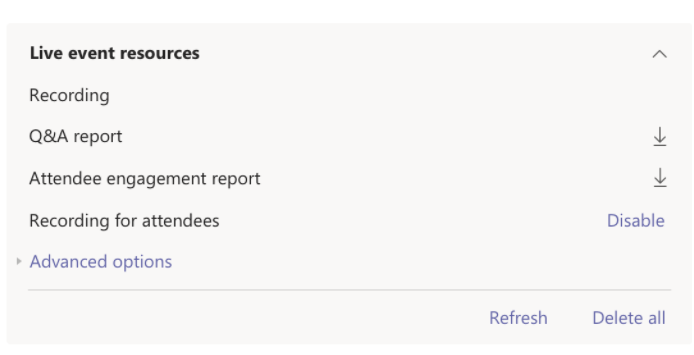
You can download the recording in Resources of the event. To see the resources you can either (1) open the Live Event in the calendar in Teams or (2) Open the Live Event in your Outlook calendar and click on Manage Live Event resources.
Attendee engagement report
If the Organizer enabled it, Producers and Presenters can download an Attendee engagement report after the Live Event. This report shows who joined and left and when, as well as other data about each attendee’s experience.
Read how to get an attendee engagement report for a Live Event
Q&A report
When Q&A was enabled for the meeting, a full report on all questions (private, public and dismissed) and answers can be downloaded after the Live Event.