A team in Teams is a collaborative space where a group of people can chat, have online (video) meetings, share/collaborate on documents and more. This page helps you to create a new team, choose how your team is organized and set it up.
If you create a new team, you can choose between 4 different types:
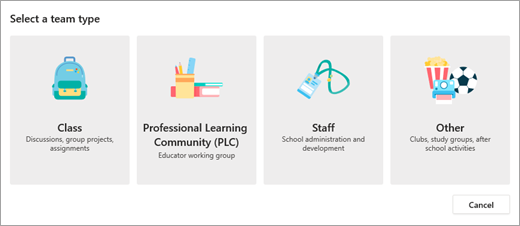
- Class Team (Student – Lecturer)
- Professional Learning Community (Lecturer– Lecturer)
- Staff Team (Corporate office)
- Other Team (Students, Lecturers, Staff in any combination)
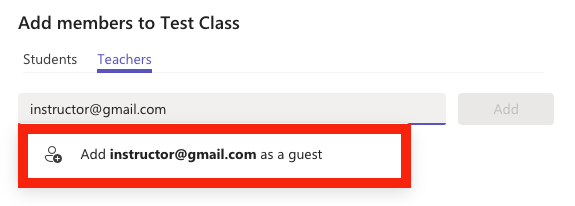
Once you have created your team, you are able to add students, colleagues, or guests from outside the TU Delft. It is also an option to share a link/code with students and colleagues from TU Delft so they can access the team themselves.
Learn more in the table below about which team meets your teaching and learning goals.
| Class Team | Professional Learning Community (PLC) | Staff Team | Other Team | |
| Description | Lecturers and students collaborating on group projects, papers, reports, and more. | Educators collaborating within a professional learning community.
Example: academic department working on a shared goal. |
Staff leaders and staff members collaborating on university administration and development. | Students and university employees collaborating in interest groups and clubs. |
| Team owners & Team members |
Lecturers are team owners and add students as team members. | Educators form the team and other educators join the team. | Staff leaders are team owners and add staff members as team members. | Any combination of students and university staff can form a team and add members. |
| Permissions | Lecturers moderate student conversations and who can post where. Students only have write permission in certain areas. | Educators share equal read-write permissions. | Staff leaders control posting settings. Staff members only have write permission in certain areas. | Team members share equal read-write permissions unless the team owners alter the settings. |
| Features |
|
|
|
|
| Educational goals |
|
|
|
|
- Select Teams
 in the navigation bar on the left.
 - Click on Join or create team > Create a team.

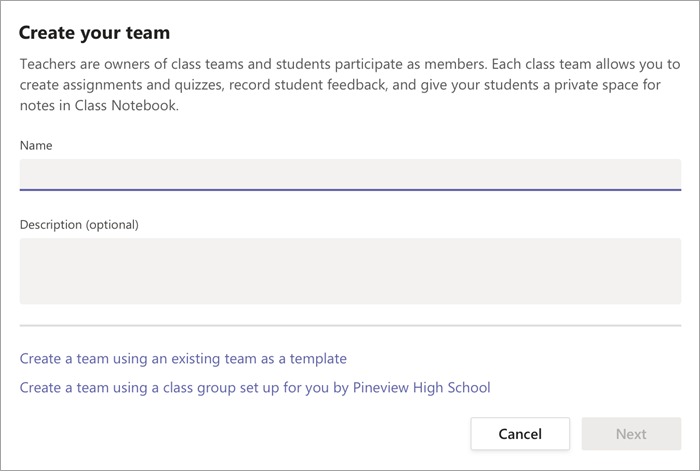
- Select Class as the team type.
- Enter a name and optional description for your class team.
Use the same name as in Brightspace:
[Course code] [course name] ([year] [quarter])
For example: AB1234 Technical design (2020/21 Q2)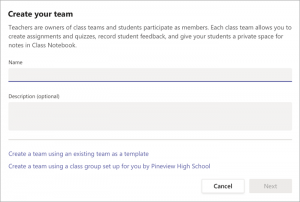
- Select Next.
- Follow the steps in the accordions below to Add your students and/or co-lecturers as team members. This will add them right away. You can also skip this step for now and add students later on.

Lecturers can add up to 10 co-lecturers to a class team. Each co-lecturer will have the same permissions to:
- Set team members’ permissions for channels and conversations
- Control @[team name] mentions that will notify everyone on the team
- Allow @channel or @[channel name] mentions, which will notify members who’ve favorited the channel
- Allow use of stickers
To add co-lecturers:
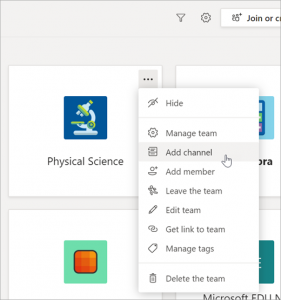
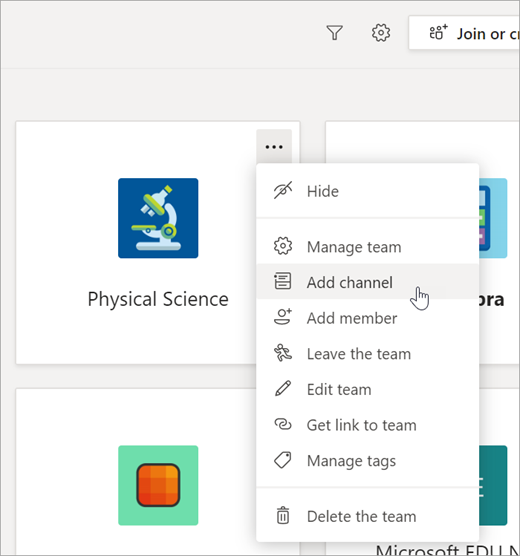
- Navigate to the Class Team
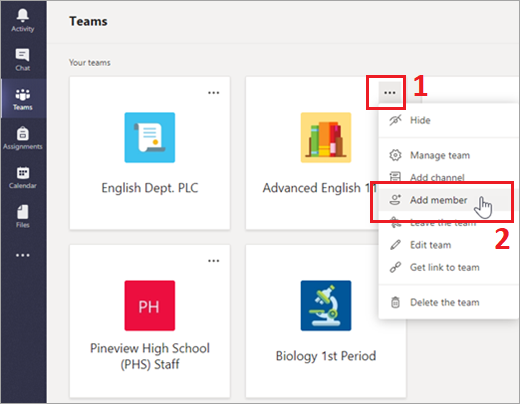
- Select More options
 next to your class team, then select Add members.
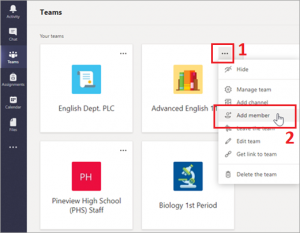
- Select the Teachers tab, then type in the lecturer’s name or email and then select Add.
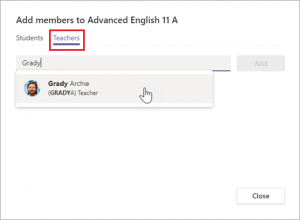
- The lecturer is immediately added to the class team as an Owner.
- Select Close to return to teams.

Tip: Always assign two owners per team. This is to ensure that at least one owner is available.
There are multiple options to enroll students to your class team:
- Enroll students manually one by one via Add member
- Have students self-enroll via a link
- Have students join via a code
Add members manually
- Navigate to the Class Team.
- Select More options next to your class team.
- Select Add member.
- Select the Students tab.

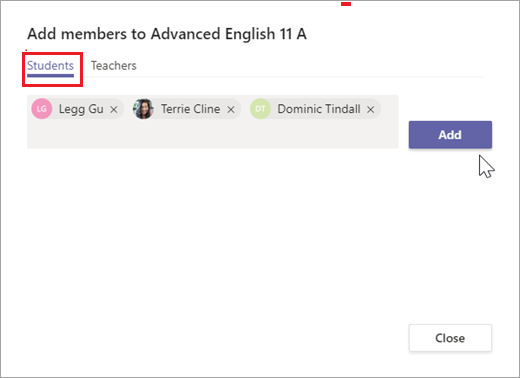
- Type in the name of the student(s) or previously created team in Teams and select Add. By adding a previously created team, you will add all the members from this team to your new team.
Self-enroll via a link
If you provide students with a link, students can request to join the team—it is possible to accept or deny all requests.
- Navigate to the Class Team
- Select More options next to your class team and select Get link to team
- Share the link with your students (for example via Brightspace) Students can then paste the link into any browser to join the team.
- Select Close.
Join team via code
When you share a code for joining a team, students can join directly—you won’t get a join request.
- Navigate to the Class Team
- Select More options next to your class team choose Manage team.
- Select the Settings tab > Team code > Generate.
- Share the code with your students (for example via Brightspace)
- Students can join the team by clicking on Teams on the left side of the app, then click Join or create a team at the bottom of the teams list. Select Join a team with a code (the second tile), paste the code in the Enter code box, and click Join.
- To add a Channel, select More options next to your class team’s name, then Add a Channel.
- Enter a Name and an optional Description for your channel.
- Choose the Privacy-settings of the Channel:
- Standard Channels will be available to everyone.
- Private Channels will only be available to students you choose.
- Optionally check the box to Automatically show this channel in everyone’s Channel list.
- Click on Add.
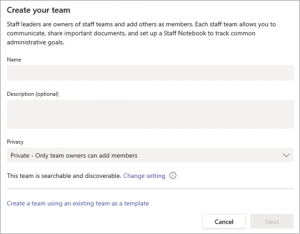
- Select Teams in the menu on the left.
- Select Join or create team > Create a team.
- Select Professional Learning Community (PLC) as the team type.
- Enter a name for your team and optional description for your team, then select Next.
Tip: During this step, you can also create a new team using an existing team as a template. - Once you’ve created a PLC team, follow the steps to add other educators as team members.
Tip: Always assign two owners per team. This is to ensure that at least one owner is available.
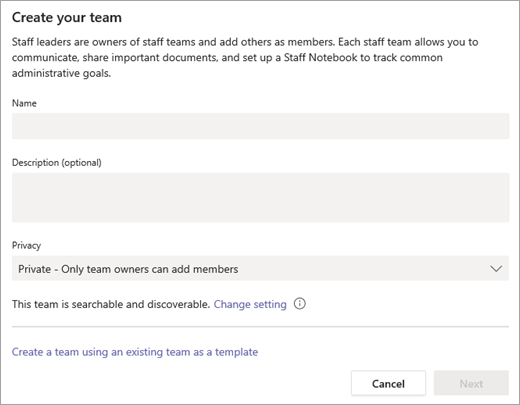
- Select Teams in the navigation bar on the left.
- Select Join or create team > Create a team.
- Select Staff as the team type.
- Enter a name and optional description for your team, then select Next.
 Tip: During this step, you can also create a new team using an existing team as a template.
- Once you’ve created the staff team, follow the steps to add other educators as team members.
Tip: Always assign two owners per team. This is to ensure that at least one owner is available even if the other is not.