The Import/Export tool is particularly helpful when instructors want to enroll and unenroll students in groups using a CSV or Excel file. Besides this, the tool makes it possible to quickly download the classlist, so that Instructors can add the information about their groups to an excel file.
- To export the classlist, go to Collaboration.
- Select Group Import/Export tool.
- Select the Download Classlist tab.
- Click Download Classlist to download a .CSV file.
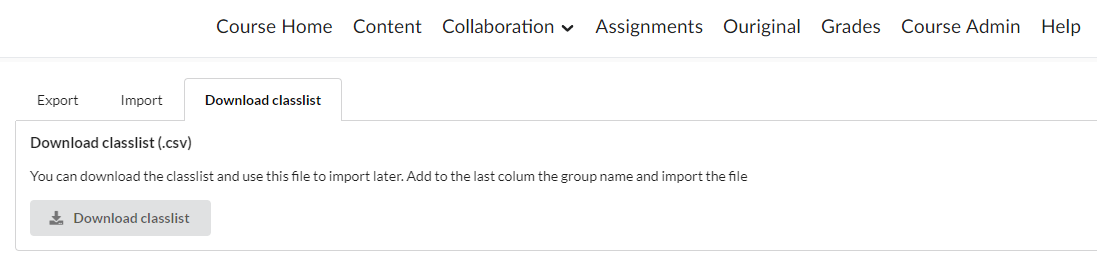
- Open the .CSV file you just saved and edit/replace the information corresponding to the groups you wish to create. For example, if the GroupCatergory and GroupName columns are empty you can fill these in according to the groups you wish to create.
Do not hesitate to contact the Teaching & Learning Support desk, if you have any difficulties with this.
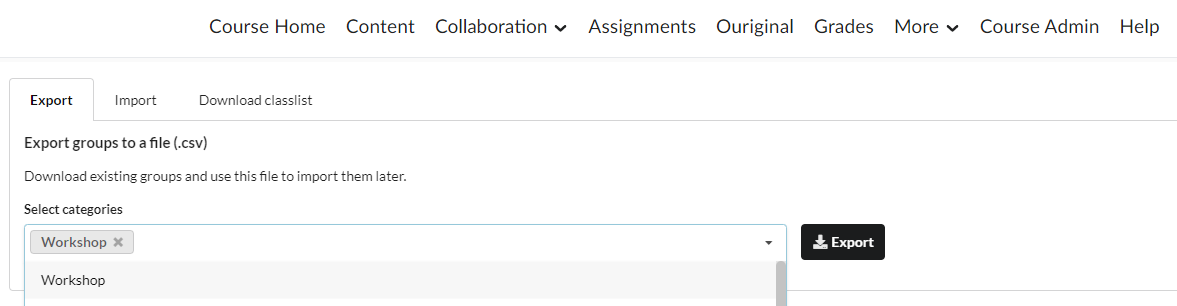
To export an existing group category and download the group enrollments:
- Go to Collaboration and select Group Import/Export tool
- Select the Export tab
- Select one or more group categories you wish to export and click Export.
- Save the file as a .CSV file. Please note, group categories accommodate individual groups.
Groups can be imported into Brightspace using the following procedures:
- Use the Classlist file as a template. Follow the steps described above to download your file. In the .CSV file, add the group category and the group for which the enrollments are meant for.
- You can easily add people to existing groups. You can do that by exporting the group for the specific category. Add new people to the file (get the exact information from the classlist file) and add the already existing category and group names behind their names.
- As a third option, you can also build your own enrollment file (not recommended). The file must be in CSV (comma delimited), excel or txt format. The fields should contain the following structure:
OrgDefinedId,Username,LastName,FirstName,Email,GroupCategory,GroupName
The OrgDefinedID is the student number. This, as well as the group category and name are compulsory.
Once you have your file follow the same steps described above and select Import, instead of Export.
- Click on the text field to add a .CSV or Excel file. Once the file has been uploaded, the upload icon turns into a green icon.
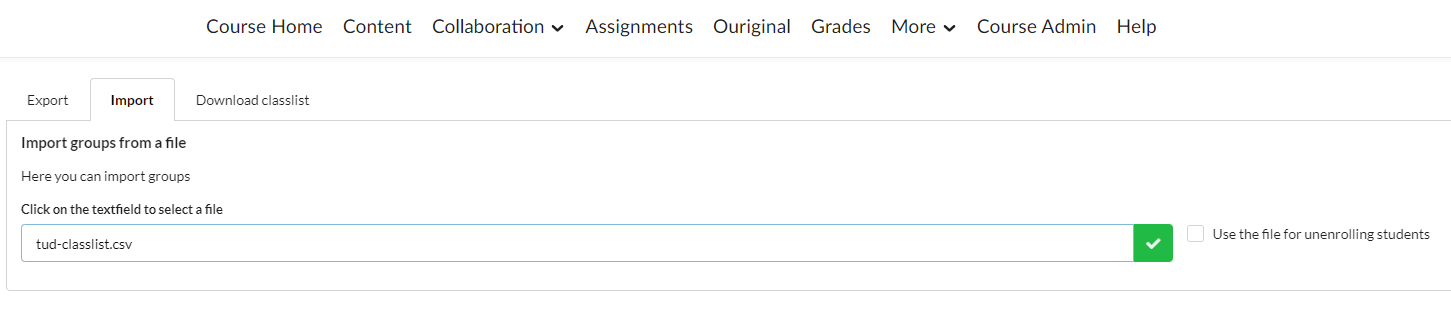
- Click on it to save your file.
You can also use the import/export group tool to unenrol students from a group. Follow the same procedure as described above.
- You can use the export tool to export a file with the group enrollments for the category you wish to unenrol students from, or use the file you used for the Import.
- Edit any of these files only with the information regarding the students you wish to unenroll by, for example, removing the group name and category.
- Upload your file and before saving it, check the box Use the file for unenrolling students.
- A pop-up window will open. Click to confirm agreement.
- Click on the red icon to save the file.

Troubleshooting
This error occurs when students have manually deleted the course from their catalogue, but have not officially left the course through Osiris. In order to overcome the error, you must use a work-around using the grades tool:
- Go to Course menu > Grades.
- Make sure you are on the Enter Grades-tab.
- Click on Export.
- Set the following settings:
- Export Grade Items For: All users.
- Key Fields: Both
- Sort by: Personal choice.
- Grade values: none checked
- User Choice: Personal choice, but at least Group membership should be
- Make sure everything under Choose Grades to Export Grade is unchecked.
- You can choose to Export to .CSV or Export To Excel.
How to use this to improve your course
The first time you use the tool, you might receive the question if the tool might access your information. Agree to this and check the box ‘Do not ask me again for this application’, if you do not wish to see this notification again in the future.