To re-use course content from the previous year or semester it is possible to import, copy and/or export course materials.
Importing a Course or Course Items from an existing source.
There are two ways to import your course or content items:
- Import Components from external sources: this option is used for content items originated outside of Brightspace.
- Copy course material from existing courses in Brightspace: use this option to copy a course, or specific course items, from one course in Brighspace to another.
Select this option in order to import content from other, external sources. An import is done through *.ZIP files which can be created in the source application.
Files and standards supported:
- Brightspace by D2L
- Angel Learning 8
- Blackboard Learn 9.1
- Moodle 3.5 (.MBZ)
- Sakai (Archive Format)
- UCompass
- IMS Content Packaging 1.2
- IMS Common Cartridge 1.1, 1.2, 1.3
- IMS Thin Common Cartridge 1.3
- QTI 1.2, QTI 2.1 (Partial)
How to Import
- Create an export package (ZIP file or another archive format) from the source application.
- In the target Brightspace course, click on Course Admin
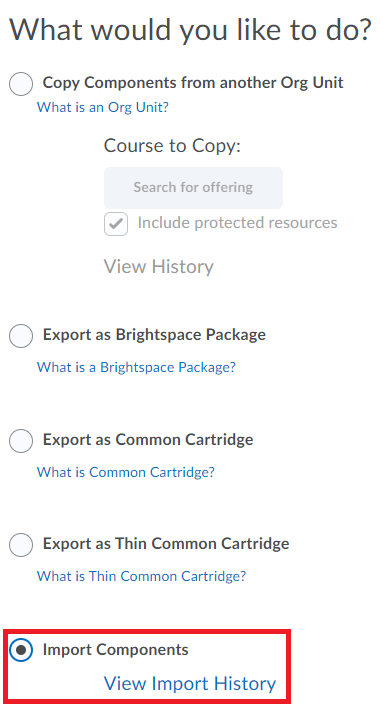
- Select Import/Export/Copy Components.
- Select Import Components
- Select Start
- Upload the course package file in ZIP or any other archive format (max 1 Gb).
- Select Import All Components or Advanced Options (to import selected parts) depending on the requirement.
- Click Continue and wait while it processes. It may take up some time depending on the size of the file.
- Finally, select Finish and view your course.
- Go to the destination course (where the copied items should be copied to) and select Course Admin in the navigation bar.
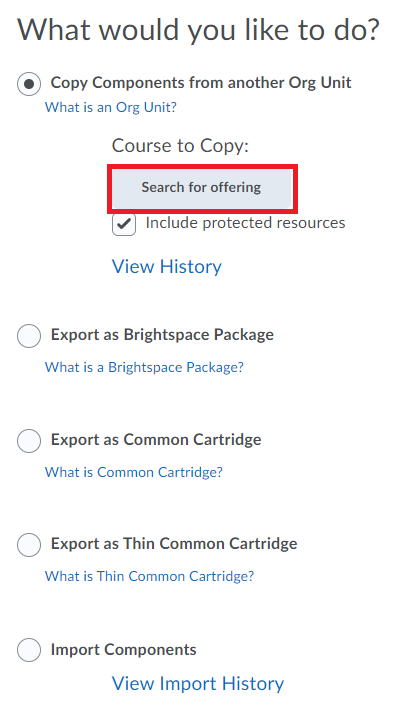
- Select Import/Export/Copy Components.
- Select Copy Components from another Org unit radio button.
- Click on Search for offering and enter in the name of the source course
- Select the name of the course and click on Add Selected. In case the selected course has already been copied into this course, a dialogue box will appear asking you whether you want to proceed anyway.
- Select either Copy All components to copy an entire course or select Selected Components to copy or import specific course items

- If selected Selected Components: In the menu ‘Choose Components to Copy’, please select the required components. For further information on the description of the individual components, please see the list below with a explanation of each component.

- When done selecting components, click on Continue.
- Select Finish to complete the import/copy process.
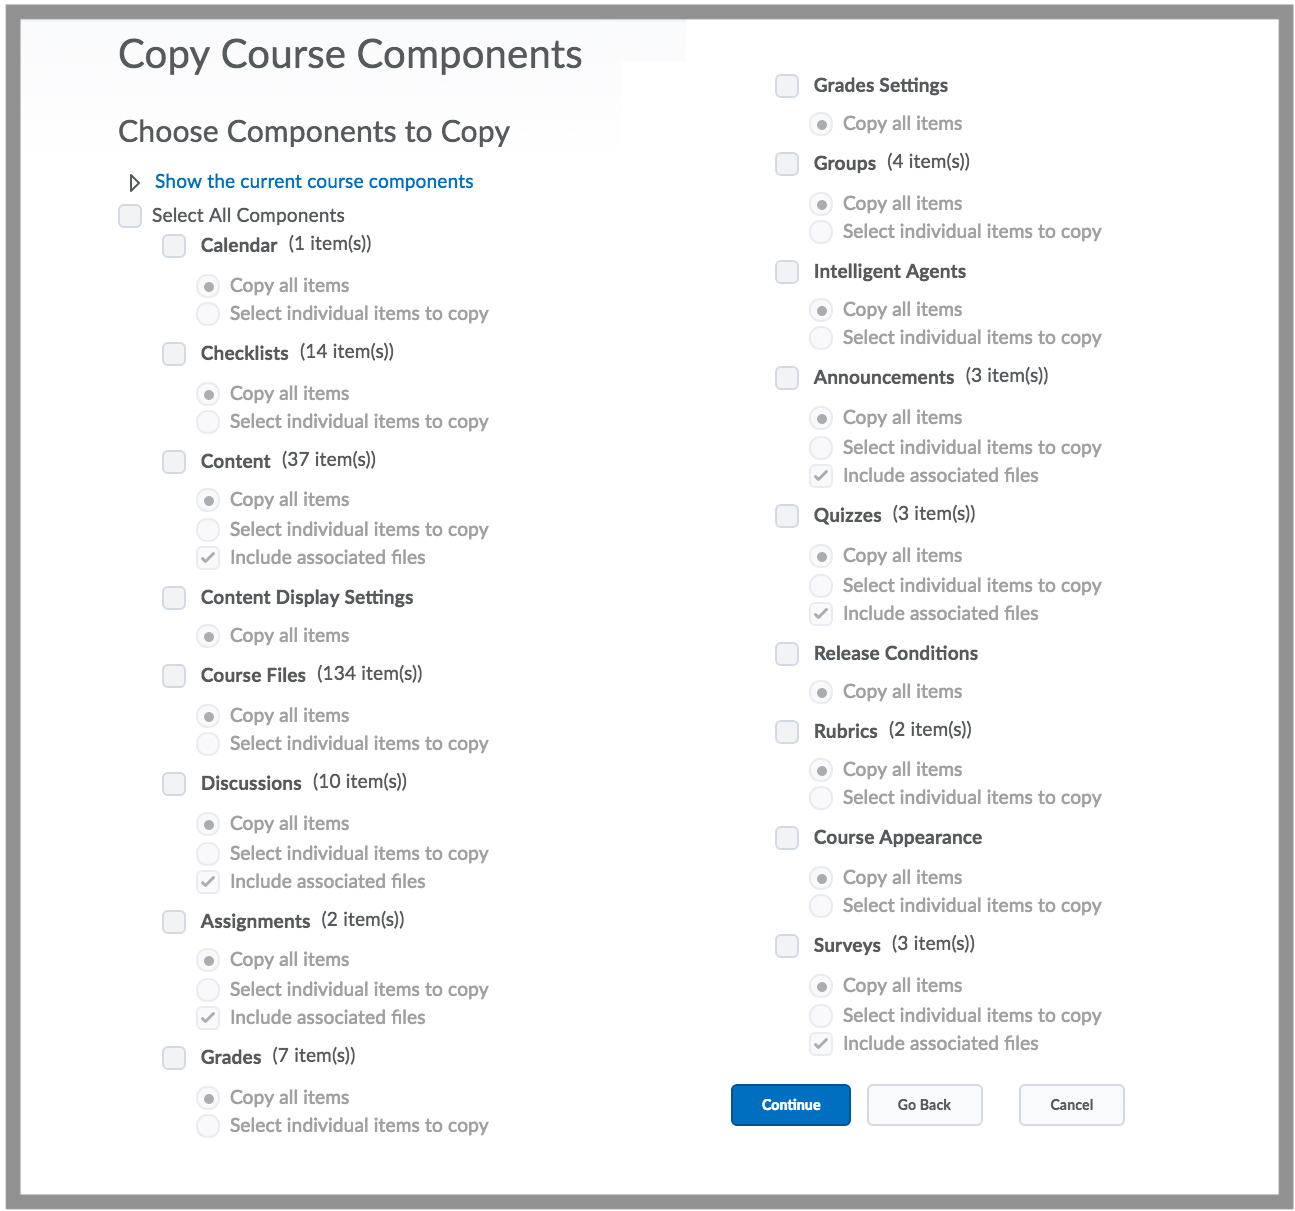
| Components | Explanation |
| Announcements | Announcements are the messages you put on the course home. When copying, you will be asked if and how you want to offset the dates. |
| Assignments | When copying assignments you can choose if you want to copy all assignments, or just a selection. Note that this will not copy any submissions made by students. |
| Attendance Registers | You can copy a selection of, or all the attendance registers present in the old course. The attendance registers are to be found in Course Admin -> Attendance . This copies the registers but not the actual student attendance. If you copy the register any attached register schemes will be copied automatically. |
| Calendar | The calendar of the course contains scheduled events by teaching staff, also known as Course schedule in content. You can copy all items, or a selection. After .selecting them, you have the option to offset the dates. |
| Checklists | Checklist are lists where students can track their own progress. Due dates are also copied, you have the choice to offset the dates. |
| Content | This includes all content of the modules and submodules in Content. Content does not include course files or content display settings; these must be selected as separate components. Be sure to copy all course files used in the course as well as the content topics, otherwise only the content topic structure is copied. |
| Content Display Settings | You can change how course content appears in the Content tool by selecting your viewing preferences in the Content Settings area. These settings can be copied with Content Display Settings. |
| Course Files | This includes all files that are located under Course Admin -> Manage Files. |
| Course Appearance | With Course Appearance you can copy the course image, banner text and if the banner is visible or not. |
| Discussions | All forums located in Collaboration -> Discussions, along with all threads in those forums but without the posts in them. |
| External Learning Tool Links | With the External Learning Tool Links you can copy all or some of the links you have made with external learning tools, like ANS, Kaltura, Grasple or any other tool. The links are found in Content -> Existing Activites -> External Learning Tools. When you copied the corresponding content as well, the link should be accessible through the content. Some tools do not react well after being copied, then it is best to delete the copied link and create a new one. |
| FAQs | If you want to copy Frequently Asked Questions from another course, you first have to enable FAQs in Course Admin -> Tools. When it is enabled, FAQ will show up in the list of components to copy. You can copy all questions, or a selection of the categories or a selection of the questions available. |
| Grades Settings | Grade Settings are the settings found in Grades -> Settings. |
| Grades | You can copy grade items and categories. It is not possible to copy grade schemes. Actual student grades will not be copied. |
| Groups | Copies groups that are located under Collaboration -> Groups. Note that this will not copy any enrollments in these groups, only the group structure and settings. |
| Intelligent Agents | Intelligent agents can be created under Coures Admin -> Intelligent Agents. When copying, the intelligent agents will be disabled to prevent messages going out as soon as you copy them over. If the release conditions are associated with an item you did not copy over, the release conditions will be automatically deleted. |
| Question Library | The Question library is found under Course Admin -> Quizzes -> Question Library. You can copy all or only a selection of the sections and questions. |
| Quizzes | You can copy all quizzes, or a selection of the available quizzes in the old course. If a quiz contains pictures, it is absolutely necessary to leave the ‘Include associated files’ checkmark on. |
| Release Conditions | When copying release conditions, which you can create inside the content (edit properties in-place of an item-> add dates and restrictions -> release conditions), you have to copy all release conditions. There is no option to create a selection of release conditions. When copying a release condition, you have to copy the associated content or referenced tool at the same time, otherwise nothing happens. |
| Rubrics | If you want to copy Rubrics from another course, you first have to enable Rubrics in Course Admin -> Tools. When it is enabled, Rubrics will show up in the list of components to copy. You can copy all rubrics, or a selection of available rubrics. |
| Self Assessments | Self Assessments can be found under Course Admin -> Self Assessment. If you cannot find it, you can turn it on under Course Admin -> Tools -> Self Assessment. When copying, you can choose to copy all or a selection. |
| Surveys | Surveys can be found under Course Admin -> Surveys. When copying, you can choose to copy all or a selection. |
| Tool Display Names | When you altered a name in Course Admin -> Tools -> Custom Navbar Name, you can choose to copy those to the new course as well. |
Full courses or selected course items can be exported into a course package format, and uploaded to new or existing Brightspace courses. As the course package is in the archive format (ZIP), this functionality can also be used as a backup or for archiving purposes.
The option Review and Manage Dates is available after copying components from another course or by accessing Copy components History.

Click Review and Manage Dates in this menu to:
- View, bulk edit, and bulk offset the date availability.
- Set the calendar status of all content topics and modules, discussion topics and forums, assignment submissions folders, grades categories and items, announcement items, quizzes, checklists, and surveys in your course from one central location.
When filtering course objects, any bulk changes made, are applied to the filtered results only. This allows to update multiple availability dates based on specific criteria.
For more information about the Manage Dates tool, please view this page.
Full courses or selected course items can be exported into a course package format, and uploaded to new or existing Brightspace courses. As the course package is in the archive format (ZIP), this functionality can also be used as a backup or archiving purposes.
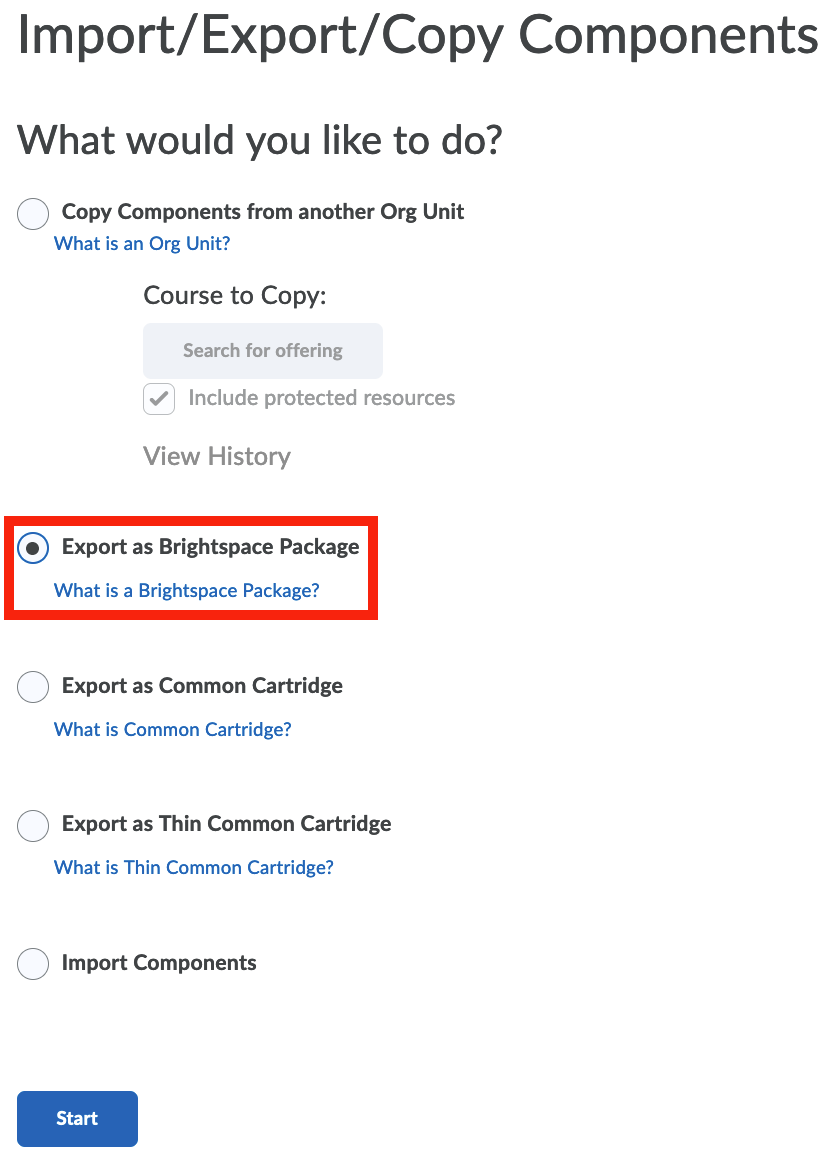
- Go to Course Admin.
- Select Import/Export/Copy Components.
- Select Export as Brightspace Package.
- Select the items to be exported.
To create a back-up of the course, Select All Components - Select Continue to confirm.
- Finally, click on Finish and a ZIP file will be ready for download.