Creating a course structure in Brightspace is very easy. However, setting up a correct course structure requires some knowledge on how information is presented. This article aims to enable instructors to create a clear and concise course structure that is intuitive for students to use.
Courses can be set up in a variety of ways. The most commonly used are:
- Hierarchical. I.e. Lesson 1, Lesson 2, etc / Chapter 1, chapter 2, etc
- Chronological or Schedule base. I.e. Week 1, Week 2, etc
- Activity based. I.e. Content, Assignments, Projects, etc
Of course, Instructors are free to choose a structure but it must be pointed out that the lack of consistency in structures is a major source of student complaints.
The recommended way of structuring a course would be to use modules and submodules that each have a unique number as part of their title. The below illustration shows how such a structure would look in a spreadsheet format:
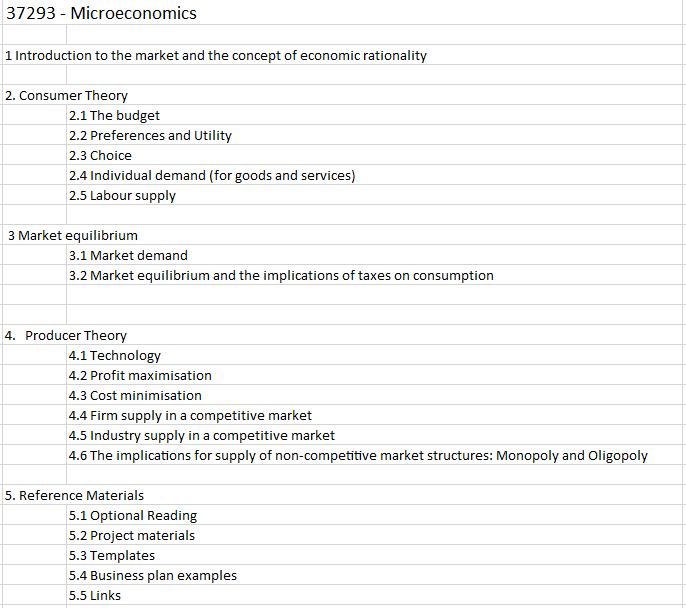
In this example, only two levels are used: level 1: module, level 2: a submodule. In Brightspace, the same structure would look like this:

In order to view only the top-level structure (module), click the Table of Contents. All submodules will be folded in under the module level and will be hidden until a specific module is selected.
You can find more information on how to add and move (sub)modules on this page.
Creating a clear and concise structure for the top and sublevels is already a great step towards creating a professionally looking course. Creating a content structure will really finish it off and will allow you some practical benefits as well.
Example: In the submodules of the example course used in this article, multiple documents have been added for students to read. It is Best Practice to continue your numbering structure with content items. Doing so will allow Instructors to easily refer to other content items within a course (i.e. ‘You can find more information in in 2.2.3’).
An example screenshot:
 As shown here, each Content Item is provided with a unique number in this course, based on the Module and Sub-Module number.
A great way to make sure students utilize the learning materials provided, is by doing two things:
- Answer the question ‘What is this Content Item about?’ or ‘Why should I open this?’
- Clearly communicate the expectation the Instructor has towards the student
In the above screenshot, you will see that each Content Item has been supplied with a description. The description could be a very short ‘Definition of terms’ or a short text on how the Instructor sees the Content Item’s place and function in the course. The description 2.2.3 uses the first two sentences of the document as the description.
Knowing the function of a Content Item allows the student to quickly asses the importance of the Item to him or her and make a decision on how to use it.
Instructors can create a Content Item description by opening the ‘Edit Properties in Place’ functionality. More about that here.
Instructors can describe in detail what they expect a student to do with a Content Item. However, experience shows that branding a Content Item as ‘Required’, ‘Recommended’ and ‘Optional’ is generally enough to communicate to students what is expected and the consequences of not reviewing the Content Item.
Just like writing a Content Item’s description, the expectation text is also created in Edit Properties in Place (recommended reading).