Looking for how to set-up your course in Brightspace? On this page, we will guide you through a quick setup with all the necessary steps before making your course visible to students. If you follow all steps listed below, your course is good to go.
Step 1. Banner
Please choose a new course banner. The banner image should be unique and representative of your course content. It will also appear as a thumbnail for students to quickly locate it.
- Log in to Brightspace
- Select your course by clicking on the title under My Courses
- Go to Course Home
- Click on the top right corner of the default banner image and select the extra options icon as shown in the image below.
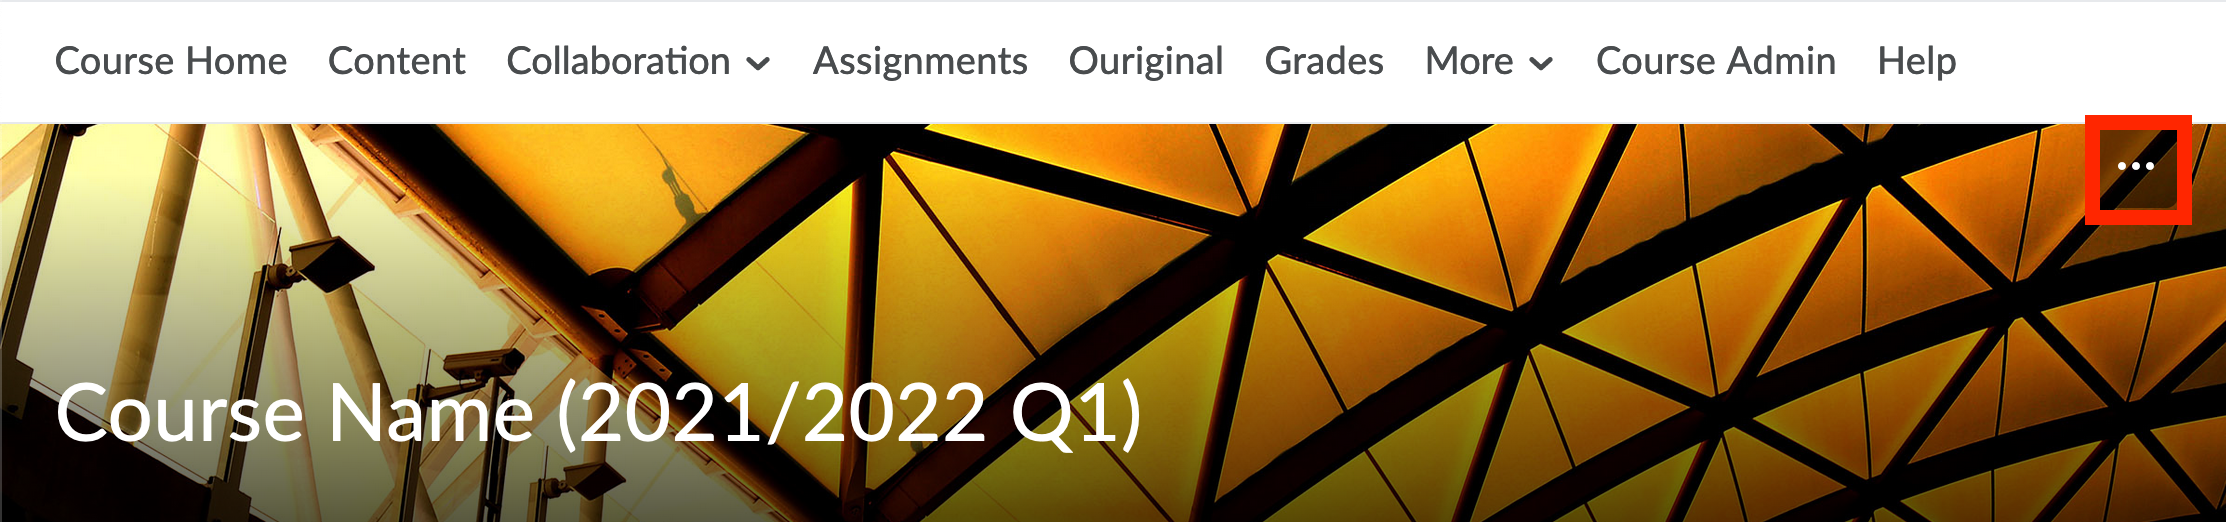
- You can now Remove This Banner or Change Image.
- Select Change Image.
- Upload your own image
You can use any image as your starting point, and adjust it to the desired size in image editing software. Feel free to ask for assistance from colleagues, or teaching assistants.
Read more about Banners, here.
Step 2. Announcements
Announcements are the first content area students see. We advise placing at least 1 announcement with a welcoming message. Announcements are also a good way to communicate reminders or updates about materials or date changes.
To create a new announcement:
- Go to Course Home and click the Announcements’ dropdown menu.
- Select New Announcement.
- Fill in your announcement Headline and Body with text.
- You can choose to attach files and adjust the start and ending date of your announcement. Announcements can also have release conditions, for example, they can be restricted to specific groups.
Read more about Announcements, here.
Step 3. Course Structure
To make sure TU Delft courses stay recognizable and easy to understand for students, they are built using the same structure. By default, all courses include the modules:
- Overview
- Bookmarks
- Course Schedule
- Course Information
- Instructor area.
The Course Information is one of the most important parts of your course. This module is automatically updated from Course Base and includes the submodules Course Description, Learning Objectives, Course Structure and dates, Assessment, Resources and Tools, Staff and Support.
In case you wish to add specific information to Course Information, please update it to the Specification submodule. Specification submodules are by default set to Draft which means they will not be visible to students unless you change their status to Publish.
To add Course Information, follow these steps:
- Go to Content and click Course Information.
- Click the title of the sub-module you wish to update then click Edit HTML.
- After updating your information, finalize by clicking Save and Close. This will now be available to students.
Read more about the Course Information module
Step 4. Adding content and keeping it organised
Creating meaningful content that follows your course structure will make it easier for students to navigate information. For example, within Table of Contents create a Module for Week 1, Week 2, etc.
Do note that a maximum of 2 to 3 layers for each module is advised. To create a new module and add content, follow these steps:
- Go to Content and click Table of Contents.
- On the left menu bar click Add a Module and name it (Week 1 for example).
- On the right side of the page click the Upload/Create drop-down button.
- Click Upload Files and Add Files from your computer.
Read more about Adding and Updating Content on your Brightspace Course
Step 5. Grading
We advise to use the grade center in Brightspace to comply with the student privacy standards.
Once you have your grade allocation planned, you are ready to set up your gradebook in Brightspace. The quickest and easiest way is to use the Setup Wizard.
- Go to Grades on your course’s navigation bar.
- Go to the tab Setup Wizard.

However, we highly recommend you to first read our Introduction to the Brightspace Gradebook page, here.
Step 6. Finalising your course
Your course will only be visible to students once it is set to Active in Brightspace.
- Go to Course Admin.
- Click Course Offering Information under the heading: Site Setup.
- Scroll down and select the option Course is Active by checking the checkbox.
- Finalise by clicking Save.
Read more about Setting your course to Active, here.
Most Brightspace courses are listed in the Course Catalog and are available for self-enrollment by students. Some courses will not be visibly listed or available for self-enrollment in the Course Catalog (these agreements are made per faculty).
A course will appear in the Course Catalog once it has been set to Active in Brightspace (see step above).
To find your course in course Catalog, go to your Homepage of Brightspace and click on Catalog in the Menu bar.
Go to our Course Catalog page to read the default settings and what other settings are available.
Classlist
To add/enroll students or staff to your course:
- Go to Course Admin.
- Click on Classlist under the heading: Learner Management.
- Go to the Add Participants dropdown menu.
- Click Add existing users.
- Type in the name of the user you wish to add and click the magnifying glass icon to search.
- Check the box by the name of the user you wish to add and select their role on the right-side dropdown menu.
- Finalise by clicking the Enroll Selected Users button.
Read more about enrolling and unenrolling users, here.
Teaching & Learning Support Contact
Don’t hesitate to contact us in case you need further assistance!
We are here from Monday to Friday, 09:00 – 17:00
Teaching-Support.tudelft.nl
Email: Teaching-Support@tudelft.nl
Phone: 015 27 84333